I had a few kiwi’s left in the fruit bowl, half an hour to spare and a very dear friend who needed to try these so I thought I’d make some more kiwi loaf

The best things come in small packages so I decided to make mini versions this time 🙂 yum yum!

I had a few kiwi’s left in the fruit bowl, half an hour to spare and a very dear friend who needed to try these so I thought I’d make some more kiwi loaf
The best things come in small packages so I decided to make mini versions this time 🙂 yum yum!
As the end of chocolate week draws near I thought I’d finish with this little recipe which is another I’ve had for a while and not got round to posting. These do require double baking but it’s less of a faff than you think – honest! and it’s very much worth it! I guarantee you won’t be able to tell these apart from “normal” (gluten filled, dairy filled) chocolate biscotti and they’re perfect with a cup of coffee over the weekend 🙂
I hope you enjoy it and do let me know if you try out this recipe and what you think of it (that goes for all my recipes!).

1/3 cup Almond milk
2 tbsp Ground linseed
3/4 cup and 2 tbsp Raw unrefined coconut palm sugar
1/2 cup Almond or Hazelnut oil
1/2 tsp Vanilla extract
1/2 tsp Almond extract
1 and 1/4 cups Spelt flour (wholewheat or white) or Gluten free flour blend
1/2 cup Quinoa flour (if you don’t have this add more spelt flour)
1/3 cup Raw cocoa Powder
2 tbsp Arrowroot powder or Cornflour (also known as cornstarch in the US)
2 tsp Baking Powder
1/2 tsp Himalayan rock salt
1 cup Whole, Raw Hazelnuts (these can be toasted first if you want really crunchy nuts!)
Preheat the oven to 350F/180C and grease a large baking tray very well.
In a large bowl, whisk together the milk and ground linseed for about 30 seconds. Add the sugar, oil and extracts and stir until smooth. Sieve in the flour, cocoa powder, arrowroot or cornstarch, baking powder and salt. Stir to mix and just as the dough starts to come together, knead in hazelnuts. Knead very briefly to form a stiff dough.
Transfer the dough to the baking sheet and form it into a rectangle (approx 12 inches long and 3 – 4 inches wide). Push in the nuts if they pop out! Bake for 20 – 25 minutes. It will rise and get a bit puffy and the top may start to crackle. Keep an eye on it from 20 minutes onwards as it can start to burn. Obviously remove if it starts to burn (this can be hard to see because of the chocolate colour so give it a good sniff if in doubt!) 🙂
Remove from the oven and allow to cool for 30 minutes until very firm.
Turn up the oven to 375F/190C. Carefully transfer the baked dough to chopping board and using a serrated knife, slice 1/2 inch slices. Push the knife down in one go, don’t use a sawing action as you will find the biscotti crumble. They are extremely delicate at this stage so you need to be gentle. I ended up with a fair bit of crumbling and breakage but that’s not the end of the world, it just meant I had lots of bits to taste! 🙂
Place the slices on the baking tray and bake for 12-15 minutes until brown and crispy. Don’t be tempted to over bake – they will still seem quite soft when you remove them from the oven but they will crisp up as they cool – I promise (Trust me, I’m a Dr 😉 ). Remove from the oven and allow to cool for a few minutes on the baking sheet before transferring the slices to a cooling rack. When completely cool, store in an air tight container and enjoy with a cup of your favourite coffee 🙂
It’s grey and windy here in the UK at the moment (well it is where I live!) so it just makes me want to have lots of warming, spicy foods and we all know how well chilli and chocolate go together so I thought it was time I wheeled out this recipe. I actually made these ages ago but just never got the chance to post the recipe. It’s modified from the amazing Isa Chandra’s recipe

1/2 cup Almond oil
1 cup Raw unrefined coconut palm sugar
1/4 cup Maple syrup
3 tbsp Almond or Soya milk
2 tsp Vanilla extract
1 and 2/3 cup Spelt or gluten free flour blend
1/2 Raw cacao powder
1/2 tsp Cinnamon
1/2 tsp Cayenne pepper
1 tsp Bicarbonate of soda
1/4 tsp Himalayan rock salt
For the topping:
1/3 cup Raw golden caster sugar
1 tsp cinnamon
Preheat the oven to 350 F and grease and line a baking tray (or 2!).
Put the oil, sugar, maple syrup and milk in a bowl and mix together using a fork. Add in the vanilla extract and mix well. Mix the rest of the ingredients in a large bowl and sieve in to the wet ingredients. Mix until you have a dough. The dough will be quite moist and sticky.
Put the topping ingredients on a plate and mix together.
Take small, walnut sized, balls of the dough and pat into the topping sugar to make discs about 2 inches across. Make sure they are well covered in sugar. Put them on to the baking tray with the sugar facing up. Cook for 10 – 12 minutes until they are crackly on the top and have spread a little. Allow to cool on the baking tray for 5 mins then transfer to a wire rack to cool.
Enjoy! 🙂

.
Continuing my chocolatey theme I thought today I’d leap in with my current favourite chocolate treat. I’ve shared this delight before but not in it’s chocolate form! This stuff is amazing and such a blessing for anyone trying to avoid dairy (for whatever reason) but still wanting something yoghurt/mousse-like in their diet.
It’s Coyo! the raw chocolate variety 🙂 It’s basically just coconut milk and raw chocolate! It’s great on it’s own or really good with some fresh berries 🙂

It’s “Chocolate week” this week apparently! Hurrah I hear you cry! 🙂
So in order to celebrate one of my favourite things I wanted to share some chocolatey goodness with you all. Sadly my kitchen is still in a state of disarray (tile dramas!) so I haven’t been able to create anything new but it offers the perfect chance to go back to some old favourites. So here, just for you all, are a few of my favourite chocolate creations:
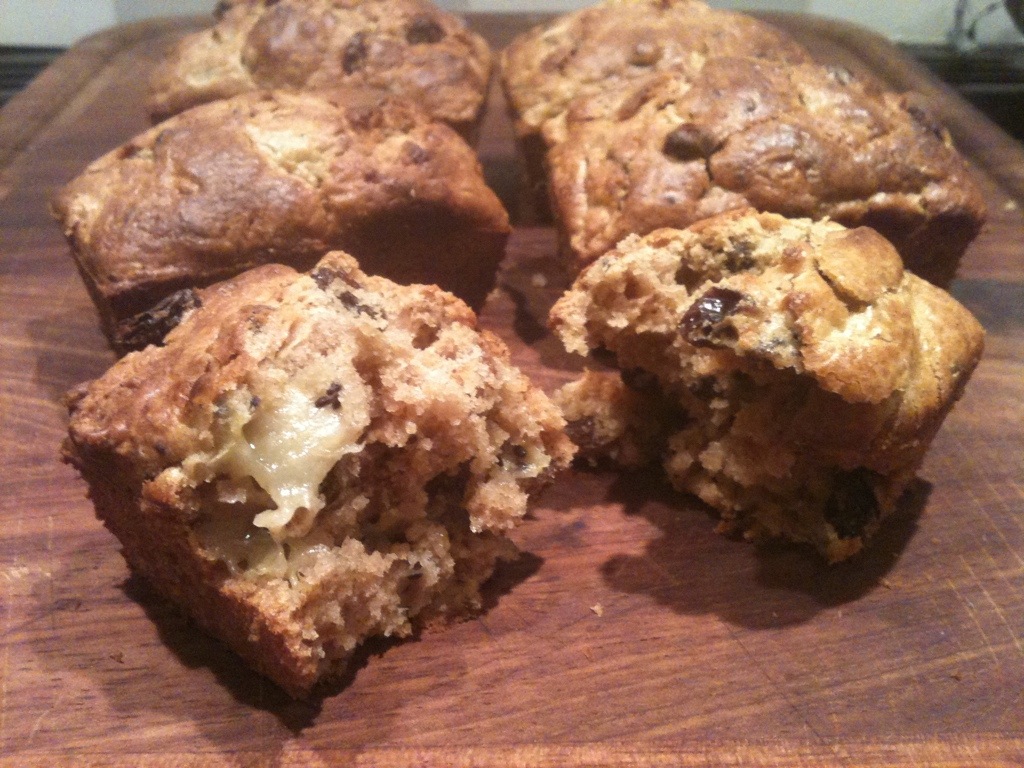
These are naughty, but not too naughty…. They’re best served hot so the chocolate oozes out of them…. hmmmmmm
Chunky Cherry Chocolate Loaves 
This has to come a close second. It was originally featured on the fab Pure Form Fitness Kitchen blog and it’s the Ultimate Chocolate Dessert. The spelt chocolate brownies (which are also used for the valentine Brownie Love Bites) are, in my humble opinion, out of this world, especially with the sauce on it (which you can make thicker and as more of an icing if you choose….)


You can’t beat a bit of simplicity and these Raw Chilli Chocolates certainly fit the bill. They’re so easy and quick to make, full of antioxidants and simply divine!

Another recipe featured on Pure Form Fitness Kitchen, is my Chocolate Treat Bar. These are fab – full of goodness, full of chocolate but still healthy! These are my go to bar if I’ve had a big work out day or if I’m just having a chocolate craving! 100 times better than any pre-packaged cereal bar and you can use whatever seeds (or nuts) and dried fruit you like in them.

I’m going to leave it at that for now, before we all pass out from a chocolate induced high! But as it’s chocolate week ALL week I’m going to keep on posting a few more chocolatey delights as the week goes on so watch this space! 🙂
It’s been very quiet on the baking front for the last 10 weeks or so. I was away in Indonesia working on my primate conservation project for much of that (you can read all about it here) which is why I couldn’t really do much baking! I got home a couple of weeks ago but still couldn’t bake as the kitchen is being re-done (very very exciting! 🙂 ) and now I’m in Denver for a week presenting my research at a conference. So it’s been a bit of a whirlwind summer and I’m missing my cooking and baking enormously, but it’s all good and there are exciting times ahead with the new kitchen 🙂
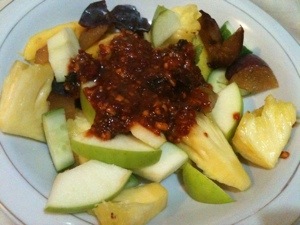
So for now I thought I would share a little recipe I picked up in Indonesia. It’s called rujak and it’s divine! It’s basically a fruit salad with a peanut chilli sauce 🙂
You can use any fruit you like but you really want nice tart fruits, it tends to be fruits like:
Pineapple
Mango (not too ripe)
Stone fruit
Cucumber
Apple (granny smiths work well)
You can also add things like plums, pear, water apple, guava (not too ripe), papaya etc.
Slice up your fruit and place in a bowl.
For the sauce you need:
Approx 50g peanuts (raw)
200g coconut palm sugar
Large red chilies (2 or more depending how hot you like it!)
Tamarind – a small ball of tamarind (2cm or so) or a good tbsp of tamarind paste.
Pinch of Himalayan rock salt
Fry the peanuts in coconut oil lightly for a few minutes. Place the chilli and salt in a pestle and mortar and grind in to a paste. Add the peanuts and grind again. Finally add the sugar and the tamarind and continue to grind. You will need to add a little water – just enough so you end up with a sticky paste.

Mix well then serve on top of the fruit!
Enjoy 🙂
This will probably be my last ‘baking’ blog for a while as I’m now in Indonesia for 2 months working on my primate conservation project (to find out what I’m doing check out www.nancypriston.com). There may be some food posts but I definitely won’t be cake making! 🙂 I meant to post his before I left but ran out of time, so here goes!
I’ve been having a play with buckwheat lately! I haven’t had much success cooking it so was looking for other ways to use it. My friend Colette gave me a recipe for making buckwheat crunchies so I thought I’d use them in a chocolate-based snack recipe! I’m pleasantly surprised with the results! I’m still not too sure about the buckwheat but so far it’s the best I’ve come up with!
It’s fairly straightforward but first off you need to make your buckwheat crunchies. Purchase some raw buckwheat groats (grains/kernels/whatever they’re called!) from the local health food store. You need to soak these over night – use 3 times as much water as buckwheat. Rinse really well in the morning and drain. Then spread them out on greaseproof paper and either pop them in your dehydrator if you have one, or in the oven on low heat. They will need a couple of hours. When they’re done they will be crispy and crunchy.

You can eat these as they are (in fact I quite like them sprinkled on fruit and soya yoghurt for brekkie to give some crunch) but you can also use them to create these yummy chocolate treats!
I made two versions:

Chocolate topped crispie
1/2 cup Coconut butter (you need the proper butter, not the oil – you can get it here. Nb other brands call themselves butter but are actually the oil – you need one that uses the coconut flesh)
1/2 cup raw Cacao powder
2 cups Buckwheat crunchies
1/4 cup Cacao nibs
1/8 cup Chia seeds
squirt of Sweet freedom (adjust to taste)
For the topping:
equal quantities of cacao powder and coconut butter (to make enough to cover the crispies to whatever depth you want!)
squirt of sweet freedom (adjust to taste)
Gently melt the coconut butter in the microwave or in a pan until it is runny. Mix all the ingredients in together and stir well. Line a tin or tupperware box with greaseproof paper and push the mixture in to it to the desired thickness. Then in another bowl melt the coconut butter for the topping and mix with the cocoa powder and sweet freedom. Pour on to the top. Chill in the fridge for at least 30 minutes.
Almond Cherry Chocolate Crunchies
1 cup Buckwheat crunchies
1 cup raw Cacao powder
1 cup soaked Almonds (soak in water for as long as you gave time for – ideally overnight)
1/2 – 1 cup Coconut butter (not oil)
1/4 Sweet freedom (or less – to taste)
2 tbsp Pure protein powder (vanilla)
1/2 cup dried Cherries/cranberries/goji berries
Once you have the buckwheat crunches and soaked almonds ready it only takes a few minutes to make these. First blitz the almonds in a food processor – just a few pulses to chop them up a bit and place to one side. Then gently melt the coconut butter and add the cacao powder and sweet freedom. Mix to a paste and stir in the protein powder, buckwheat and almonds, finally gently stir in whatever fruit you are using. Line a tin or tupperware box with greaseproof paper and push the mixture in to it to the desired thickness. If you find the mixture isn’t holding together melt a little more coconut butter and pour over the top. Chill for 30 mins then slice and enjoy!
🙂
Although I’m definitely a fan of making my own cakes sometimes it’s just not possible, so if you’re out and about and need a cake then I think I’ve found the perfect solution.
Honeybuns are a Dorset-based company that specialise in gluten-free (and some dairy-free) cakes, cookies, brownies and a whole range of other baked goods. I love this company – it’s what I aspire to become! The founder, Emma Goss-Custard, started off cycling around town delivering her home-made cakes to local deli’s and cafés. Now it’s a thriving small-scale business, but still makes its cakes by hand using locally sourced ingredients where possible.

They very kindly sent me some samples to try so I thought I’d let you know what I thought of them.
I got to try:
Almond moon
Milk chocolate brownie
Snowy hills
Amondi
Sconeybun

Gosh, where to start! Think I’ll just make a cuppa…… 😉
Almond Moon
This is a polenta, cranberry and almond slice and oh my it’s good! As I’ve said before on here I am a massive fan of almond-based cakes so this was always going to be a winner with me! It’s lovely and moist with just the right amount of crunch in the base. The fruit is perfect and offsets the sweetness of the cake brilliantly. The texture is lovely too!
Milk Chocolate Brownie
This is possibly the best gluten-free, bought, brownie I’ve ever had. Too often they are overly sweet and too moist but this is just perfect. It’s dense but not too dense, moist but not too gooey and it tastes divine. It contains real coffee so there is a delicious hint of coffee flavour throughout which I love and naturally it goes brilliantly with a cup of the black stuff!
Snowy Hills
Wow, they just get better and better! This is a ginger and polenta shortbread with a lemon sponge topping and it is seriously good. The shortbread is lovely and crispy with hint of ginger but it’s not overpowering. The sponge is fantastic – sweet, moist and just lemony enough! This is really really good!
Amondi
Another almond treat! This is like a macaroon but denser and moister and really very very nice indeed! It’s not light like an almond macaroon but I like that – you really feel like you’re getting plenty of cake for your money! It’s crunchy on the outside and chewy on the inside just like it should be and it tastes fab! It’s also dairy free as well as gluten free.
Sconeybun
This is probably my least favourite of the 5 to be honest, but then it would be hard to follow all those wonderful flavours! The sconeybun is basically a cross between a bun and a scone and this one is dairy free as well as gluten free. It does what it says on the tin! It’s basically a dense, cakey bun. It’s nice but after the other 4 cakes I felt it was lacking flavour a bit, but then again I think toasted with some jam it would be just perfect! Plus if you’re looking for something a little less sweet then this is definitely for you!
The best thing about all of these cakes is that you wouldn’t know they were gluten free (or dairy free) at all – they taste simply amazing and just like “normal” cakes.
So which is my favourite? hmmmm I’m not sure…it’s so hard to decide! I think if I had to choose it would probably be the Snowy Hills lemon cake or maybe the Almond Moon… or maybe the brownie …. oh I can’t decide – they’re all just too good!
Do check them out – they’re available at various cafe’s and shops but they also do an online mail order service too – just take a look at their website 🙂
Ok, I think I’ve found the perfect way to eat my Indonesian Inspired Pineapple Bites.. with this!

It’s divine! Creamy and delicious and totally dairy free! Only 193 kcals for a pot too!

It was so good I’d eaten half before I remembered to take a photo! 🙂
You can get the yoghurt at your local health food store (check here for more info)
I’m off back to Indonesia for 2 months soon so I thought I’d get in the mood with some Indonesian inspired flavour combinations! The pineapple- peanut butter-tamarind combo is a classic sweet/sour flavour explosion in Asia and I just love it! I used a dehydrator for these but you can use your oven. I like them cooked or dehydrated for a long time so they go all chewy, but they are also delicious cooked for only 20 mins and served warm and juicy over yoghurt or booja booja ice cream… 🙂

300 g Fresh Pineapple (approx half a big pineapple)
4 tbsp Peanut butter (smooth works best)
2 tsp Tamarind paste
2 tbsp Almond oil (or other neutral oil)
Cut the pineapple in to thing rings and then slice into small pieces. In a separate bowl mix the other ingredients. Stir well until it forms a runny paste. You may need to add a little more oil if the paste is too thick. Pour over the pineapple and ensure all the pineapple is coated. Place on a baking tray in the oven or arrange on your dehydrator rack and dehydrate for 3 – 4 hours or until it’s as chewy as you want it. If you want juicy, warm pieces to put on top of ice cream then oven bake at 190 C for about 20 minutes. If you are dehydrating it in the oven just leave it in longer at a lower heat.
Once ready either put on yoghurt or ice cream, or if it’s the chewy stuff pop it in a pot and snack on it to your heart’s delight! 🙂

With you every step of the way
Travel tips-Restaurant reviews-Recipes
One woman's take on whole foods, clean living and boundless energy.
{salty wit + a sweet tooth}
Simple Gluten Free recipes for any time of day.
wildernesswalking123
This WordPress.com site is the bee's knees
