Easy Easter Biscuits


I thought it might be fun to do a little Easter baking! These are fun super easy, spicy Easter and spring biccies that are great fun to make, and eat! You can leave the spices out if you prefer of course or add any flavouring you like! Something fun to do with the kids too ๐Ÿ™‚ The icing is flavoured with either lemon, fresh raspberry or fresh blueberries.

I use low fat spread and “half spoon” sugar – but you can use normal butter/spread and any sugar you like! ๐Ÿ™‚

20130331-160723


For the biscuits you need:

300g plain flour

140g Sugar (if using “half spoon” sugar then just 70g)

180g Dairy free spread

Optional spices: 2 tsp Cinnamon, 1/2 tsp Nutmeg, 1/2 tsp Cloves

For decoration:

Sugar and cinnamon

Currants

Icing sugar

Lemon juice, raspberries and blueberries

Sugar balls etc

Preheat the oven to 175 C.

Put the spread and sugar in a bowl and cream together. Combine the flour and spices if using and mix really well. Once it forms a dough, wrap it in clingfilm and pop it in the fridge for 20 mins if you have time (you can also save it in the fridge for use later that week or you can freeze it for months if you need).

Remove and roll out. Use whatever shaped cutters you like to it your biscuit shapes and transfer to a baking tray.

If you are using currants for bunny eyes and noses then add those now. Sprinkle with a little sugar and cinnamon. Place in the oven and cook for 8 – 12 mins or until golden. Remove and allow to cool on a wire rack.

Once cool you can ice the biscuits. Mix up your icing powder with lemon juice or fresh mashed raspberries or blueberries and then spread on the biscuits (or just water if you prefer). Add sugar decorations if you like. Allow to set and then eat!

Enjoy! ๐Ÿ™‚

xx

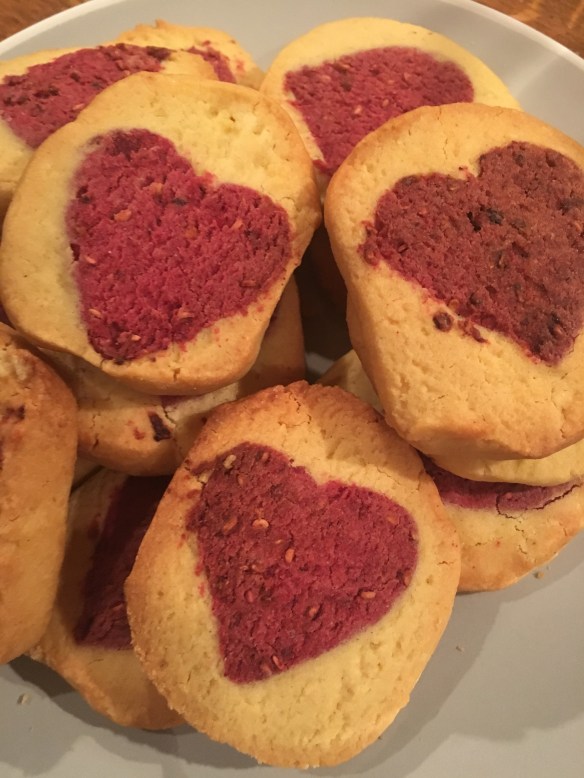
Raspberry and vanilla heart biscuitsย 


I thought I’d have a go at some cute valentine’s biscuits this year. These can be gluten free or not depending on what flour you use. They’re dairy free but do contain eggs. They look fab and are a lot simpler to make than they look!


Give them a go this Valentine’s ๐Ÿ™‚

You will need:

300g plain flour (or plain gluten free flour)

200g dairy free margarine 

120g golden caster sugar

2 egg yolks

30g freeze-dried raspberries

2 tsp vanilla extract

Put the flour and margarine (chopped or in small bits) in a food processor and pulse until it forms a crumb-like texture. Add the egg yolks and sugar and then pulse again until it forms a dough. 

Take 1/3 of the dough and put in a separate bowl. Add the vanilla extract to the remaining 2/3 and pulse again to combine. Then remove that dough and leave it in the fridge to chill. 

Put freeze dried raspberries into the processor and whizz until a fine dust. Add the 1/3 of the dough you removed to the raspberries. Pulse to combine.  Put the dough in the fridge to chill for at least an hour. 

Once chilled roll out the raspberry dough and cut out small heart shapes (I used a small 3cm heart cutter). It doesn’t matter exactly how thick they are as you will take all the cut out hearts and stack them together. Press them carefully together, ensuring you maintain the heart shape. Wrap in cling film and pop in the freezer for a couple of hours (you can do all this but one day and leave it overnight too).

When you’re ready to make the biscuits take the heart-roll out the freezer and the vanilla dough out of the fridge. Make three cylinders of the vanilla dough that are the length of the heart-roll. Stick them on to the heart-roll and carefully press them around it until you have completely covered the hearts in a circle. 


Wrap and pop in the freezer for 20 mins or so, then remove and cut into 1cm slices. 


Place them on a baking tray and pop them into a preheated oven at 170 C for 20 – 25 mins or until the edges start to turn golden. Allow them to cool on the tray for ten mins and then transfer to a wire rack.


They’re crumbly and yummy! Enjoy with a cup of tea or give them to someone you love!

A host of Easter Treats


With Easter upon us I thought I’d share a few of my favourite, slightly healthier but equally yummy Easter recipes.

So if chocolate is your thing then why not try some quick, raw chocolates like these chocolate coconut treats, or the raw chocolate filled eggs and fruit eggs, or if you fancy something with a little more kick – why not try the chilli chocs.

2014-04-18 19.27.21ย  ย  ย  ย ย 2014-04-13 16.29.29

Or how about whipping up some quick, cute, marzipan bunnies!

2014-04-05 17.33.53

What about creatingย a quick batch of Easter spiced biscuits, or some fresh, lightย lemon and chia cookiesย to dunk in your afternoon tea on Easter Sunday.

If you’re feeling adventurous you could try my coffee and amaretto cupcakes (using any instant coffee you have to hand).

2014-04-05 17.37.59

And finally..it wouldn’t be Easter without some hot cross buns right? Try my better bun recipe for some hot cross fun! ๐Ÿ™‚

Happy Easter! ๐Ÿ™‚


Raw Almond Caramel Chocolate Fingers


I’ve been dying to make something nutty and caramel-ly for ages and just haven’t got round to it ย – finally the other weeked I got all my ingredients out and had a play and I’m very very pleased with the results! These are delish! They need to be kept in the freezer and are best eaten cold otherwise they get a bit squishy… although… that’s not such a bad thing!!

IMG_1411

You will need:

For the base:

1 cup Macadamia nuts

2 – 3 Tbsp Coconut syrup (or any liquid sweetener – agave, rice malt syrup etc)

1/2 tsp Vanilla powder or 1 tsp vanilla extract

1/4 tsp Almond extract

For the caramel:

12 – 14 Medjool dates

3 tbsp Almond butter

1/8 tsp Almond extract

pinch of salt

A little Water as needed (it depends how dry your dates are)

For the chocolate:

1/2 cup Coconut oil (melted) or Cacao butter (melted)

1/3 cup Raw cacao powder

1/4 cup Coconut syrup or maple syrup (or any liquid sweetener)

1/4 tsp Vanilla powder or 1/2 tsp Vanilla extract

First you need to make the base. Pop all the ingredients into a food processor and pulse until well blended and it forms a sticky dough. Line a small tray with baking paper and then press the base mixture in to the tray firmly.

IMG_1388ย  ย ย IMG_1390

Pop this in the freezer and then start on the caramel layer. I find it easier if you chop the dates up a bit first, so chop them and pop in to the processor together with the other ingredients, but not the water. Pulse until blended in to a paste. If it’s a little too dry then add some water (carefully so you don’t add to much). Once you have the consistency you want (sticky but spreadable) then take the base out the freezer and spread the caramel on top. You may have some caramel left over – this is no bad thing, I rolled it into balls which I coated in chocolate for some extra little caramel bites! ๐Ÿ™‚

IMG_1391

Place this back in the freezer for as long as you can – an hour or more if possible.

Once you’re nearing the end of your the hour you can make up the chocolate (if you want to make it sooner you can, and you can just gently warm it to re-melt it). It’s best to use a large bowl for this so your caramel fingers will fit in (it makes it easier to coat them). Add the cacao, coconut syrup and vanilla to the melted coconut oil or cacao butter and mix well using a fork or a small hand whisk. Remove the caramel from the freezer and slice into fingers (or any shape you want).

IMG_1394

Then comes the fun bit! First of call place a wire rack over some baking parchment (or a board – or anything you don’t mind getting messy!). Make sure your chocolate is melted and combined well, then begin the dipping! Dunk the caramel fingers in the chocolate and ensure they’re coated. Then transfer to the wire rack and allow to set. They will stick to the rack, so before they’re set just move them slightly. If you’re anything like me you will probably end up with a bit of a mess on the bottom side, don’t worry, just wait til the top is set (it won’t take long) and turn them over and drizzle chocolate over them to tidy them up.

If you find the chocolate starts to thicken while you’re still coating them then just pop it in the microwave for a few seconds to re-melt (or even just place in a warm area – like on a radiator for a few moments – it melts so easily). Once they are all coated and lightly set (because the fingers are frozen it sets pretty quickly but will still be fragile) pop back in the freezer (I just popped them in a tupperware pot).

IMG_1395

Store in the freezer until you want to eat them.. then eat! They’re delicious as a quick pick me up.. and if you’re feeling really naughty they’re even better dipped in a tofu chocolate chili mousse (oh yes I did..!).

IMG_1400IMG_1408IMG_1414


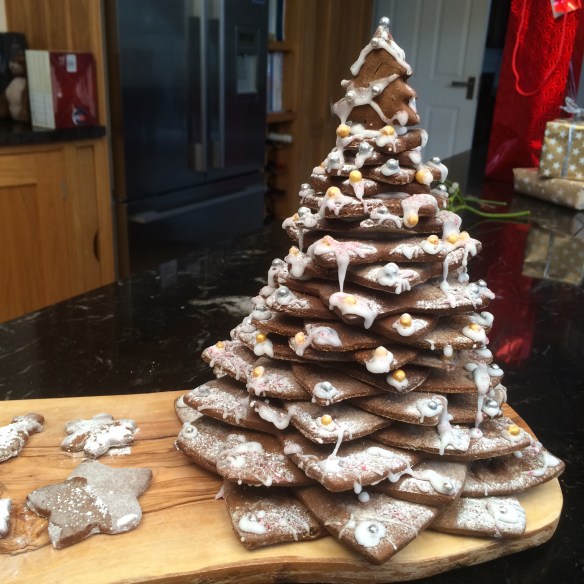
Christmas Gingerbread Tree – gluten and dairy free


The gingerbread christmas tree has become a bit of a tradition for me now and my friend’s husband is a big fan so I couldn’t let this year pass without making him one. This is a quick dough to make and is something fun to do on Christmas Eve ๐Ÿ™‚

/home/wpcom/public_html/wp-content/blogs.dir/ca7/32324338/files/2014/12/img_3654.jpg

/home/wpcom/public_html/wp-content/blogs.dir/ca7/32324338/files/2014/12/img_3629.jpg

To make the gingerbread biscuits: (if you’re going for a really big tree then you can always double this)

1/3 cup Olive oil

3/4 cup unrefined raw sugar (golden raw caster sugar, coconut palm sugar, or dark raw cane sugar)

1/4 cup molasses

1/4 cup soya milk

1 cup amaranth flour / quinoa flour

1 cup gluten free flour mix (make your own or you can use an organic pre-mixed one. If you want low gluten not gluten free then go for spelt flour instead of the amaranth and gluten free flours)

1/2 tsp ground nutmeg

1/2 tsp ground cloves

1/2 tsp ground cinnamon

1 and 1/2 tsp ground ginger

1/2 tsp bicarbonate of soda

1/2 tsp baking powder

1/2 tsp Himalayan rock salt salt

Whisk the oil and sugar together in a large bowl. Add the soya milk and the molasses and whisk all together. Sieve the flours, spices and baking powder, salt and bicarbonate of soda in to the wet ingredients and mix until it forms a dough. The dough may seem quite moist. You want it to be workable but not so sticky that you can’t lift it. Add a bit more flour if it is too wet. Wrap in cling film and leave in the fridge to chill for an hour if you can (the dough can be left in the fridge for several days so you don’t have to use it all at once. It can also be frozen).

Preheat the oven to 175 C and line a baking tray with greaseproof paper. Roll the dough out on a floured surface. It’s worth trying small amounts of dough at a time and be generous with the flour. It will stick a bit but don’t worry. You want it to be rolled out fairly thin but not too thin – maybe 5mm thick or so.

To make the tree you need star cutters of different sizes. If you don’t have them don’t fret. Draw some stars out on a piece of card and use them to draw around ๐Ÿ™‚ If you want to make a massive tree then you could use more stars. You want at least 2 or 3 of each sized star. I used two tiny christmas tree shaped cutter for the very top, but you could use another star.

Cut out the biscuits and transfer to the baking tray. Bake for 8 minutes. Then remove from the oven and allow to cool on the tray for 3 minutes before transferring to a wire rack. They will seem soft when they come out the oven but as they cool they harden. If you want super crispy biscuits just pop them back in the oven for another few minutes.

/home/wpcom/public_html/wp-content/blogs.dir/ca7/32324338/files/2014/12/img_3649.jpg

For the icing:

1/2 cup raw icing sugar

1 tsp soya milk (or any non dairy milk)

Mix the icing sugar with the milk until it’s smooth. If the icing is too runny just add more icing sugar until you get the consistency you want. Transfer to a piping bag (if you don’t have one then use a plastic freezer bag and snip the corner off to pipe through).

Assemble the tree!

This is the fun bit ๐Ÿ™‚

Start with your biggest star and place it on the plate. Add a glob of icing to the centre and stick the next star on top (arranged so the points don’t overlap).  Then add a glob of icing to the top of the uppermost star and stick the next one one… continue, going down in size until you get to the top! I then added a glob of icing and popped two tree shaped biscuits on the top.

/home/wpcom/public_html/wp-content/blogs.dir/ca7/32324338/files/2014/12/img_3650.jpg

Now you can decorate each layer. Pipe icing on to the points of the bottom star and decorate with silver balls, gold balls, edible glitter etc.

/home/wpcom/public_html/wp-content/blogs.dir/ca7/32324338/files/2014/12/img_3651.jpg

Finally dust with icing sugar so it’s all snowy-looking! Then you’re done!

yay! ๐Ÿ™‚

/home/wpcom/public_html/wp-content/blogs.dir/ca7/32324338/files/2014/12/img_3655.jpg

/home/wpcom/public_html/wp-content/blogs.dir/ca7/32324338/files/2014/12/img_3652.jpg

Amazing Protein-Packed Flapjacks – dairy and gluten free


I get hungry, especially after a workout and I love a good flapjack or energy bar but I hate the fact that so many of the store bought ones are just full of sugar. Many of the ‘healthier’ versions I’ve bought are tasteless and unappetising so last Saturday, after a full on day, I thought I’d create some homemade protein flapjacks – full of good things!

image

I thought I’d do a little video to show you them in the flesh – so here goes:

and the finished product:

image

These don’t take long to put together and you can always substitute things if you don’t have them in the cupboard or don’t like them.

image

You will need:

300g rolled porridge oats (gluten-free or spelt if you want)

100g desiccated coconut

100g flaked almonds

100g Pumpkin seeds

215g dried, soft Prunes

315g dried dates

175g Almond butter (or your nut butter of choice)

100g Liquid sweetener (I used rice malt syrup but you can use agave, maple syrup, honey etc)

2 tbsp Coconut oil (measured when solid)

4 tbsp Vanilla protein powder (any brand you like – or you can also omit this)

4 tbsp Water

2 generous tsp Cinnamon

1/2 tsp Salt

Preheat the oven to 170 C.

Line a baking tin (I used a 20 x 20cm one) with baking paper. Mix the oats, almonds, pumpkin seeds and coconut together and pour into the baking tin. Place in the oven for 20 mins or until starting to brown. Make sure you turn regularly with a wooden spoon so the whole mixture gets toasted.

While that’s in the oven pop the dates and prunes into a blender or food processor and blitz to a paste. You may need to keep stopping to scrape the mixture back down in to the bowl. It doesn’t need to be completely smooth – a few lumpy bits are good!

Remove the oats from the oven and stir the protein powder through the mixture. Allow to cool.

Put the date mixture, nut butter, liquid sweetener, coconut oil, water, cinnamon and salt in to a large saucepan and heat very gently. Stir and allow the mixture to come together. Remove from the heat and pour the oats into the liquid mixture and mix really well.

Using a spatula scrape the mixture back into the lined baking tin and press down firmly. Then allow to cool and pop in the fridge. Do make sure you lick the saucepan (once it’s cool enough!!!) because the mixture is divine when warm! ๐Ÿ™‚

Once it’s chilled you can cut in to slices. It makes the perfect post workout snack on the go and is great to pop in to lunchboxes too!

image

Spicy Hallowe’en biscuits


I couldn’t resist whipping up a batch of my favourite biccies for Hallowe’en. These are so super easy! And I had these fun spooky icing eyes I’ve been wanting to use so I just had to make some.

IMG_7614.JPG

The original recipe is here (click here) but I’ll quickly run over it here.

You just need:

2 cups Spelt or gluten-free flour

1 cup unrefined Icing sugar

6oz dairy-free spread

Spices to taste – in this version I used

1 tsp cinnamon

1/4 tsp ground cloves

Pinch nutmeg

Preheat oven to 180 C. Mix the flour, icing sugar and spices together and then cream the spread in. Mix well until it forms a dough but try not to over mix. Pop in the fridge to chill for as long as you can wait! Then remove, sprinkle a little flour down on a clean surface and roll out to your desired thickness. Use biscuits cutters to cut in to shapes and then pop in the oven for 5 – 7 mins or until golden brown. Do keep an eye on them – especially if they’re thin!

Allow them to cool and then if you want to you can ice them – just mix icing sugar with a little water or non-dairy milk and then have some fun!

Enjoy Hallowe’en!

IMG_7644.JPG

Lemon curd thumb biscuits!


Having made a big batch of lemon curd (recipe is here).ย I thought I’d better find some yummy ways to use it!

photo 5

Now I could just eat it straight from the jar (and actually I do!), or with yoghurt and fruit for brekkie….

photo 1

… but… it’s also pretty delicious combined with almonds in these divine little biscuits.

photo 4

They are super easy to make and take less than 30 mins.

To make about 12 biscuits you will need:

130g Ground almonds

1/4 tsp Baking powder

1/4 tsp Himalayan rock salt

1 tsp Vanilla extract

Zest from 1 – 2 lemons (you can use any left over zest that you froze after making the lemon curd)

2 1/2 tbsp Coconut oil

2 tbsp Maple syrup

1 tbsp Lemon juice (or 1/4 tsp Lemon extract)

1 – 2 tbsp Lemon curd (recipe here)

a handful of Dried cherries

Preheat the oven to 180 C

Place the ground almonds, baking powder, salt and lemon zest in a bowl and mix well. Add the vanilla extract, maple syrup and coconut oil and use your hands to mix into a dough.

Take tablespoon-sized portions of the dough and place on a greased baking sheet. Pat down and then use your thumb to make an indent in the center.

photo 1 (2)

Place the tray in the oven and bake for 10 – 12 minutes. After 5 minutes check them and if the indents are starting to close just gently use your thumb to re-shape them. Bake until they are brown. If you like your biscuits a bit crunchier then bake a little longer.

Remove from the oven but leave the oven on. Fill the indents with lemon curd and place a dried cherry in the middle. Pop them back in the oven for 2 – 3 minutes.

Allow to cool.

They will be lovely and crunchy if eaten straight away. If left for the next day they become soft and macaroon-like – which is simply yummy! You can always pop them back in the oven to re-crisp if you fancy it ๐Ÿ™‚

photo 2


Lemon and Chia Seed Cookies – Dairy and Gluten free!


I’ve seen quite a few recipes around using tapioca flour and finally my supermarket has started stocking it so Iย thought I’d have a go at making up some cookies with it!

These are simply divine – they’re light and crumbly and really melt in the mouth.

photo 3

You will need:

1 cup Tapioca flour

1.5 cups raw Cashews

1/2 cup Coconut oil (melted)

1 Egg

1/4 cup Maple syrup

3 tbsp Chia seeds

Zest of 1 and 1/2 lemons

a pinch of Himalayan rock salt

For the icing:

100g unrefined Icing sugar

Zest of half a lemon

Juice of up to half a lemon

photo 4

First pop the cashews in to a blender or food processor and blend until they form a fine flour. Combine the cashew flour and tapioca flour together in a large bowl. Grate the lemon zest in to the bowl and add the chia seeds and salt and mix well.

Create a well in the centre of the dry mixture and add the egg, maple syrup and coconut oil and mix really well to form a dough. You may find the mixture is a little too wet (depending on the size of your egg!) – if so add more tapioca flour until it forms a firmish dough (whilst the coconut oil is melted though it will still be quite a loose dough).

Wrap it in clingfilm and pop the dough in the fridge to chill for 20 minutes.

Pre-heat the oven to 160 C.

Place the dough between two sheets of baking parchment and roll thin (few mm thick). Use whatever shaped cutters you like and then transfer the cookies to a lined baking tray. Bake in the oven for 20 – 25 mins or until golden (check after 15 mins).

Allow to cool and then mix the icing ingredients together. Add the lemon juice a little at a time until you have a consistency that you want. Then drizzle over the biscuits. Allow to set and then enjoy with a nice cup of tea! ๐Ÿ™‚

photo 1

Christmas Hats! Black Pepper, Coconut Cream and Strawberry Festive Fun!


I love dressing up (as my friends well know…) .. so much in fact that even my bakes are getting in the act this year….. ๐Ÿ™‚

These are a fun little festive treat to make for parties over the Christmas season. The biscuits themselves are very light, and not too sweet and so they go nicely with the sweetness of the strawberry and the rich coconut cream – the pepper adds a bite and make these a perfect bit of adult fun. If you want something a bit sweeter for the kids you can use my basic biscuit recipe for the bases instead – recipe here

2464

You will need:

150g Spelt, rice or gluten-free flour blend

50g Dairy free margarine

50g raw Coconut sugar / unrefined dark sugar

1 egg (if you want to go egg-free then use a little oil instead – 1/4 cup olive or almond oil but add less of the mixture in (see below)

2 tbsp Maple syrup (or agave or rice syrup, or honey)

1/2 tsp baking powder

1/2 tsp ground Cinnamon

1/2 tsp fresh ground Black Pepper

1/8 tsp ground Cloves

1/8 tsp ground Nutmeg

A punnet strawberries

1 can of Coconut cream (milk – the canned milk, not the carton) (65 โ€“ 70% coconut extract – see below)

a little unrefined icing sugar (optional)

2435


A few hours before you make these (or a day if you can) you need to set the coconut milk. I use this variety.

Pop the can in the fridge for a few hours or overnight and try not to move it. The coconut fat solidifies and separates at the top, leaving clear liquid at the bottom. When you are ready to make the cake remove the can carefully from the fridge and turn the can upside down in one move (i.e. no shaking!). Then open the can at the bottom โ€“ yes โ€“ trust me, open the bottom! You should find that the fat has solidified and you will see a few cmโ€™s of clear liquid. Pour this off (donโ€™t throw it away โ€“ you can pop it in a smoothie!) and then you are left with the coconut cream to use! ๐Ÿ™‚

To make the biscuits:

Preheat the oven to 170 C.

Pop the flour, baking powder, spices and sugar in a food processor and blend briefly. Add the margarine and mix again for a minute or so.

While this is mixing break the egg in to a bowl and whisk the maple syrup in to it to form combine. Trickle a little of this mixture in to the processor bowl while it is running slowly. Keep adding until the mixture forms a firm dough (you may not need all of it).

Once it forms a dough use your hands to combine it and remove from the processor. Roll out the dough on a lightly floured surface until it’s about 3 – 5 mm thick and use a small round cutter to cut shapes. You will probably have more dough than you need but it can be wrapped in cling film and frozen for later ๐Ÿ™‚

Pop the biscuits on to a lined baking sheet and bake in the oven for 12 – 15 minutes or until they start to brown. Remove and allow to cool.

Coconut cream:

Take the solidified coconut cream and using electric or a hand whisk beat until fluffy. If you want a little sweetness add a little unrefined icing sugar in as you whip it.

Strawberries:

Remove the stem of the strawberries and cut the top off each to give a flat base.

Now you can assemble your biccies!

Pop the whipped coconut cream in to a piping bag. If you don’t have one (I don’t!) then put it in a plastic ziplock bag and just snip the corner of the bag off to use as a nozzle. Pipe a small amount of cream on to the centre of each biscuit. Pop a strawberry on top and then pipe around the base of the strawberry and add a little dot of cream to the top (for the bobble on the hat!). You could dust with a little icing sugar and a grind of black pepper if you wanted to. Serve as soon as possible. They will last overnight but the biscuits will go softer so wait to assemble until as close to serving time as possible. Any extra biscuits can be stored in an airtight container for a few days and they will stay crispy.

Have fun! ๐Ÿ™‚

2437