Homemade healthy coconut “bounty” bars! Dairy and Gluten-free


I made these a while ago but totally forgot to put the recipe up! Bad Nancy!

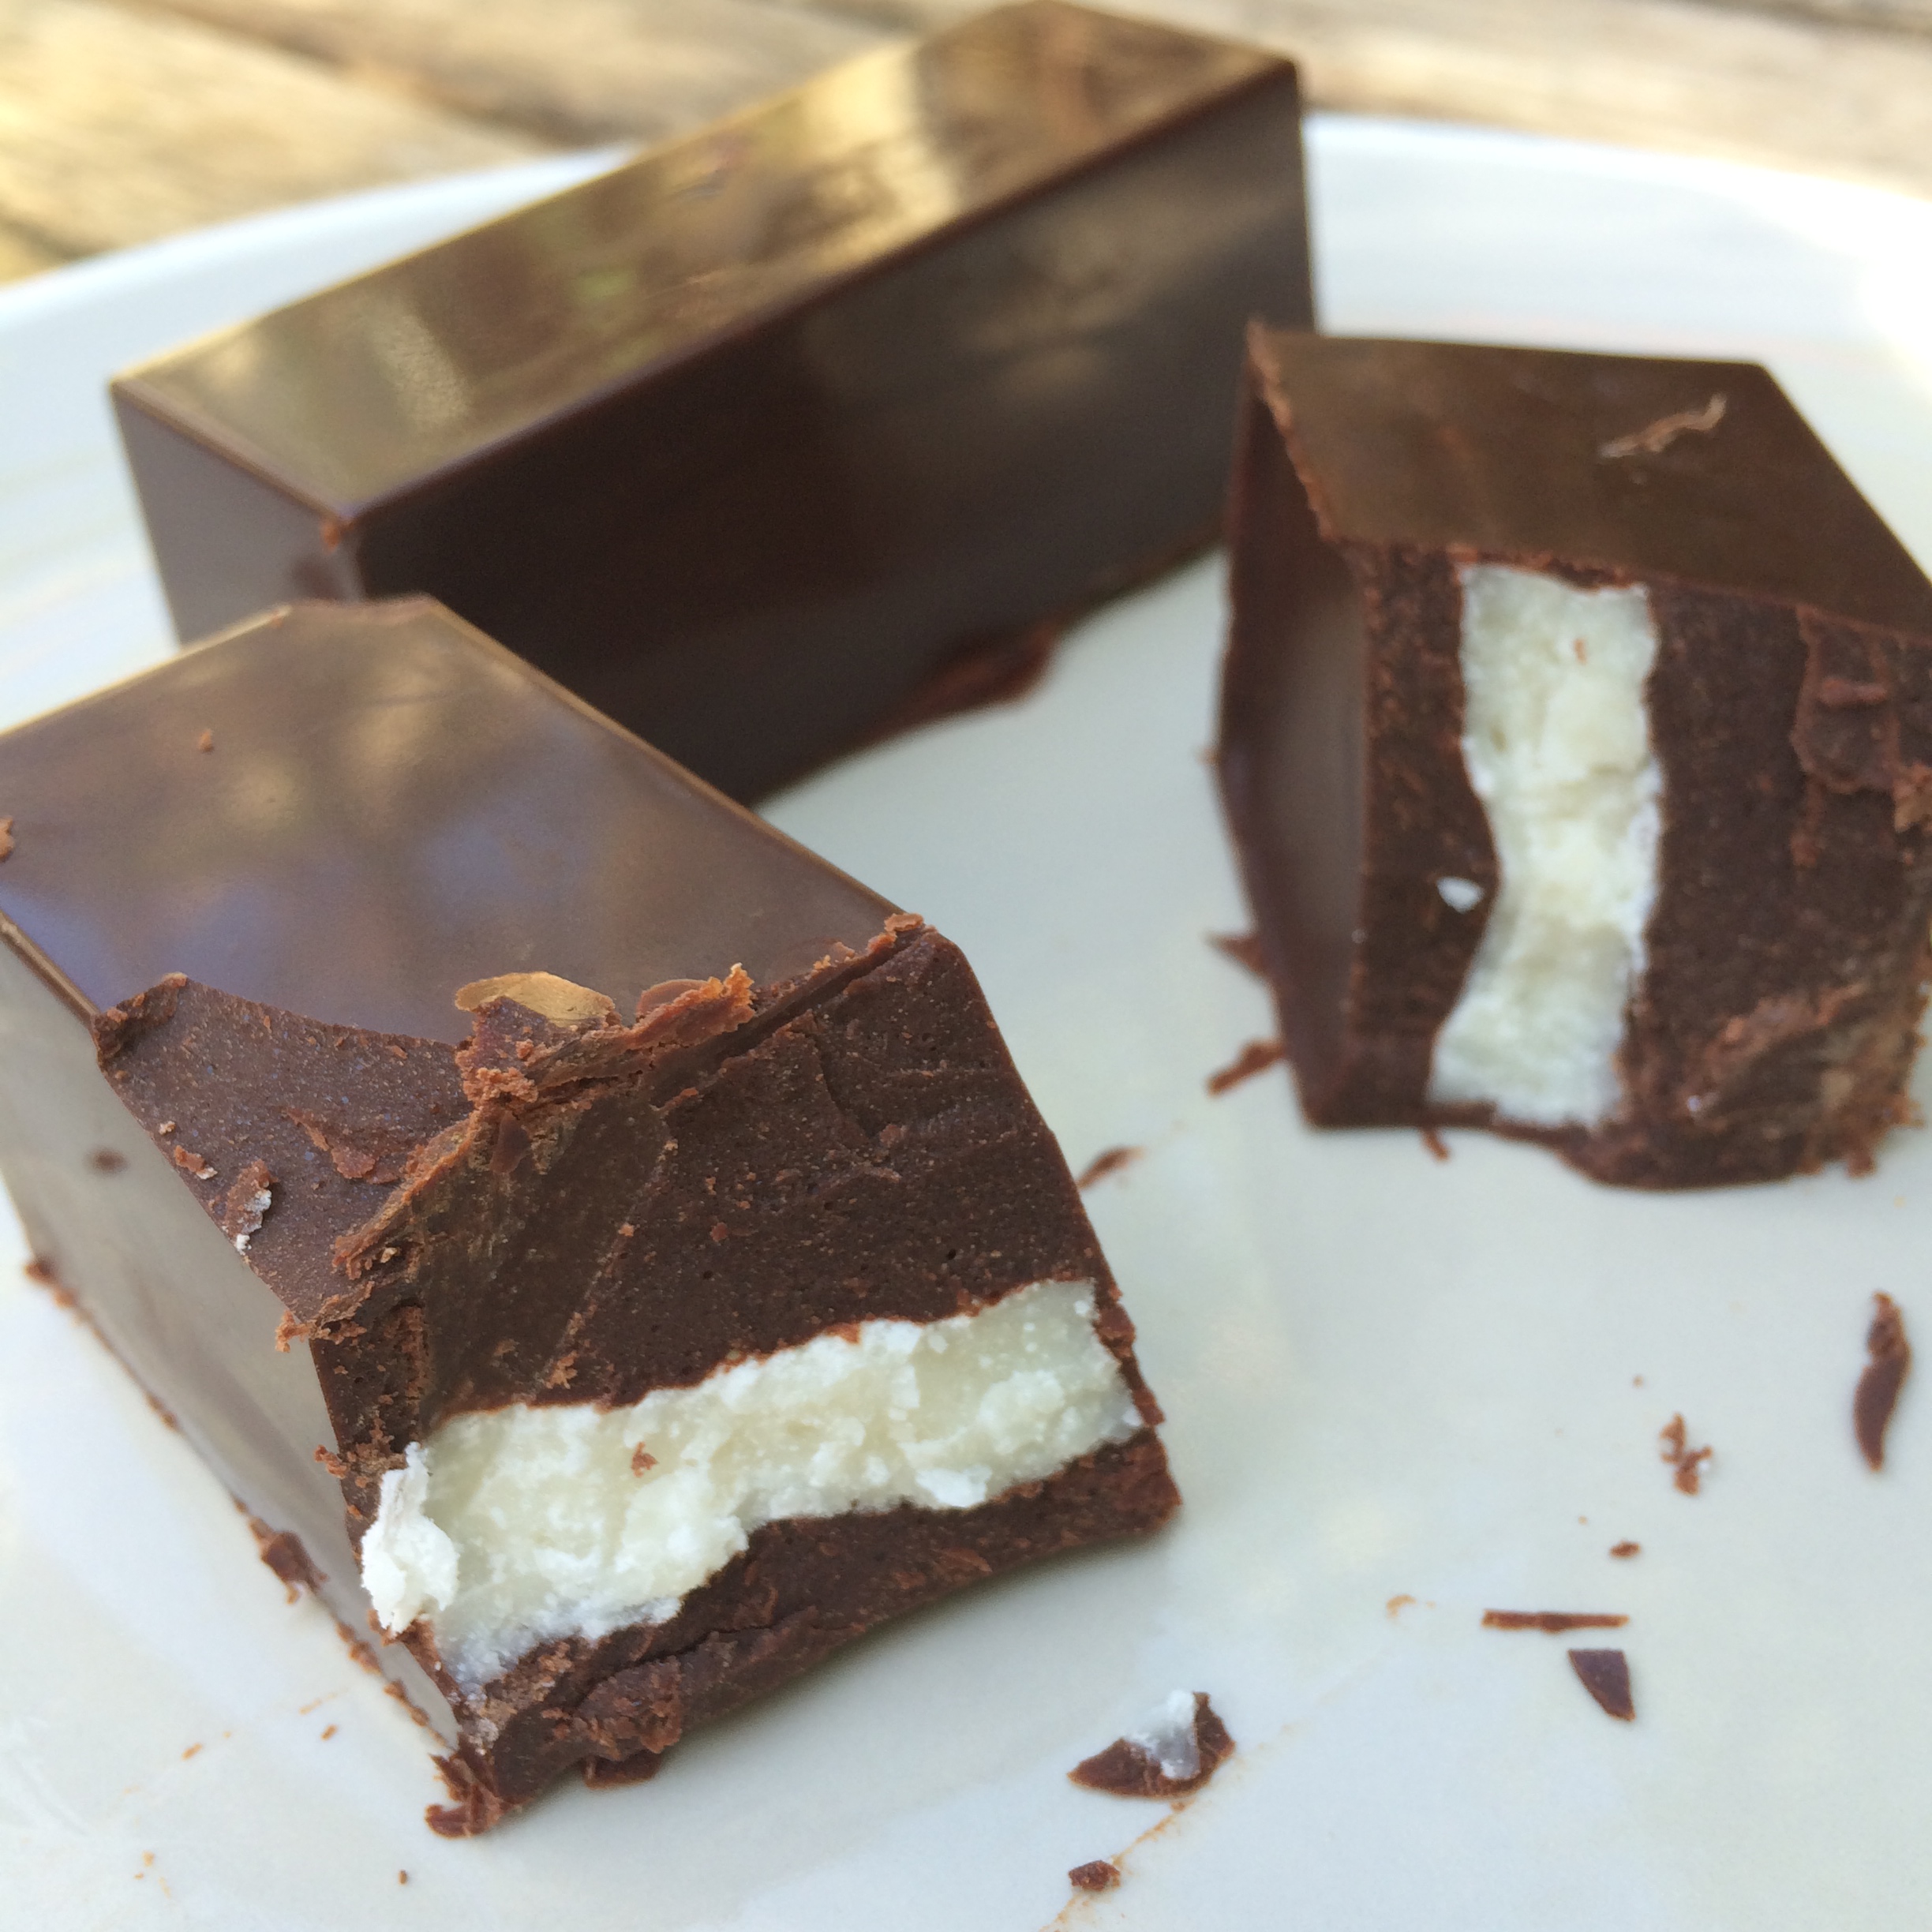
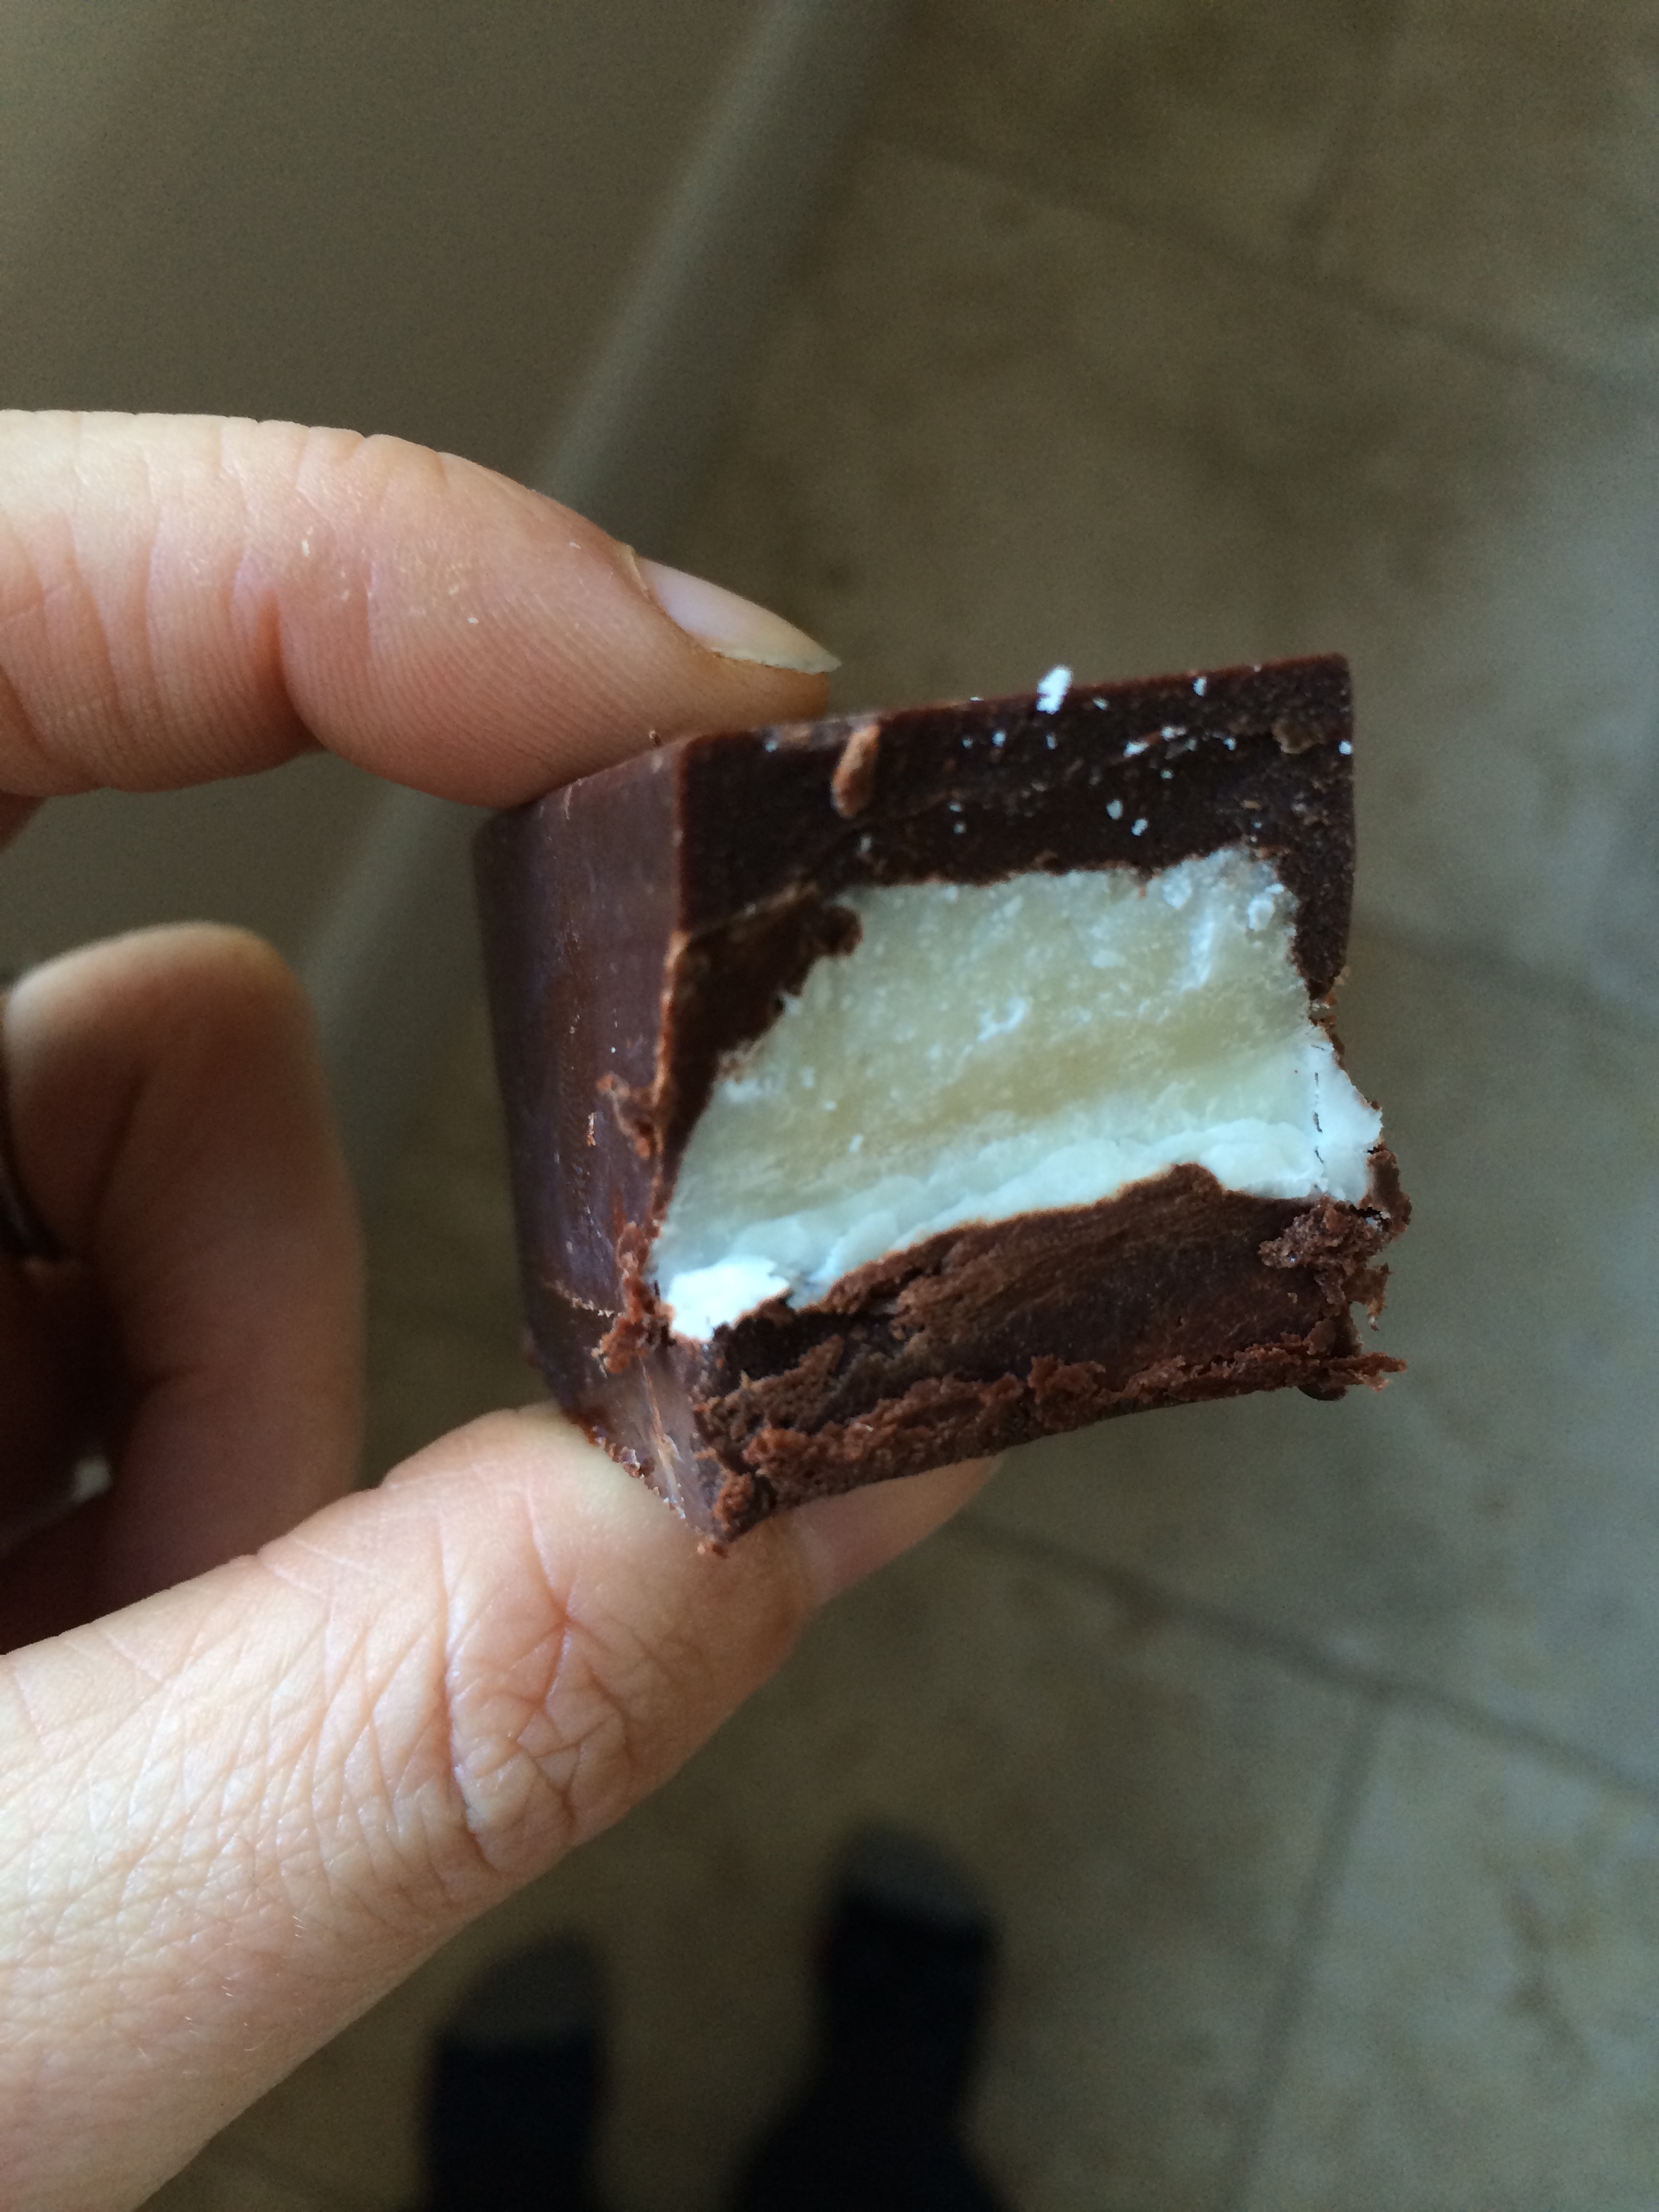
These are delish – a great alternative to a traditional “Bounty” bar and FAR healthier! They’re made with raw chocolate so they’re full of antioxidants and the coconut centre is pure coconut, nothing else!

2014-04-15 17.33.27

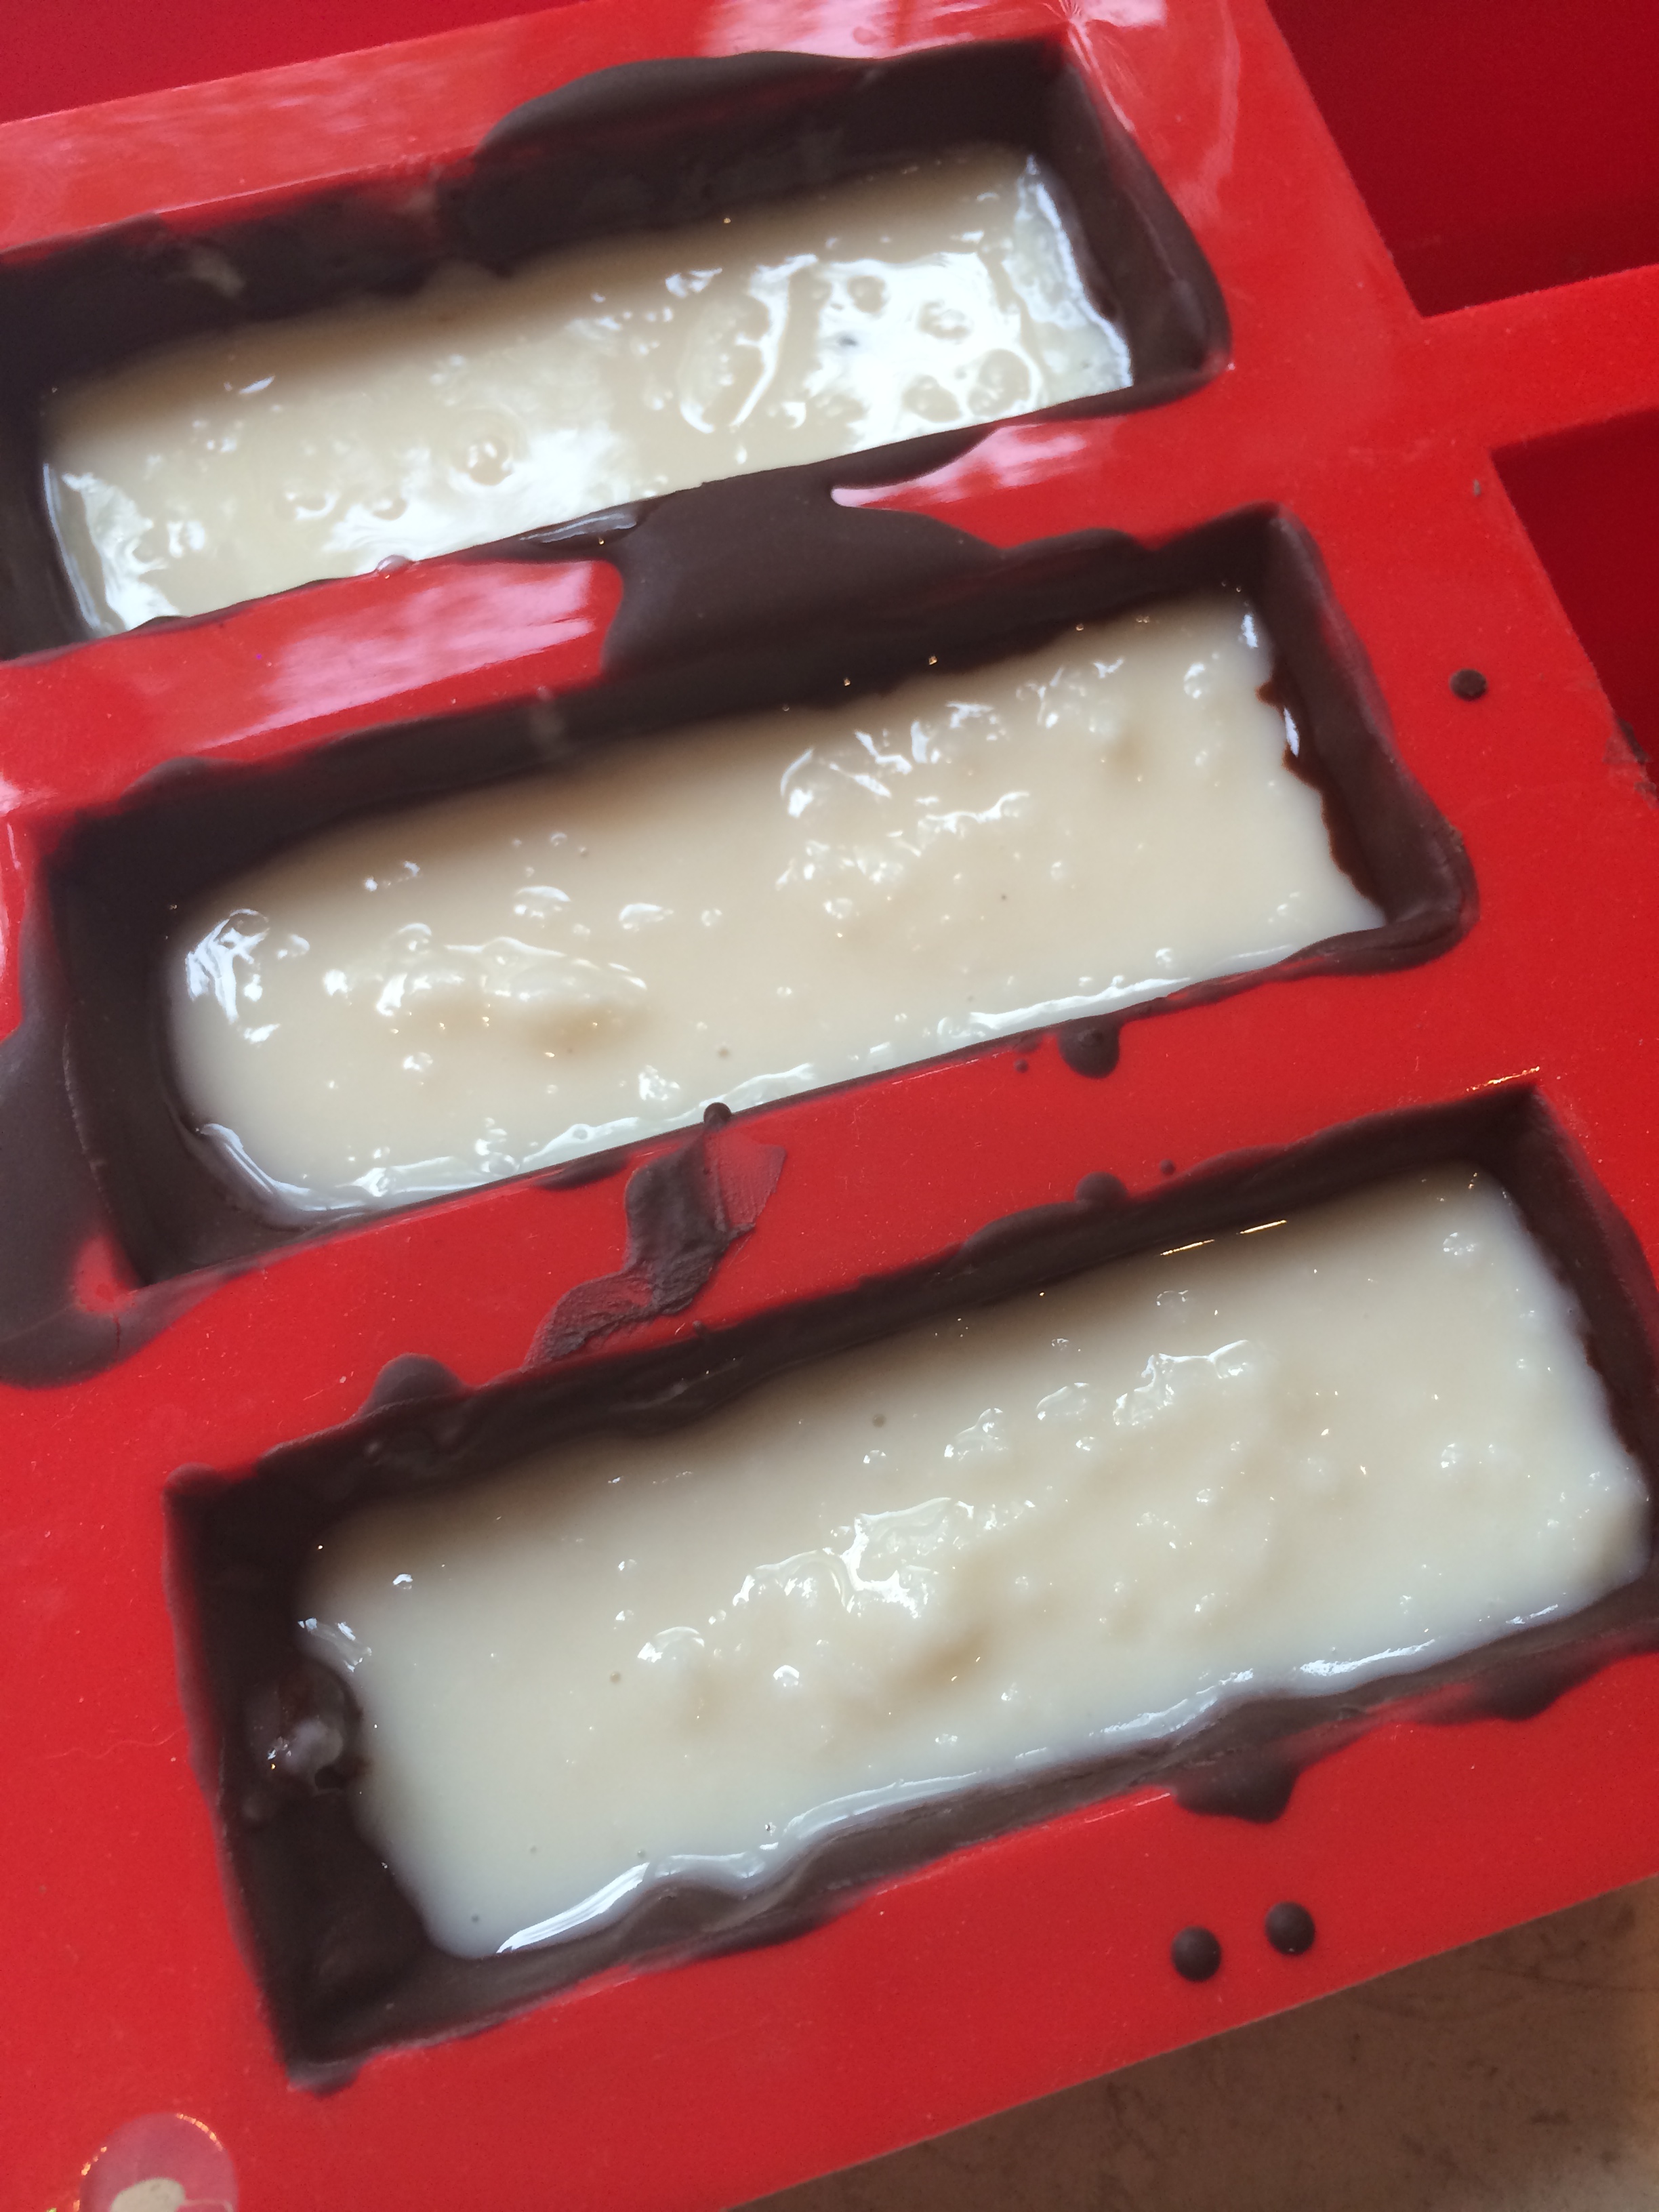
You will need some sort of mould for this – it can be any shape and any size you like! I’ve gone for a rectangular one as I happened to have one in my cupboard but anything will do.

For the chocolate you will need:

1 cup Cacao butter (melted)

1 cup Raw Cocoa powder

1/3 Cup Maple syrup (or other liquid sweetener)

For the filling you will need:

A few tbsp desiccated Coconut (adjust quantity to taste)

Coconut butter – the amount will depend on the size of your chocs so start with a small amount and it’s easy to make more as needed. You need to make sure you use a whole coconut flesh butter, rather than coconut oil. I used the Artisana brand.

2014-04-12 17.07.29

Start with the chocolate. Mix the cacao butter, cocoa and maple syrup together and ensure there are no lumps. Pour a small amount in to the mould – remember you are filling this so don’t fill the mould – probably aim for a third of the mould. Save enough to cover the filling later. You will probably find that it settles at the bottom leaving the sides with only a very thing layer. This is ok – just pop it in the fridge for now. After about 5 mins check it and as it’s beginning to solidify just swirl the mould around so the chocolate coats the sides too. Place back in the fridge until set hard (15 mins should do it).

Now prepare the filling. Just melt the coconut butter gently in a warm pan, stirring all the time. Add as much desicated coconut as you want to get the desired texture and then pour in to the chilled moulds. Place back in the fridge immediately until this has set (at least 15 mins)

2014-04-12 17.01.50

Cover the top with more of your raw chocolate mix (you may need to re-warm it if it’s started to set). Pop straight back in the fridge until properly set – 30 mins or more.

These are best kept in the fridge until you want to eat them and then remove them and allow them to warm very slightly at room temperature for a few mins before serving. I made my chocolate layers just a little bit thick… but I quite like that! 🙂

Enjoy!

2014-04-13 12.44.28

Advertisement

Guilt Free Goodies – a review


I had the great pleasure this week of being sent a beautiful box of treats from Guilt Free Goodies.

photo 3 (2)

This UK, home-based business is run by Natasha and her partner, who produce homemade, all natural, healthy goodies – from granolas, nut butters to delicious treats and cakes. They’re perfect for anyone looking for dairy-free treats, diabetics and those wanting refined sugar-free treats (only natural sweeteners are used) or following the “paleo” diet. They’re also great for anyone who’s just health conscious and wants to watch what they eat. They can also make most of their products (granola, bites, energy balls and butters) suitable for vegans (some products do contain egg or honey).

I was sent this delightful selection of:

Peanut butter surprise muffin

Cashew butter, coconut and blueberry energy balls

Honey and peanut granola

Salted caramel almond bites

The first thing I noticed is how lovely the packaging was – all the items are beautifully packaged with lovely little touches like the handwritten notes. They’re also really securely packaged so nothing was damaged in transit.

photo 1 (2)

As instructed I popped the almond bites in the freezer (top tip – highly recommended!) and the first item I tucked in to was the cashew, coconut and blueberry energy balls. After a busy morning teaching spin and bodypump I was famished and needed something quick to munch on. These really hit the spot – full of goodness and flavour. Really satisfying and tasty too – not too sweet but sweet enough to satisfy 🙂

photo 2 (3)

Later that afternoon I was in dire need of a boost so thought I’d try the granola next – I served it with some homemade compote from my friend Colette and a big dollop of soya yoghurt.

photo 5

It was absolutely divine – crunchy and crisp with a great mix of nut and fruit. The sweetness wasn’t overpowering either which was great. I had to eek it out as otherwise I’d have eaten it all in one go! As it’s full of good fats (from the nuts) it really sustained me for my evening classes which is exactly what I needed. This would be just as good served with a little almond milk or yoghurt for brekkie, or as a decadent treat you could serve it with some coconut yoghurt or ice cream for dessert! Yum!

photo 3 (3)

I saved the muffin for a mid-morning snack with a cuppa. This was a really nice treat. Now it’s not like a traditional muffin so don’t be surprised. It’s a lot smaller but it’s also much denser. I really like this about it – it’s moist and squishy (in a good way!) and although small it’s exactly the right amount for a snack. I loved the peanut butter in the middle of this one. The nice thing about these muffins is that they really fill you up in a way traditional muffins just don’t.

photo 4

I saved the best until last – the almond bites. I was most excited about these – they looked delicious and I’m such a sucker for anything almond-based so I had high hopes.

photo 2

I was not disappointed in the slightest. These were so good! They’re definitely best out the freezer – the base goes all crispy and the caramel stays soft. The combination of the caramel, a whole almond in the middle (!), and lovely chocolate on the top is just fab!

photo 3

So all in all I was really impressed with all these products. They certainly live up to their reputation and satisfy your cravings without ruining any of your hard work!

I just love that this is a home-run business, run by someone who clearly puts their heart and soul in to their products. I’d definitely recommend them so do go and try them. You can also buy hampers or sample boxes and they’d make great gifts for the health foodlovers in your life. I’m really looking forward to ordering some of Natasha’s other products now – especially the loaf cakes and nut butters! 🙂

You can find out more about the products and place orders from their facebook page – here: Guilt Free Goodies or their new online shop here: Guilt Free Goodies Eshop.

Do check them out! and if you do let me know what you think 🙂


Blackberry and cinnamon cakes with blackberry and mint swirled cashew cream!


I managed to get a mahoosive haul of wild blackberries last weekend so decided I’d better find some ways to use them! I fancied a light, muffin/fairy cake kinda thing for tea so came up with this little beauty. They’re delicious on their own, but if you want something a bit special then serve them with this blackberry and mint swirled cashew cream for a bit of afternoon tea!

photo 2 (2)

For the cakes you will need:

1 cup of non-dairy Milk
1 tsp Cider apple vinegar
1 1/4 cups Gluten-free flour or Spelt flour
2 Tbsp Cornflour
3/4 cup Raw unrefined sugar/ coconut palm sugar
3/4 tsp Baking powder
1/2 tsp Bicarbonate of soda
1/2 tsp Himalayan rock salt
1/3 cup Olive oil
2 1/4 tsp Vanilla extract
1 tsp ground Cinnamon
Blackberries – couple of handfuls (depending how large they are!)

For the cashew cream you will need:

A cup of cashew nuts (or however many you want to use!)
Some water
maple syrup/agave syrup/rice malt syrup (optional – to taste)
handful of Blackberries
handful of fresh Mint leaves
A blender/ vitamix

Soak the cashews overnight in water (so that they are well covered).

To make the cakes:

Preheat oven to 350 F. Put the milk and vinegar together in bowl and whisk together, then leave to curdle for a few minutes. Add the milk mixture, oil, sugar and vanilla extract to a large bowl and mix together. Sieve the flour, cornflour, cinnamon, baking powder, bicarbonate of soda and salt into the liquid mixture and stir well until no large lumps remain. Gently stir the blackberries in to the mix. Pour into cupcake liners in a muffin pan – this should make approximately 15 cakes. Make sure the blackberries are covered with batter (you may need to just gently push them down).

photo 2

Place in the oven for 20 – 25 minutes until a skewer inserted in the middle comes out clean. Once done place on a wire rack to cool.

photo 3

To make the cashew cream

Drain and rinse the soaked cashews and then pop them in to the blender. Start by adding about half as much water as cashews to the blender and give it a blitz. Continue adding water until the cashews are smooth and you have the consistence of cream that you want – less water, thicker cream! If you want to add some sweetness add your choice of liquid sweetener to taste.

Smoosh the blackberries up a little bit with the back of a knife, and chop the mint finely. Stir it in to the cream and adjust quantities to taste.

photo 5

Serve your cakes with a big dollop of the cream and a sprig of mint!

photo 1 (2)

Cashew Cream


I can’t believe I’ve waited this long to try making cashew cream! Thank you to my good friend Colette over at Colette’s Fitness Kitchen for the inspiration 🙂

photo

This is super easy. You will need:

A cup of cashew nuts (or however many you want to use!)

Some water

maple syrup/agave syrup/rice malt syrup (optional – to taste)

A blender/ vitamix

Soak the cashews overnight in water (so that they are well covered).

Drain and rinse them and then pop them in to the blender. Start by adding about half as much water as cashews to the blender and give it a blitz. Continue adding water until the cashews are smooth and you have the consistence of cream that you want – less water, thicker cream! If you want to add some sweetness add your choice of liquid sweetner to taste. That’s it! Easy! 🙂

photo 5


Chocolate Cherry Brownies – gluten and dairy free


My hubby and I had a rare evening out last night with some very good friends to go and watch “Dirty Dancing” at the open air cinema. Tasked with providing dessert I decided I’d go for some good old chocolately goodness and whip up a new version of my brownies for us to munch on whilst watching the film… They’re almost as tasty as Patrick Swayze 😉

The sweet-sour of the cherries works so well to balance out the rich chocolate in these and they’re brilliant served with berries and some cashew cream (recipe here) for a decadent (but not too bad for you) dessert.

photo 4

You will need:

1/4 cup Rice flour

1/2 cup Ground almonds

1 cup unrefined Raw sugar (golden caster sugar, coconut sugar etc)

1/2 cup almond oil (or coconut oil)

1/4 cup raw Cacoa powder

2 tbsp chia seeds soaked in 6 tbsp water

1/2 tsp Himalayan rock salt

1/4 tsp Bicarbonate of soda

1 tsp Vanilla extract

100g dried Cherries

Dairy free chocolate (I use Willie’s cacao drops) – about a handful (approx 100g)

For Icing

100g Dairy free chocolate (again I use Willie’s cacao drops)

100 – 200g Unrefined icing sugar (adjust quantity to depending how runny you want your icing)

Freeze dried Cherries to decorate

Preheat the oven to 170C and grease a 20 x 20cm square baking pan with parchment paper.

Mix the ground almonds, flour, cacao powder, sugar, salt and bicarbonate of soda together in a large mixing bowl. In a separate bowl soak the chia seeds in the water. Once the chia seeds have absorbed all the water add them to the mix along with the vanilla extract, and oil. Whisk together using a hand mixer until well mixed. It should be thick and glossy when mixed.

Stir in the chocolate and cherries (cut them in half if they are large). Pour in to the baking tin and place in the oven for 25 – 30 mins until a skewer inserted in the middle comes out clean.

Cool on a wire rack

Then prepare the icing. Melt the chocolate and then stir in the icing sugar a little at a time until you get the consistency you want. Spread quickly on to the brownies and sprinkle the freeze dried cherries and any other decorations you want to use on to the top!

photo 1

Then enjoy (preferably with a side helping of Patrick Swayze 😉 )

photo 3