For we all like Figgy Jam……. Fig and Ginger Jam!


This is so easy and so delicious! I’ve been trying to add a bit more ginger in to my diet lately as it’s so good for your stomach and helps with the digestion of other nutrients. It’s also a fab anti-inflammatory so is brilliant for muscle and joint aches. Apparently it has aphrodisiac properties as well!!!

Figs are also brilliant for you – they’re full of fibre and are a great source of potassium and calcium and they taste yummy! πŸ™‚ So this jam is perfect! It’s really easy to make and tastes divine.

IMG_0042

You will need (makes one small jar):

250g fresh, ripe Figs

2 tbsp Maple syrup (or your liquid sweetener of choice – agave, honey, rice syrup etc)

1.5 tbsp Lemon juice

zest of 1/2 Lemon

3/4 tsp ground Ginger

1/4 tsp ground Cinnamon

Cut the figs in to quarters (or smaller if they are very large) and pop in a saucepan. Add the other ingredients and then bring to a simmer over a medium heat, stirring all the time.

IMG_0031

Don’t let the mixture boil but keep it simmering for about 30 – 40 minutes or until the fig has started to break down and it takes on a jammy consistency! Taste (carefully – it will be hot!) and adjust the sweetner if required.

IMG_0034

Take a clean glass jar and rinse with warm soapy water (or pop through the dishwasher). Dry it well and then place it in to the oven at about 180 C for approx 20 minutes. Remove carefully and then add the jam to the jars while they are both still hot. Pop a lid on and once cool place in the fridge. This should keep for a few weeks at least.

Enjoy your jam spread on some yummy rye toast with a nice cup of tea πŸ™‚

Ninjabread men! Chocolate, cherry and ginger dairy free biscuits


Gosh it’s been a long time since i’ve had time to bake – sorry! Real life has got in the way (in good and bad ways!), but oh how i’ve missed it!

20130709-202434.jpg

Thankfully I had an excuse to bake again πŸ™‚ yippee! I wanted to make something yummy to celebrate (or rather commiserate) the last body combat class with a very special friend of mine. What better way to mark the occasion than by baking some funky little Ninjabread men! I used ginger, dark chocolate and dried cherries in mine but you could flavour the biscuits any way you like πŸ™‚

For the biscuits you need:

2 cups Spelt flour or gluten-free flour mix

1 cups Unrefined Icing sugar

6 oz Dairy-free margarine (get the best quality you can)

2 tsp ground Ginger

handful of chopped dried Cherries

handful of dairy free chocolate (I used Willie’s chef’s drops)

Ninja cutters (available online) or just use normal ginger bread man cutters πŸ™‚

Pre-heat the oven to 180 C. Put the margarine in a large mixing bowl, sieve the flour, icing sugar and ground ginger in and cream it together. Try not to over mix but make sure the margarine is properly mixed with the dry ingredients. Add the cherries and chocolate and combine well. Once it’s formed a dough wrap in cling film and chill for 30 mins. If you find the dough is too sticky then add some more flour.

Once chilled, roll out and use the biscuit cutter to cut out your little ninjas. Use a palate knife to transfer them carefully to a greased baking tray. Sprinkle with a little raw sugar if you like and bake for 8 – 10 mins, or until golden. Remove from the oven and allow to cool on the tray.

20130709-202620.jpg

Decoration

Once the biscuits are cool you can have some fun! I used a variety of ninja designs. For the dark icing you can get black food colouring or use melted dark chocolate. Unleash your best ninja using skills!! πŸ™‚

20130709-201914.jpg

20130709-201957.jpg

20130709-202032.jpg

Dark chocolate cherry cookies (dairy and gluten free! :) )


You’d think I’d be bored of biscuits by now …but no, I just keep thinking of new scrummy flavour combos! Today it’s dark choc and cherry – a winning combination. The tartness of the cherries works so well with the rich, dark chocolate πŸ™‚

20130315-184707.jpg

These use the same basic ingredients as my choc and ginger biccies but just replace the ginger with a handful of dried cherries! Simple! πŸ™‚

20130315-184759.jpg

Yummy mummy! Dark choc and ginger cookies (low gluten and dairy free!)


You may have noticed a certain penchant for cookies and biscuits lately? what can i say? I just love this simple recipe and how easy it is to customise it with whatever flavours you like πŸ™‚

20130310-094729.jpg

20130310-094807.jpg

So this weekend Mother’s Day and the return of my lovely friend from holiday inspired me to bake some more biscuits for both of them πŸ™‚ Both are fans of the combo of ginger and dark chocolate and they work brilliantly with these cookies. I also had some fun with a cool set of letter cutters (I’m such a child!).

20130310-095335.jpg

20130310-095345.jpg

You will need:

2 cups Spelt flour or gluten-free flour mix

1 cup Unrefined Icing sugar

6 oz Dairy-free margarine (get the best quality you can)

A handful of crystallised ginger

A handful of dairy free chocolate (I used Willie’s chef’s drops)

20130310-093326.jpg

Pre-heat the oven to 180 C. Put the margarine in a large mixing bowl, sieve the flour and icing sugar in and cream it together. Try not to over mix but make sure the margarine is properly mixed with the dry ingredients. Chop the ginger and chocolate into small pieces and add to the mix. Once it’s formed a dough wrap in cling film and chill for 30 mins (optional). If you find the dough is too sticky then add some more flour.

Roll the dough out and use cutters to cut your biscuit shapes and transfer to a greased baking tray. I found that this dough worked best as a thick biscuit (about half a cm). If you don’t want to roll it then take small balls and flatten on to the baking tray. Bake in the oven for 10 – 12 mins or until as brown as you like them (I like my biscuits bordering on burnt so I kept them in a little longer! πŸ™‚ ).

If you have some letter cutters (or you’re handy with a knife and can freehand them) then you can have fun spelling stuff in biscuit form! πŸ˜‰

20130310-095722.jpg

Lemon Drop Shortbread Biscuits (gluten and dairy free and oh so yummy!)


As we move from winter in to spring my thoughts turn to lighter bakes and lemon always features highly in my list of spring and summer baking yumminess!Once again this is the result of a little seed planted in my head by my good friend Colette (anyone would think she had a bit of a thing for these biscuit recipes… πŸ˜‰ ).

IMG_0470

This is super-easy and fun – perfect to make for the kids and can be done pretty quickly after school or on a sunday afternoon. Equally yummy for adults too though! πŸ™‚

IMG_0475

You will need:

2 cups Spelt flour or gluten-free flour mix

1 cup Unrefined Icing sugar

6 oz Dairy-free margarine (get the best quality you can)

zest of 2 small Lemons

1 tbsp fresh Lemon juice

Dairy- free (or non dairy free if you want!) Lemon curd – it will depend how much you use but less than half a jar should do it πŸ™‚

Pre-heat the oven to 180 C. Put the margarine in a large mixing bowl, sieve the flour and icing sugar in and cream it together. Try not to over mix but make sure the margarine is properly mixed with the dry ingredients. Add the zest and lemon juice and combine it well. Once it’s formed a dough wrap in cling film and chill for 30 mins (optional). If you find the dough is too sticky then add some more flour.Β  Once chilled, make small balls of dough (approx 1 inch diameter) and pop them on a greased baking tray. Push them down to flatten them and use your thumb to create a deep hollow in the centre. Prick the bottom of the hollow with a fork.

IMG_0463

Bake for 8 minutes. Then remove from the oven and spoon in a small amount of lemon curd in to each hollow.

IMG_0466

Bake for a further 2 minutes or so, or until golden. Remove from the oven and allow to cool on the tray. Be very careful when you remove them from the oven as the curd will be molten! Avoid the temptation to eat them straight away (trust me on this one!), just allow them to cool a little before you tuck in! πŸ™‚

IMG_0476

Cherry, macadamia, coconut and white chocolate shortbread biscuit recipe :)


Ok, I think I need new friends, or maybe I need ones that don’t have such great ideas…. Once again I find myself in my kitchen, baking biscuits at nearly 11pm….Definitely worth it though (thank you my lovely friend Colette from Colette’s Fitness Kitchen for planting yet another seed in my head for some scrummy biscuits!).

IMG_0382

So it’s the same biscuit recipe as before but this time I’ve added in:

approximately 100g Dried cherries

approximately 75g Macadamia nuts

100g of good quality white chocolate (omit this if you want it dairy free – or better yet replace with dairy free dark chocolate! yummo!)

a handful of dessicated coconut!

IMG_0380

Chop the cherries, nuts and chocolate fairly small and then add all of the ingredients in to the dough at the end and ensure they’re mixed well throughout. You can just make little round dollops of these, or you can roll them out (gently!) and use a cutter as I’ve done.

IMG_0377

They will be bit thicker so may need longer in the oven. Enjoy! πŸ™‚

Oh and I should say… they are also yummy with the raspberry icing on…! πŸ™‚

IMG_0379

Give the gift of yumminess this valentine’s day – quick gift idea!


These valentine’s biccies would make a fab present for the one you love πŸ™‚ Whip up a batch of normal or coconut biccies, with or without icing and pop a load in a cellophane bag. Tie with a pretty ribbon and voila! One lovely home made gift of love! IF you can bear to give them away! πŸ™‚

20130212-135211.jpg

20130212-135345.jpg

Coconut Dairy-free Valentine’s day shortbread biccies! :)


Apparently I’m very suggestable… which is why I found myself in my kitchen at 11pm on a Monday night making more biscuits! What, I hear you cry? has she not made enough biscuits already! Well no, apparently not! A very dear friend, who shall remain nameless (though her name begins with a C, has an o, two l’s and a couple of e’s and t’s in it…….) suggested to me this evening that those valentine biscuits would be even better with some dessicated coconut in them… now I’m a massive coconut fan and though it pains me to admit when she’s right… she was right, in fact she was damn right!

IMG_0352[1]

I went straight home and whipped up a batch! (well after a trip to the local shops for some ingredients!)…. and wow are they good! Seriously you need to try this! I think they’ll work brilliantly with the raspberry icing too – I just ran out of icing sugar so couldn’t ice them tonight!

IMG_0356[1]

So it’s the same recipe as beforeΒ  ( i halved it this time) with some dessicated coconut added

2 cups Spelt flour or gluten-free flour mix

1 cups Unrefined Icing sugar

6 oz Dairy-free margarine (get the best quality you can)

Approx 1/2 cup (to be honest I just shook a load in from the tub but just try a little at a time and keep working it in until it’s evenly spread throughout the dough!)

Pre-heat the oven to 180 C. Put the margarine in a large mixing bowl, sieve the flour and icing sugar in and cream it together. Try not to over mix but make sure the margarine is properly mixed with the dry ingredients. Add the dessicated coconut as the dough starts to come together and ensure it’s evenly distributed throughout. Once it’s formed a dough wrap in cling film and chill for 30 mins. If you find the dough is too sticky then add some more flour.Β  Once chilled, roll out and use a biscuit cutter to cut whatever shape you have. Sprinkle with a little raw sugar if you like and place on a greased baking tray and bake for 8 – 10 mins, or until golden. Remove from the oven and allow to cool on the tray.

IMG_0354[1]

A host of Valentine’s treats! Dairy-free shortbread biccies with natural pink raspberry icing


I got a little over-excited in the biscuit-cutter section of the cake shop and end up with a loast of new valentine’s cutters! So here, for you, is a feast of valentine’s biccies for the one you love (in my case, that’s me! ha ha!) πŸ™‚

IMG_0163

All the biscuits are based on the same biscuit recipe which I’ve posted before – here but here it is again for ease. This makes LOADS of biscuits so you may want to halve the amount to start with.

4 cups Spelt flour or gluten-free flour mix

2 cups Unrefined Icing sugar

12 oz Dairy-free margarine (get the best quality you can)

Pre-heat the oven to 180 C. Put the margarine in a large mixing bowl, sieve the flour and icing sugar in and cream it together. Try not to over mix but make sure the margarine is properly mixed with the dry ingredients. Once it’s formed a dough wrap in cling film and chill for 30 mins. If you find the dough is too sticky then add some more flour.Β  Once chilled, roll out and use a biscuit cutter to cut whatever shape you have. Sprinkle with a little raw sugar if you like and place on a greased baking tray and bake for 8 – 10 mins, or until golden. Remove from the oven and allow to cool on the tray.

Cutting and Decorating!

You can use any cutters you like but I had the pleasure of trying out all my new valentine’s ones! It was such fun! For most of the biccies I just sprinkled with raw sugar. I had a wonderful set of hearts that decrease in size so I had a lot of fun with those.

IMG_0179 _MG_8051

Then I also had some with lovely little messages stamped in them.

IMG_0191

Those were all plain, but for other’s however I made some pink icing using raw icing sugar and raspberries. Simply pop a handful of raspberries into a fine mesh sieve and using the back of a spoon crush them through the sieve. You will end up with a lovely raspberry puree. Don’t throw away the seeds and pulp left in the sieve, you can whack this in to your next smoothie! πŸ™‚ Use this, instead of water, to make your icing. I simply used raw icing sugar (you can use normal icing sugar if you prefer) and the raspberry puree. I added a little at a time until I had the consistency I wanted. If you want it runnier, add a little water, if you want it less pink then add more icing sugar and water down the puree a little and just experiment!

For these adorable ‘his and hers’ jigsaw hearts I used a piping bag to pipe a thin line of slightly darker icing around the edges and then filled the middle! You could use white icing to pipe names on each half. Allow to set and then share with the one you love πŸ™‚

IMG_0192 IMG_0248

I then had a go at just smothering the little hearts in icing – yum!

IMG_0567 IMG_0560

And finally (for the icing fun) I had a go at filling in the messages on the shortbreads. This was super fiddly but I think it looks fab! I used a cake skewer dipped in the icing to fill the letters!

IMG_0250 IMG_0263 IMG_0206

Valentine’s day wouldn’t be valentine’s day without a bit of chocolate! So I had a go with that too! I just melted some high quality, dairy free chocolate and filled the letters with it in the same way as the icing. This was messy and didn’t work out quite so well but I think with a bit of practice it will! πŸ™‚

IMG_0259

Finally I made some little double hearts. Once again I piped an icing border around them and then I filled the centre with chocolate.

IMG_0568

Simply Dazzling! Dairy-free ice cream from Razzle Dazzle Ices


I have had the immense pleasure of being able to review some delicious vegan ice creams from Razzle Dazzle Ices recently and I’ve been dying to tell you all about them!

_MG_7645-2

Razzle Dazzle Ices are based in the West Country so not available across the UK yet, though their stockists are increasing by the day and I hear one day they may be able to send mail-order deliveries too (oooh I can’t wait! πŸ™‚ ). They’re a small, family-run company who have developed these ices themselves for their own son and we have the pleasure of benefitting from that. They believe in being environmentally friendly and have great business ethics so they’re pretty much good guys all round in my book!

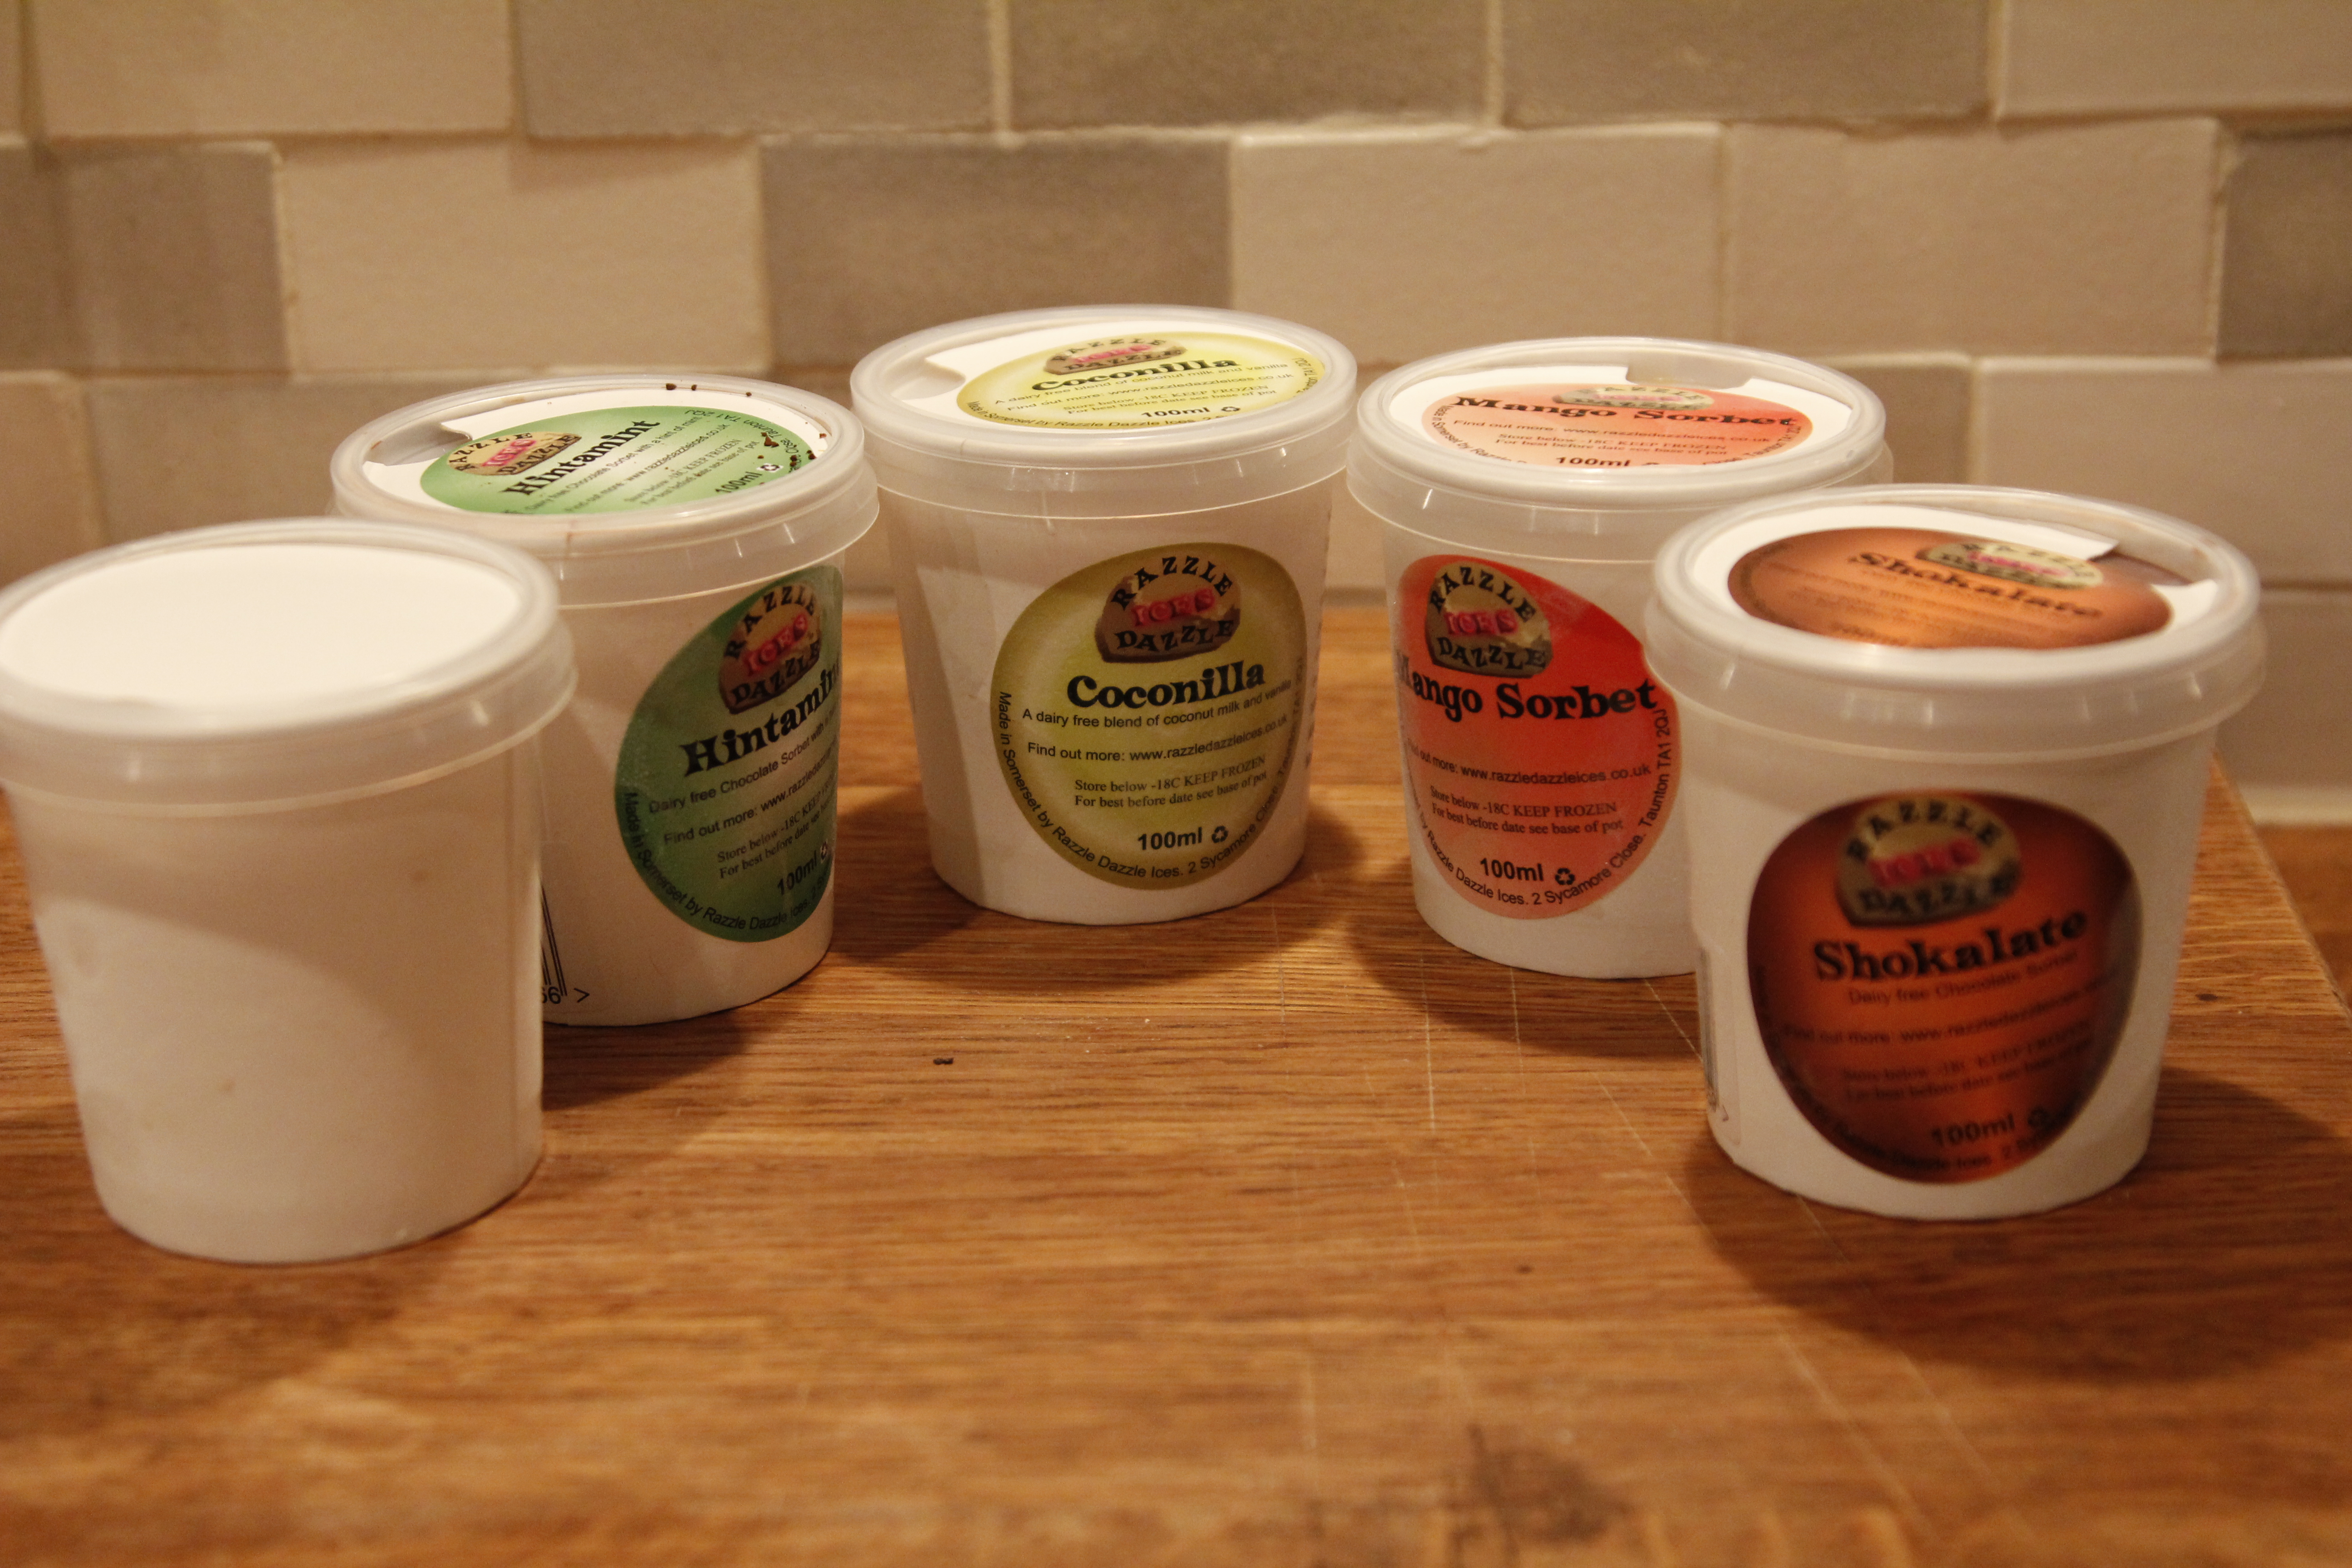
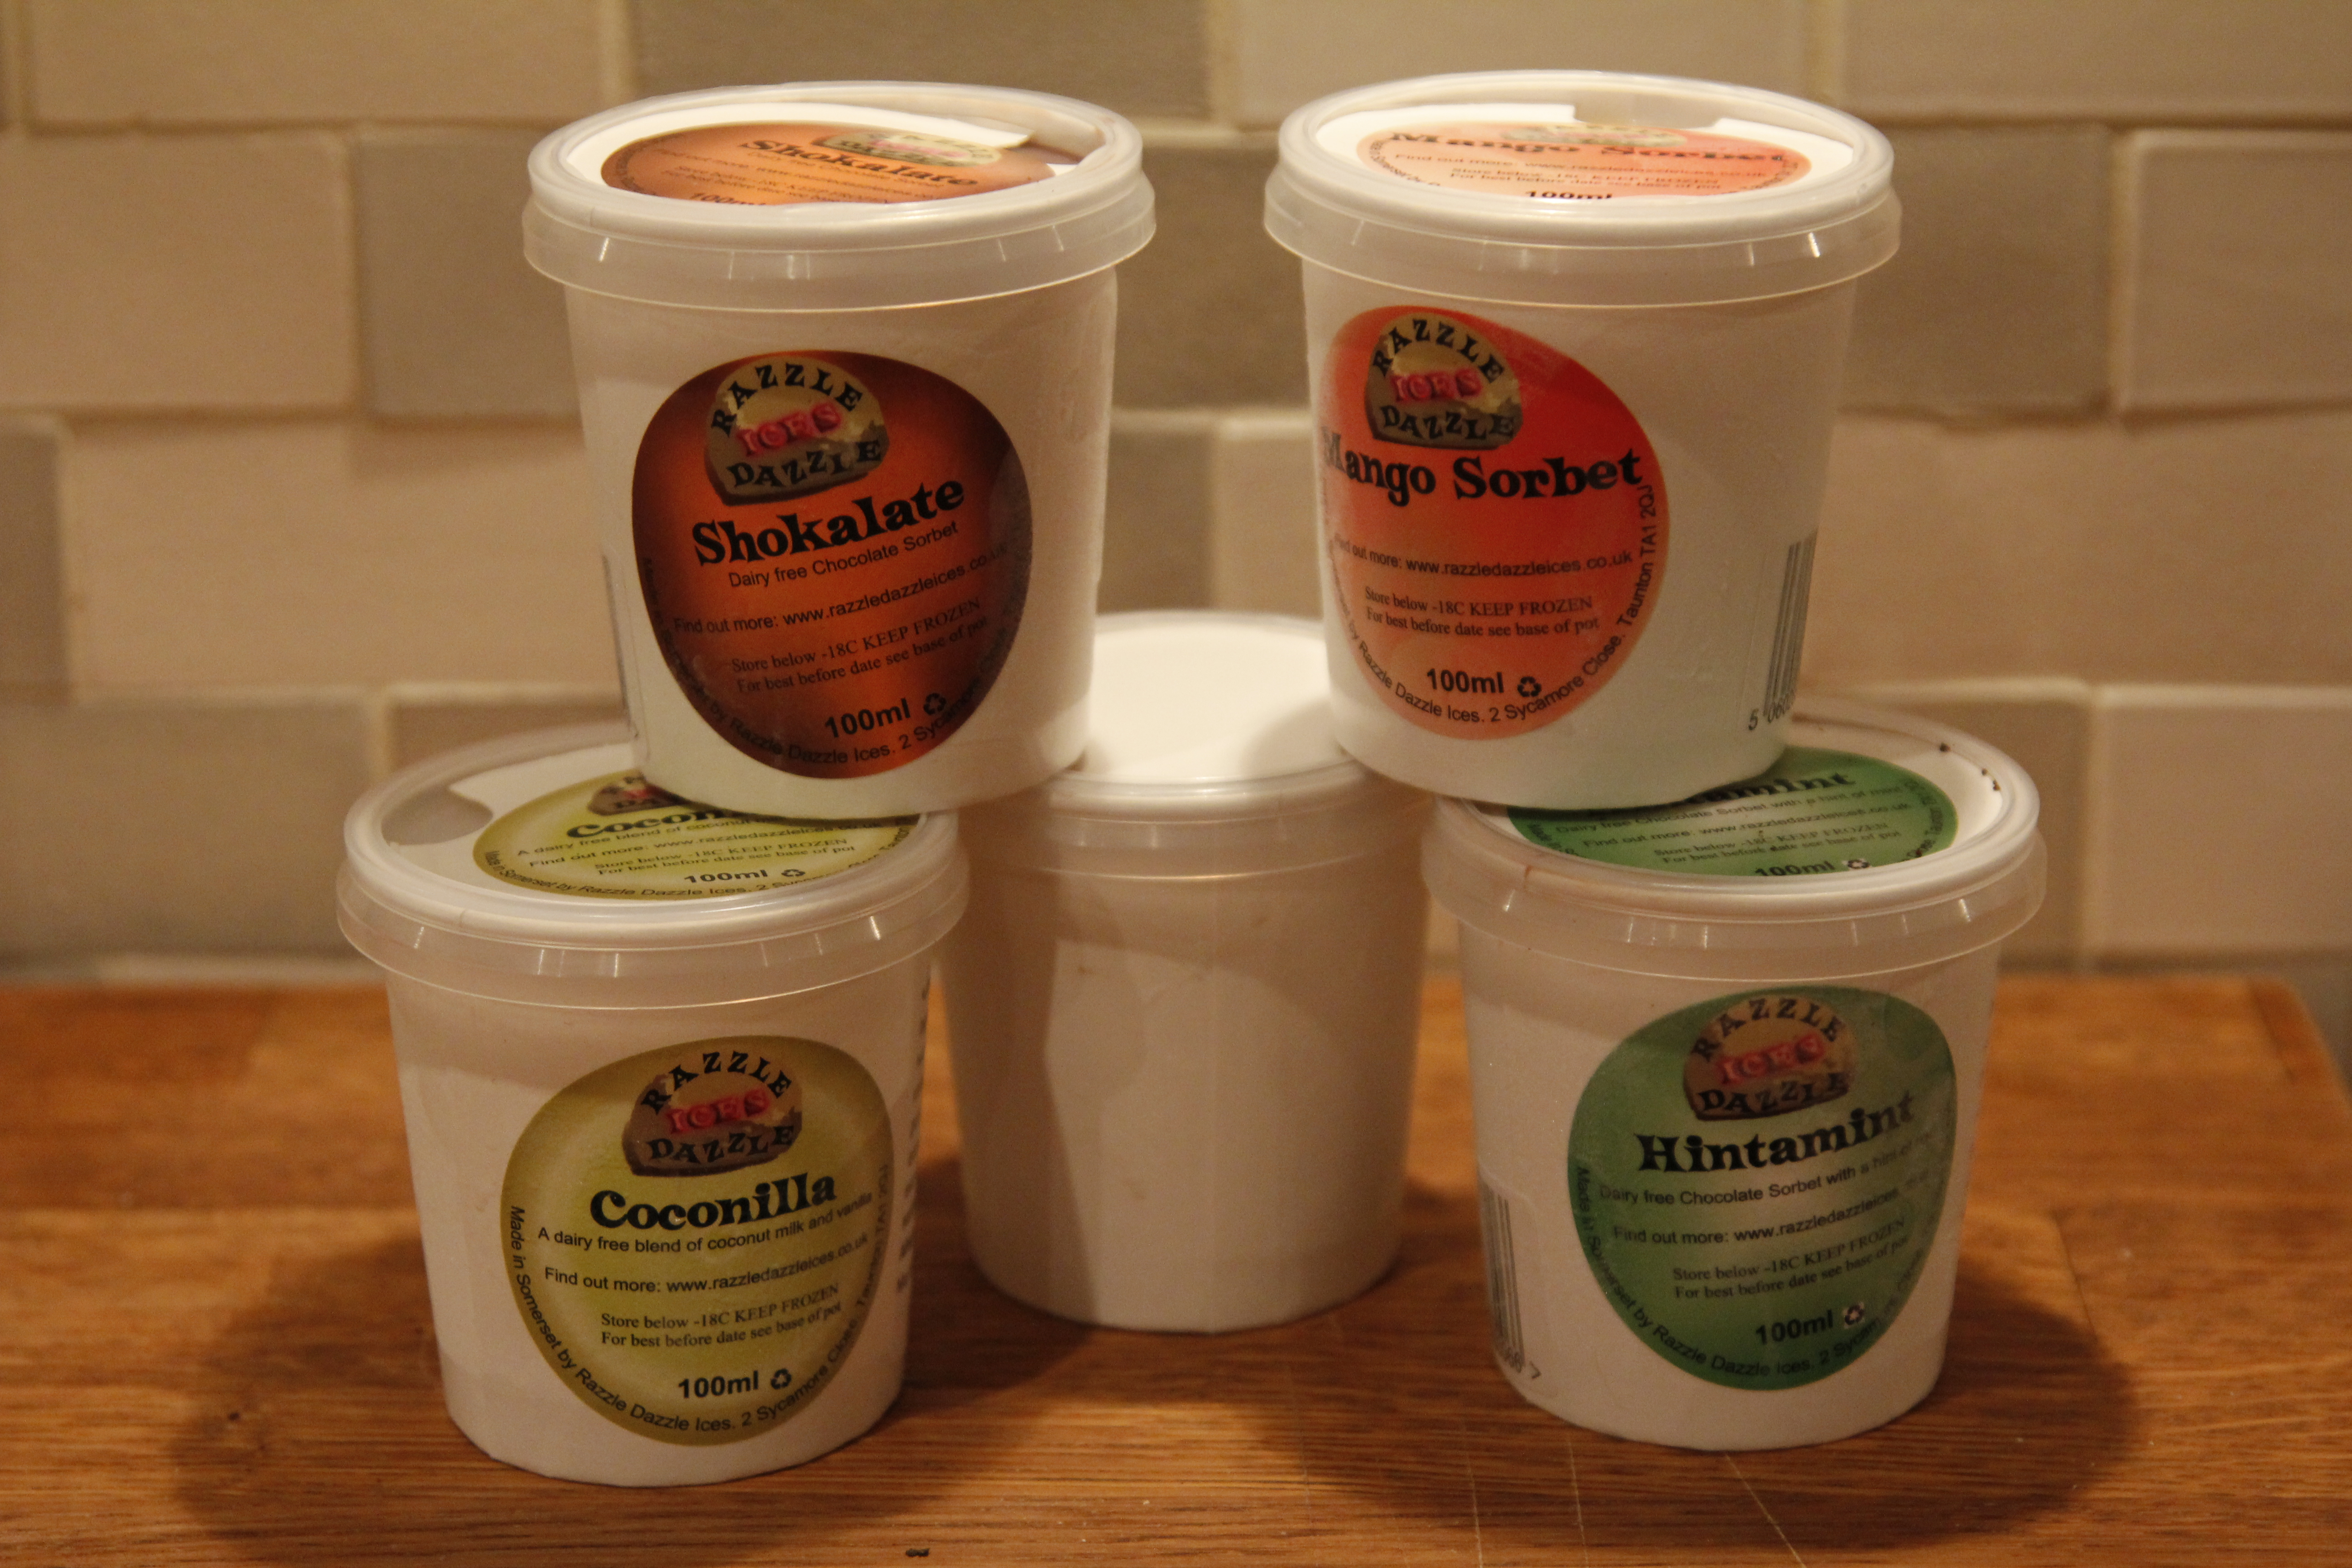
I was lucky enough to be given 5 flavours to try, each in 100ml pots: Mango Sorbet, Coconilla, Cocodough, Hintamint and Shokalate. They are essentially sorbets but you wouldn’t know that, they give the impression and mouth-feel of a lovely, creamy dessert. I’ll give my thoughts on each on in turn.

_MG_7643-2

Coconilla

A blend of coconut and vanilla ice which is lovely and smooth and creamy. The coconut gives it a really smooth texture and removes any trace of that artificial flavour you can sometimes get with vanilla. The coconut is delicate though so doesn’t over power the vanilla at all. This is lovely on it’s own but even better alongside a vegan brownie or some fresh fruit.

Cocodough

Now I’m not a raw cookie dough fiend so I didn’t expect to fall in love with this flavour. It uses the coconilla as it’s base and has chunks of vegan cookie dough interspersed in it. My fears were wiped away with the first mouthful! The sweetness and stickiness of the cookie dough is balanced really nicely with the ice cream and you get just enough of both to feel like you’re getting something naughty but not tooooo naughty!

Mango Sorbet

Divine. That’s all I can say about this! It’s so refreshing and delicious, and not in the slightest bit grainy or full of ice crystals. It’s so smooth it’s more like ice cream than sorbet and there’s no articificial fruit flavour that you can sometimes get in sorbets – you can really taste those fresh mangoes!

Shokalate

Now I confess.. I am not a chocolate ice cream fan. I love chocolate, chocolate cake, chocolate biscuits, chocolate anything in fact, but not chocolate ice cream, I never have. I think I find it too sickly and sweet, so it was with trepidation that I opened this pot. Once again I have been floored! This is so good! It tastes like a really good dark chocolate ice cream and because it’s a sorbet (though frankly you wouldn’t notice that) you get a massive chocolate hit which isn’t diluted by all that nasty creamy milk flavour! It’s just amazing; rich, smooth and just 100% chocolatey.

Hintamint

In my humble opinion, I’ve saved the best for last. This is far and away my favourite flavour. As I’ve mentioned before my two big things are choc-orange and choc-mint flavours so I knew I’d like this but this is beyond like, I love this. I could literally bathe in this stuff! It is just so good. This is a classic combination and the intense, dark chocolate ice combined with refreshing mint oil works perfectly. This is perfect for after dinner but also makes a delicious, indulgent treat for any time!

_MG_7651-2

So “hintamint” is definitely my winner! Though it’s been a very tough call as they’re all so good! I shared my stash with my good friend Colette from Colette’s Fitness Kitchen (wishing I hadn’t now though… ;)) so I’ll be updating this with her views too. In the meantime I will continue to try to lick the remnants out of the bottom of the pots! A big thank you to Phil and Darrelle at Razzle Dazzle Ices for creating such amazing desserts (and for letting me review them!).

If you can find a way to try this ices you really must! They’re now being stocked in London (Ms Cupcake and a few other places) as well as in the West Country. Check out their website for your nearest stockist and enjoy!