Spice up your summer! Chocolate chilli cookies (dairy free, low/no gluten)


Chocolate and chilli – what better combination can there be?

I recently baked up another batch of these to welcome home a lovely friend from a trip away and they seemed to go down well so I thought I’d share! They were inspired by a chocolate cookie recipe I found years ago and modified but I can’t now find the original link – when I do I’ll add it! They’re quick and easy to make and taste divine! Oh, and a warning, they smell so good when cooking that it’s pretty hard not to eat them all right there and then!

Makes about 20 (depending how big you make them!)

You will need:

1 and 2/3 cups of white Spelt flour or a gluten-free blend
1/2 raw Cacao powder
1/2 cup Almond oil
1 cup Raw coconut sugar or other raw sugar
1/4 cup Maple syrup (the best quality you can get)
3 tbsp Almond milk (you could use soya or coconut milk too)
1 tsp Bicarbonate of soda
1/4 tsp hot Chilli powder (I used dried chillies, ground up – and they are hot!)
1/2 tsp ground Cinnamon
1/2 tsp Cayenne pepper
1/4 tsp Himalayan rock salt
1 tsp Vanilla extract
1 tsp Chocolate extract (optional – available from whole food stores, online, or Waitrose for those in the UK)

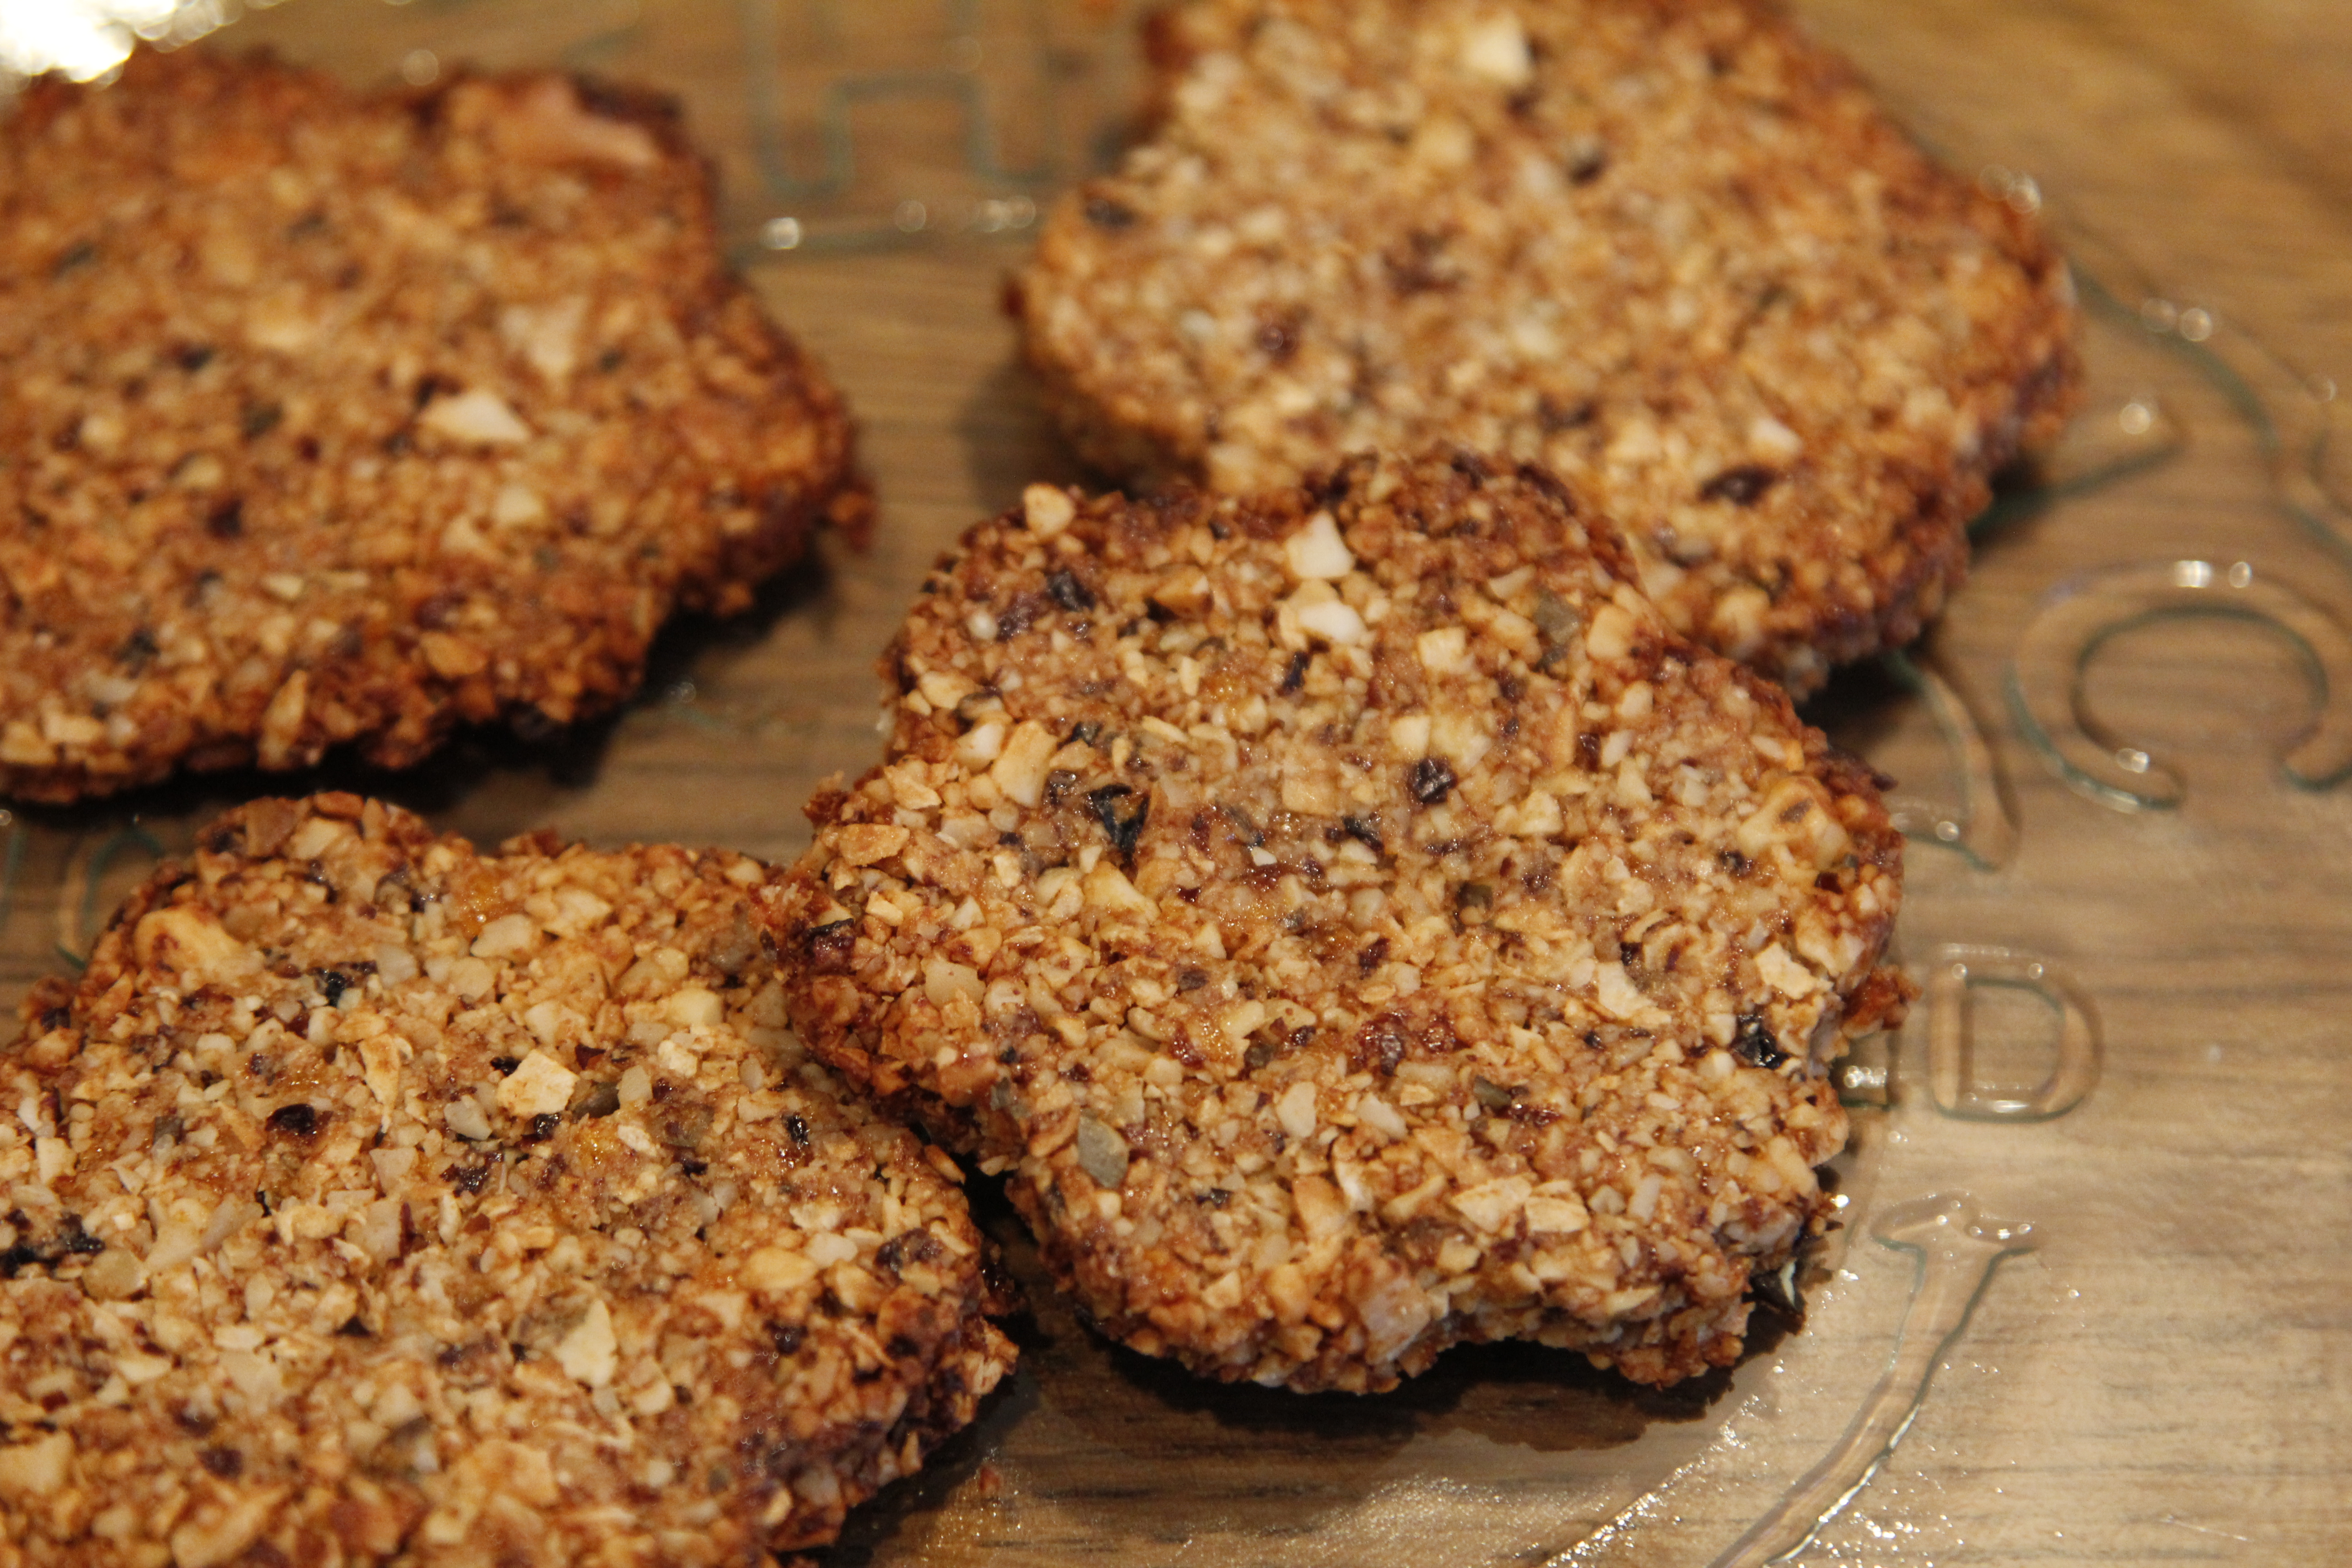
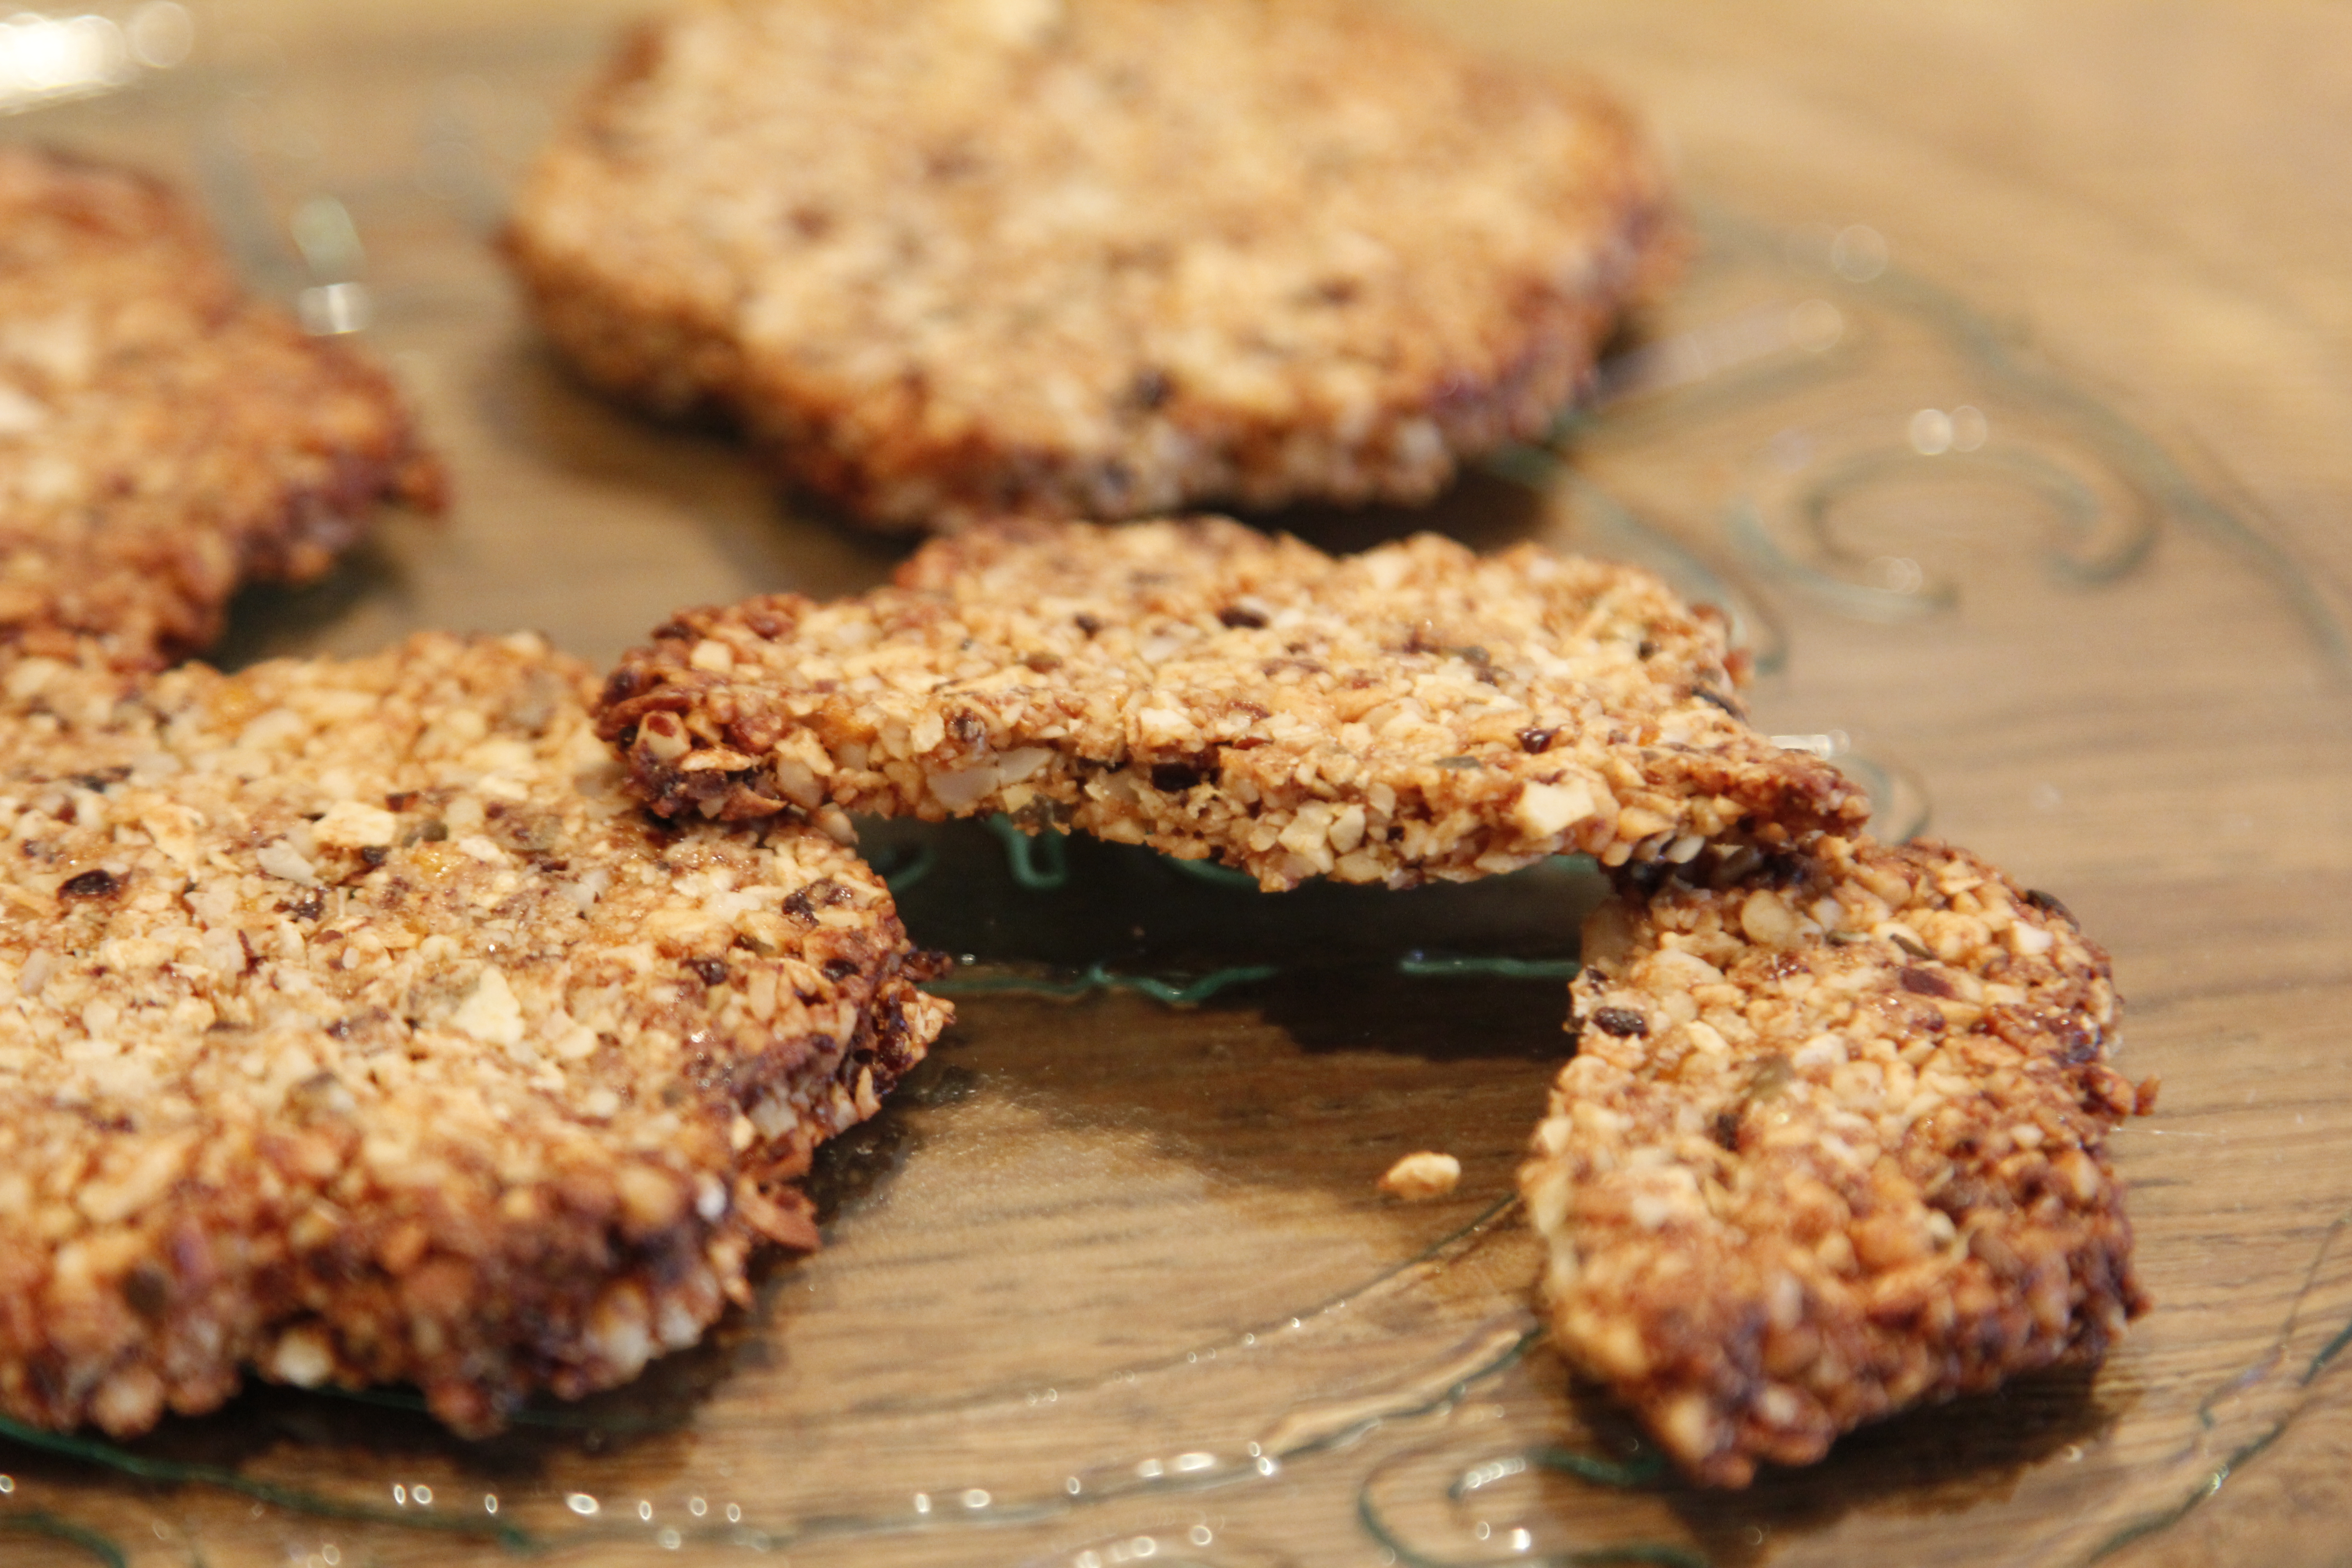
You will also need some cinnamon chocolate chilli sugar to coat them in 🙂 You can buy pre-mixed sugar, but I prefer to make my own. It’s easy! Just mix 100g sugar with 10g of cocoa powder, 2 tsp cinnamon and 1 tsp chilli powder (or more if you want it hotter!). Adjust the amounts depending how much you need but keep them in those ratios. Make up a batch and keep it in an airtight jar. Just shake before use as the sugar tends to sink to the bottom, leaving the lighter cocoa etc at the top.

Preheat the oven to 350 F and grease and line a baking tray (or 2!).

Put the oil, sugar, maple syrup and milk in a bowl and mix together using a fork. Add in the vanilla extract and mix well. Mix the rest of the ingredients in a large bowl and sieve in to the wet ingredients. Mix until you have a dough. The dough will be quite moist and sticky.

Put the cinnamon chocolate chilli sugar on a plate. Take small, walnut sized, balls of the dough and pat into the topping sugar to make discs about 2 inches across. Make sure they are well covered in sugar. Put them on to the baking tray with the sugar facing up. Cook for 10 – 12 minutes until they are crackly on the top and have spread a little. Allow to cool on the baking tray for 5 mins then transfer to a wire rack to cool.

Enjoy! :)

Scrummy Cinnamon Quinoa Porridge Recipe – Comfort brekkie :)


I fancied something a bit different for brekkie this morning as I’ve been slightly overdosing on the homemade granola lately! I’ve had a real hankering for quinoa too so I thought I’d sort out both issues in one fell swoop and make some yummy quinoa porridge. It’s very simple and very delicious! If you don’t like cinnamon just leave it out 🙂

_MG_7852

1/2 cup Quinoa

1 cup coconut/almond/soya milk (I used coconut milk today because I happened to have it!)

1/2 tsp coconut oil (not essential but adds a nice smoothness)

1 tbsp nut butter (again, not essential but adds flavour and smoothness) – I used almond butter today

1 tso Cinnamon

Toppings of your choice (I used nuts, dried fruit, coconut and apple compote)

Drizzle of date syrup / sweet freedom if desired

_MG_7860

Put the quinoa and milk into a saucepan and bring to the boil. Add in the cinnamon and put a lid on it and simmer gently for 10 – 15 minutes (until the quinoa has absorbed the liquid and is tender – add more milk if necessary). Half way through stir in the coconut oil and nut butter. Once the quinoa is tender spoon into a bowl. This amount will do one large portion or two small ones. It keeps in the fridge for a few days so you can save some if you want ( I confess, I ate it all!).

Add your desired toppings. I added a dollop of apple compote, toasted almonds and pistachios, dessicated coconut and some dried mixed berries (goji, blueberry, cranberry and golden raisins). Finally add a drizzle of date syrup if you like. Then enjoy! 🙂 This will definitely set you up for the day! Healthy and filling and absolutely scrummy 🙂

_MG_7856

Bananarama! Banana bread recipes :)


A glut of over-ripe bananas led to a bit of banana bread making so I thought I would re-post these two recipes. I’ve had a bit of fun with banana bread recently and a very good friend and I have done a blind banana bread tasting – 4 banana breads (hers and mine) so I’ll be posting the results of that soon! In the meantime though here are my two recipes 🙂

The first recipe is a dairy free, low gluten (spelt) banana bread and the second one is a modification of my  friend Colette’s mum’s recipe (modified to replace butter with oil and a few other little additions of my own) which does contain eggs (but these could be substituted out for apple puree).  Either of these recipes could have nuts added to them – walnuts would work particularly well, and if you’re feeling naughty you could throw in some dark chocolate chunks too!

Dairy free Banana Bread:

2 cups wholemeal spelt flour
1 cup coconut palm (or any unrefined) sugar
1/4 cup and 2 tbsps almond oil or olive oil
3 ripe bananas, mashed
1/4 cup soya milk mixed with 1 tsp apple cider vinegar
1/2 tsp baking soda
1 tsp vanilla extract
1 tsp cinnamon
1/4 tsp allspice
1/2 tsp himalayan rock salt

Preheat oven to 350 F / 175 C. Line and grease a small loaf tin (approximately 8 inches x 4 inches).

Mix the flour, baking soda, cinnamon, allspice and salt together in a large bowl. In a separate bowl mix the oil and sugar together until well combined. Add the mashed bananas and the soya milk (to which vinegar has been added) and the vanilla extract. Add this mix to the flour mixture and stir well. Pour into the loaf tin and place in the oven for an hour, or until a skewer inserted in the middle comes out clean. Once cooked remove from the oven and allow to cool in the tin for 5 mins then transfer to a wire rack to cool.

Colette’s mum’s modified banana bread:

2 cups white spelt flour
1 cup coconut palm (or any unrefined) sugar
1/4 cup and 2 tbsps almond oil or olive oil
4 ripe bananas, mashed
2 large eggs
1 tsp baking soda                                                                                                                      1 tsp bicarbonate of soda
1/2 tsp vanilla extract
1/2 tsp cinnamon
1/4 tsp allspice
1 tsp himalayan rock salt

Preheat oven to 350 F / 175 C. Line and grease a small loaf tin (approximately 8 inches x 4 inches).

In a large bowl mix the oil and sugar together until well combined, then add the mashed bananas and vanila extract. In a separate bowl mix the flour, baking soda, cinnamon, allspice and salt together.  Add half of this mix to the wet ingredients and mix well. Then add one egg and mix until combined. Add the rest of the flour mixture, stir well and add the final egg. Mix until well combined. Mix the bicarbonate of soda in 1/4 cup of hot water and stir in to the mixture. Pour into the loaf tin, sprinkle some unrefined coconut sugar over the top and place in the oven for an hour, or until a skewer inserted in the middle comes out clean. Once cooked remove from the oven and allow to cool in the tin for 5 mins then transfer to a wire rack to cool.


Fruit and Nut Cookies – gluten, dairy, fat and sugar free! omg!


I’m now mid week in to the first week of this amazing detox from Pure Form Fitness. I’ve done this programme before and I just love the energy it gives me and the results it achieves without leaving me feeling deprived or hungry. I also love the way it inspires me to create detox-friendly things to keep any rogue cravings at bay! These liitle cookies just sum up all of that! Fun and easy to make, delicious to eat and 100% detox friendly – just perfect with my afternoon cup of rooibos tea 🙂

_MG_7660-2

You can use any nuts and fruits you like but these are the ones I had in my cupboard and they seem to work well. If you substitute the fruit go for large, juice dried fruits like figs and dates, not things like blueberries etc.

_MG_7671-2

125g Almonds

75g Brazil nuts

40g Dried coconut flakes

85g Dried Prunes (or dates)

45g Dried apricots

20g Pumpkin seeds

15g Sunflower seeds

zest of 1/2 Lemon

1 tbsp freshly pressed Apple juice (or prune juice)

Preheat the oven to 150 C and line a baking tray with baking parchment.

Place everything in a food processor and pulse until the nuts and fruit are finely chopped and the mixture starts to come together. Add a little more juice if you find it’s too dry. You can either make small balls of the mixture and then flatten them on to a baking tray, or if you want pretty little shapes like my flower-shaped biccies then line a baking tray with baking parchment and tip the mixture in to it. Flatten the mixture down. I found the easiest way was to use a piece of baking parchment and then apply pressure with a palette knife or my hands. You want it to be about 5mm thick and well compressed. Use a biscuit cutter to cut out shapes and carefully transfer to another lined baking tray.

Bake in the oven for 15 minutes, or until firm, then cool on a wire rack. They will be a little pliable when removed, but as they cool they will harden.

Eat with a lovely cup of tea! 🙂

If you’re feeling decandent you can also add a layer of peanut butter and make a cookie sandwich! omg! 🙂

_MG_7687

Raw chocolate covered marzipan snowballs!


I had some left over marzipan and wanted to create a little treat for after dinner on christmas day so I thought I’d make some raw choc covered marzipan snowballs 🙂

IMG_9996

I used this marzipan recipe from my christmas cake post and for the chocolate you need:

35g Cacao butter

25g Raw Cacao powder

Sweet freedom to sweeten (up to 1/2 tbsp)

Extra raw cacao powder and dessicated coconut for decoration. Maybe some edible glitter too 🙂

IMG_9982

Grate the cacao butter into a small bowl and then place over a saucepan of water (bain marie). Heat the water gently and allow the butter to melt. Once melted whisk the cacao powder in with a small balloon whisk or fork. When thoroughly combined remove from the heat and stir in the sweet freedom. I like my chocolate quite bitter for this recipe so I only added a small squirt but add as much as you need 🙂

IMG_9978

Put some raw cacao powder in a small bowl and the dessicated coconut in another bowl.

IMG_9983

Roll the marzipan in to small balls and line up your bowls of chocolate, cacao powder and dessicated coconut. Drop the marzipan into the choc and used a fork to gently move around until covered. Then, if you’re using it, drop the ball into the bowl of cacao powder or dessicated coconut and gently shake it around to cover it. Remove and place on greaseproof paper. When they’re all covered pop in the fridge to set. This choc has a very low melting point so keep in the fridge until you want to serve. Enjoy! 🙂

IMG_9987


Cranberry and Apple Meringue pie! oh my!


Hands up if you love Lemon Meringue Pie! I do! And yes I know, meringue contains eggs, so I’m very sorry to my vegan friends (although you can use a commercial egg replacer for meringue so all is not lost!), but this festive meringue pie is gluten and dairy free 🙂 It’s a nice change to the usual festive fair!

_MG_6748

Pastry

100g Ground almonds
100g Flaked almonds
75g Spelt or Rice flour(or other gluten free flour)
25g Golden raw Caster sugar
50ml Almond oil
3 -4 tbsp cold almond or other non dairy milk
Pinch of Himalayan rock salt

Filling

4-5 Bramley apples, peeled, cored and thickly sliced
250g frozen or fresh Cranberries
juice of 1 clementine
75g Dried cranberries
1 tablespoon Corn flour
Raw unrefined sugar (if required)

Meringue

3 Large egg whites (or egg replacer)
150g Golden raw Caster sugar

Preheat the oven to 180 C. Put the ground and almonds into a bowl with the flour and salt and stir to combine. Keep stirring and add in the olive oil gradually. Add 2 tablespoons of almond milk and keep stirring. The mixture should hold together when pressed, if it doesn’t then add some more almond milk, stirring all the time, until it does. At this point have a taste. If you want a sweeter pastry then add some more sugar until you get the desired flavour. Press it into a 20 cm pie or fluted flan dish. Bake in the oven for 15 minutes or until set and barely golden.
Remove from the oven and brush the almond pastry with a little almond oil and return to the oven for a few minutes to set then set aside to cool.

Now for the filling! First you need to cook the cranberries. Place the frozen or fresh cranberries in a pan with the juice of 1 clementine (or half an orange if that’s easier!). Cook for 5 mins until the cranberries start to soften and burst. Taste – if too tart for you then add a little raw sugar. Put the apples, cooked cranberries and dried cranberries in a saucepan with 75ml water and bring to the boil. Simmer, partially covered, for 10 minutes.

Mix the corn flour with a tbsp of cold water till smooth then stir into fruit mixture. Boil for 1 minute then pour into the pastry case.

If using them then whisk the egg whites until stiff, then beat in the sugar, a third at a time, to form a thick meringue. Spoon over the fruit and bake 20-25 minutes until golden.
Leave to cool for a few minutes then transfer to a plate to cool.

_MG_6755

IT’s CHRISTTTTTMAAAAASSSS! :) A rich tasting christmas cake that’s gluten and fat free!


Well I had a special request to see if I could come up with a gluten free christmas cake. The big challenge was not only making it gluten free but also dairy free without turning to processed soya margarine… so I had little play around this week and I think I’ve got a winner here.  At first I wasn’t too sure about it, I was worried it was more of a bread pudding or tea loaf than a christmas cake. It’s now been tested by a good friend and christmas cake connoisseur and she gave it the thumbs up so I think it’s ready to be posted here!

IMG_9854

Gluten free flour blend:
65g Gram flour and 105g Rice flour
3/4 tsp Xantham gum
1 tsp Baking powder

or 170g White spelt flour for a low gluten option

For the rest of the cake:

85g Raw coconut sugar (or dark muscovado)
85g Currants
85g Sultanas
70g Raisins
25g Dried cherries– chopped
25g Dried cranberries
140ml Soya milk (or oat milk, rice milk, or coconut milk)
85g Ground linseed (just pop whole linseeds in a coffee grinder and whizz until powdery)
enough water to cover well.
Grated rind of 1/2 – 1 lemon
1/2 tsp Bicarbonate soda
1/2 tsp Cinnamon
1/8 tsp Nutmeg
1/8 tsp Ground cloves
1/2 tsp Mixed spice
pinch Himalayan rock salt
45ml Brandy (optional)

Sieve the gluten free flour blend (gram and rice flour, xantham gum and baking powder) (or spelt flour) together with the salt, cinnamon, nutmeg, cloves and mixed spice in to a large mixing bowl. Put the ground linseed into a small bowl and cover with water. Allow the linseed to soak up the water, then add a bit more, you want a gelatinous consistency. Stir it in to the flour mix. It will be quite hard to mix, add a little water if necessary, but not too much.

Stir in the sugar and dried fruit. Add the lemon rind and give it a good but gentle stir. Then add all but 2 tbsp of the soya milk and mix gently again. Gently warm the 2 tbsp of soya milk in a microwave or on the hob – don’t let it boil, just warm it (you should be able to put your finger in it without it burning!). Add the bicarbonate of soda to the warm milk and then add to the cake mixture amd stir gently until combined.

Pour the mixture into a lined 7 inch cake tin.  Smooth the top and make a small hollow in the centre. Bake at 180 C for one hour, then turn the oven down to 160 C and bake for a further 30 – 45 mins (or until a skewer insered in the middle comes out clean). Keep an eye on it while it’s baking.

Before you bake it you can add blanched almonds to the top. If you do this then make sure you check the cake regularly and when they start to brown cover the cake with foil for the rest of the baking time.

Once the cake is cooked remove from the oven and allow to cool for 5 minutes before removing from the cake tin. Allow to cool.

IMG_9843

If you are going to use the brandy then once the cake is cool prick it with a cocktail stick or a small skewer  and feed with a third of the brandy. Then wrap the cake in greaseproof paper and store in an airtight container. You can pour the rest of the brandy over the cake at weekly intervals. With the Brandy in it it will keep for up to a year (apparently!), without it will last 4 weeks if stored properly.

Obviously you can then add marzipan and royal icing to this. I am going to have a go at creating some dairy and gluten free marzipan and royal icing so watch this space!

IMG_9852

Chocolate banana bread! Omg!


So I have had some very ripe bananas hanging about in my kitchen for the past few days and decided I just had to do something with them… and it just had to be banana bread! But… I was in need of a chocolate fix….. and boy, is this a good chocolate fix!

I used my original non-dairy banana bread recipe with just a couple of additions:

2 cups wholemeal spelt flour
1/4 cup raw cacao powder
couple of handfuls of chopped non-dairy dark chocolate of your choice
1 cup coconut palm (or any unrefined) sugar
1/4 cup and 2 tbsps almond oil or olive oil
3 ripe bananas, mashed
1/4 cup soya milk mixed with 1 tsp apple cider vinegar
1/2 tsp baking soda
1 tsp vanilla extract
1 tsp cinnamon
1/4 tsp allspice
1/2 tsp himalayan rock salt

Preheat oven to 350 F / 175 C. Line and grease a small loaf tin (approximately 8 inches x 4 inches) or 6 mini loaf tins.

Mix the flour, baking soda, raw cacao, cinnamon, allspice and salt together in a large bowl. In a separate bowl mix the oil and sugar together until well combined. Add the mashed bananas and the soya milk (to which vinegar has been added) and the vanilla extract. Add this mix to the flour mixture and stir well. Finally stir in the chopped chocolate. Pour into the loaf tin and place in the oven for an hour, or until a skewer inserted in the middle comes out clean. Once cooked remove from the oven and allow to cool in the tin for 5 mins then transfer to a wire rack to cool. And then eat…. quickly.. while it’s still warm and the chocolate is still melted! yum!!


Kiwi loaf – dairy and gluten free and helps you sleep!


It’s been a busy couple of months since I got back from my trip to Indonesia and in that time as well as having loads on at work, we’ve had our kitchen re-done and a load of building work at home. As a result, not only have I not been able to do any baking, but I’ve found living in a building site has been impacting on my sleep! So I did some research and discovered that there’s pretty good evidence that kiwi’s (the fruit!) can help improve the quality and quantity of sleep you get (you can read my article about it here). That got me thinking about creative things to do with kiwi’s other than fruit salads! Lots of the research also suggests that a carb-based snack will also aid restful sleep so I thought I’d try combining the two. I stumbled across a recipe for kiwi bread some time ago so now that the kitchen is finally finished I decided to adapt it and give it a go. I wasn’t sure exactly how it would turn out but it’s actually really good and rather like banana bread. It’s not too sweet but you get lovely flavours from the spices which really complement the slightly tangy kiwi flavour – delish, especially warm!

1/4 cup Agave nectar or sweet freedom (or you could use honey or any liquid sweetner)

1/3 cup Almond oil (or other neutral oil)

1 tbsp Ground flaxseed (linseed) in 3 tbsp warm water (or you could use 1 egg)

1 and 1/2 cups gluten-free flour

1 cup kiwi pulp (approx 4 kiwi’s)

1/2 cup chopped nuts (I used hazelnuts and almonds as it’s what I had in the cupboard!)

1 cup Raisins

1 tsp Cinnamon

1/4 tbsp Ground cloves

1/4 tsp Himlayan Rock Salt

1 tsp Baking powder

Preheat the oven to 180 degrees CPut the ground flaxseed in the warm water and allow to thicken, then beat with the agave and oil until well mixed. Sieve in the flour, baking powder, salt and spices and combine. Then add the kiwi, raisins and nuts stirring gently. Transfer to a greased loaf tin and place in the oven for 40 – 45 minutes. Remove from the oven and allow to cool a bit before slicing (or it will crumble – as I discovered as I just couldn’t wait! 🙂 ). Enjoy slightly warm in the evening (or at any time of day to be honest!). Sweet dreams! 🙂

Chocolate hazelnut Biscotti – Dairy Free, Gluten Free and yet more chocolate!


As the end of chocolate week draws near I thought I’d finish with this little recipe which is another I’ve had for a while and not got round to posting. These do require double baking but it’s less of a faff than you think – honest! and it’s very much worth it!  I guarantee you won’t be able to tell these apart from “normal” (gluten filled, dairy filled) chocolate biscotti and they’re perfect with a cup of coffee over the weekend 🙂

I hope you enjoy it and do let me know if you try out this recipe and what you think of it (that goes for all my recipes!).

1/3 cup Almond milk
2 tbsp Ground linseed
3/4 cup and 2 tbsp Raw unrefined coconut palm sugar
1/2 cup Almond or Hazelnut oil
1/2 tsp Vanilla extract
1/2 tsp Almond extract
1 and 1/4 cups Spelt flour (wholewheat or white) or Gluten free flour blend
1/2 cup Quinoa flour (if you don’t have this add more spelt flour)
1/3 cup Raw cocoa Powder
2 tbsp Arrowroot powder or Cornflour (also known as cornstarch in the US)
2 tsp Baking Powder
1/2 tsp Himalayan rock salt
1 cup Whole, Raw Hazelnuts (these can be toasted first if you want really crunchy nuts!)

Preheat the oven to 350F/180C and grease a large baking tray very well.

In a large bowl, whisk together the milk and ground linseed for about 30 seconds. Add the sugar, oil and extracts and stir until smooth. Sieve in the flour, cocoa powder, arrowroot or cornstarch, baking powder and salt. Stir to mix and just as the dough starts to come together, knead in hazelnuts. Knead very briefly to form a stiff dough.

Transfer the dough to the baking sheet and form it into a rectangle (approx 12 inches long and 3 – 4 inches wide). Push in the nuts if they pop out! Bake for 20 – 25 minutes. It will rise and get a bit puffy and the top may start to crackle. Keep an eye on it from 20 minutes onwards as it can start to burn. Obviously remove if it starts to burn (this can be hard to see because of the chocolate colour so give it a good sniff if in doubt!) 🙂

Remove from the oven and allow to cool for 30 minutes until very firm.

Turn up the oven to 375F/190C. Carefully transfer the baked dough to chopping board and using a serrated knife, slice 1/2 inch slices. Push the knife down in one go, don’t use a sawing action as you will find the biscotti crumble. They are extremely delicate at this stage so you need to be gentle. I ended up with a fair bit of crumbling and breakage but that’s not the end of the world, it just meant I had lots of bits to taste! 🙂

Place the slices on the baking tray and bake for 12-15 minutes until brown and crispy. Don’t be tempted to over bake – they will still seem quite soft when you remove them from the oven but they will crisp up as they cool – I promise (Trust me, I’m a Dr 😉 ). Remove from the oven and allow to cool for a few minutes on the baking sheet before transferring the slices to a cooling rack. When completely cool, store in an air tight container and enjoy with a cup of your favourite coffee 🙂