Rasberry almond protein balls


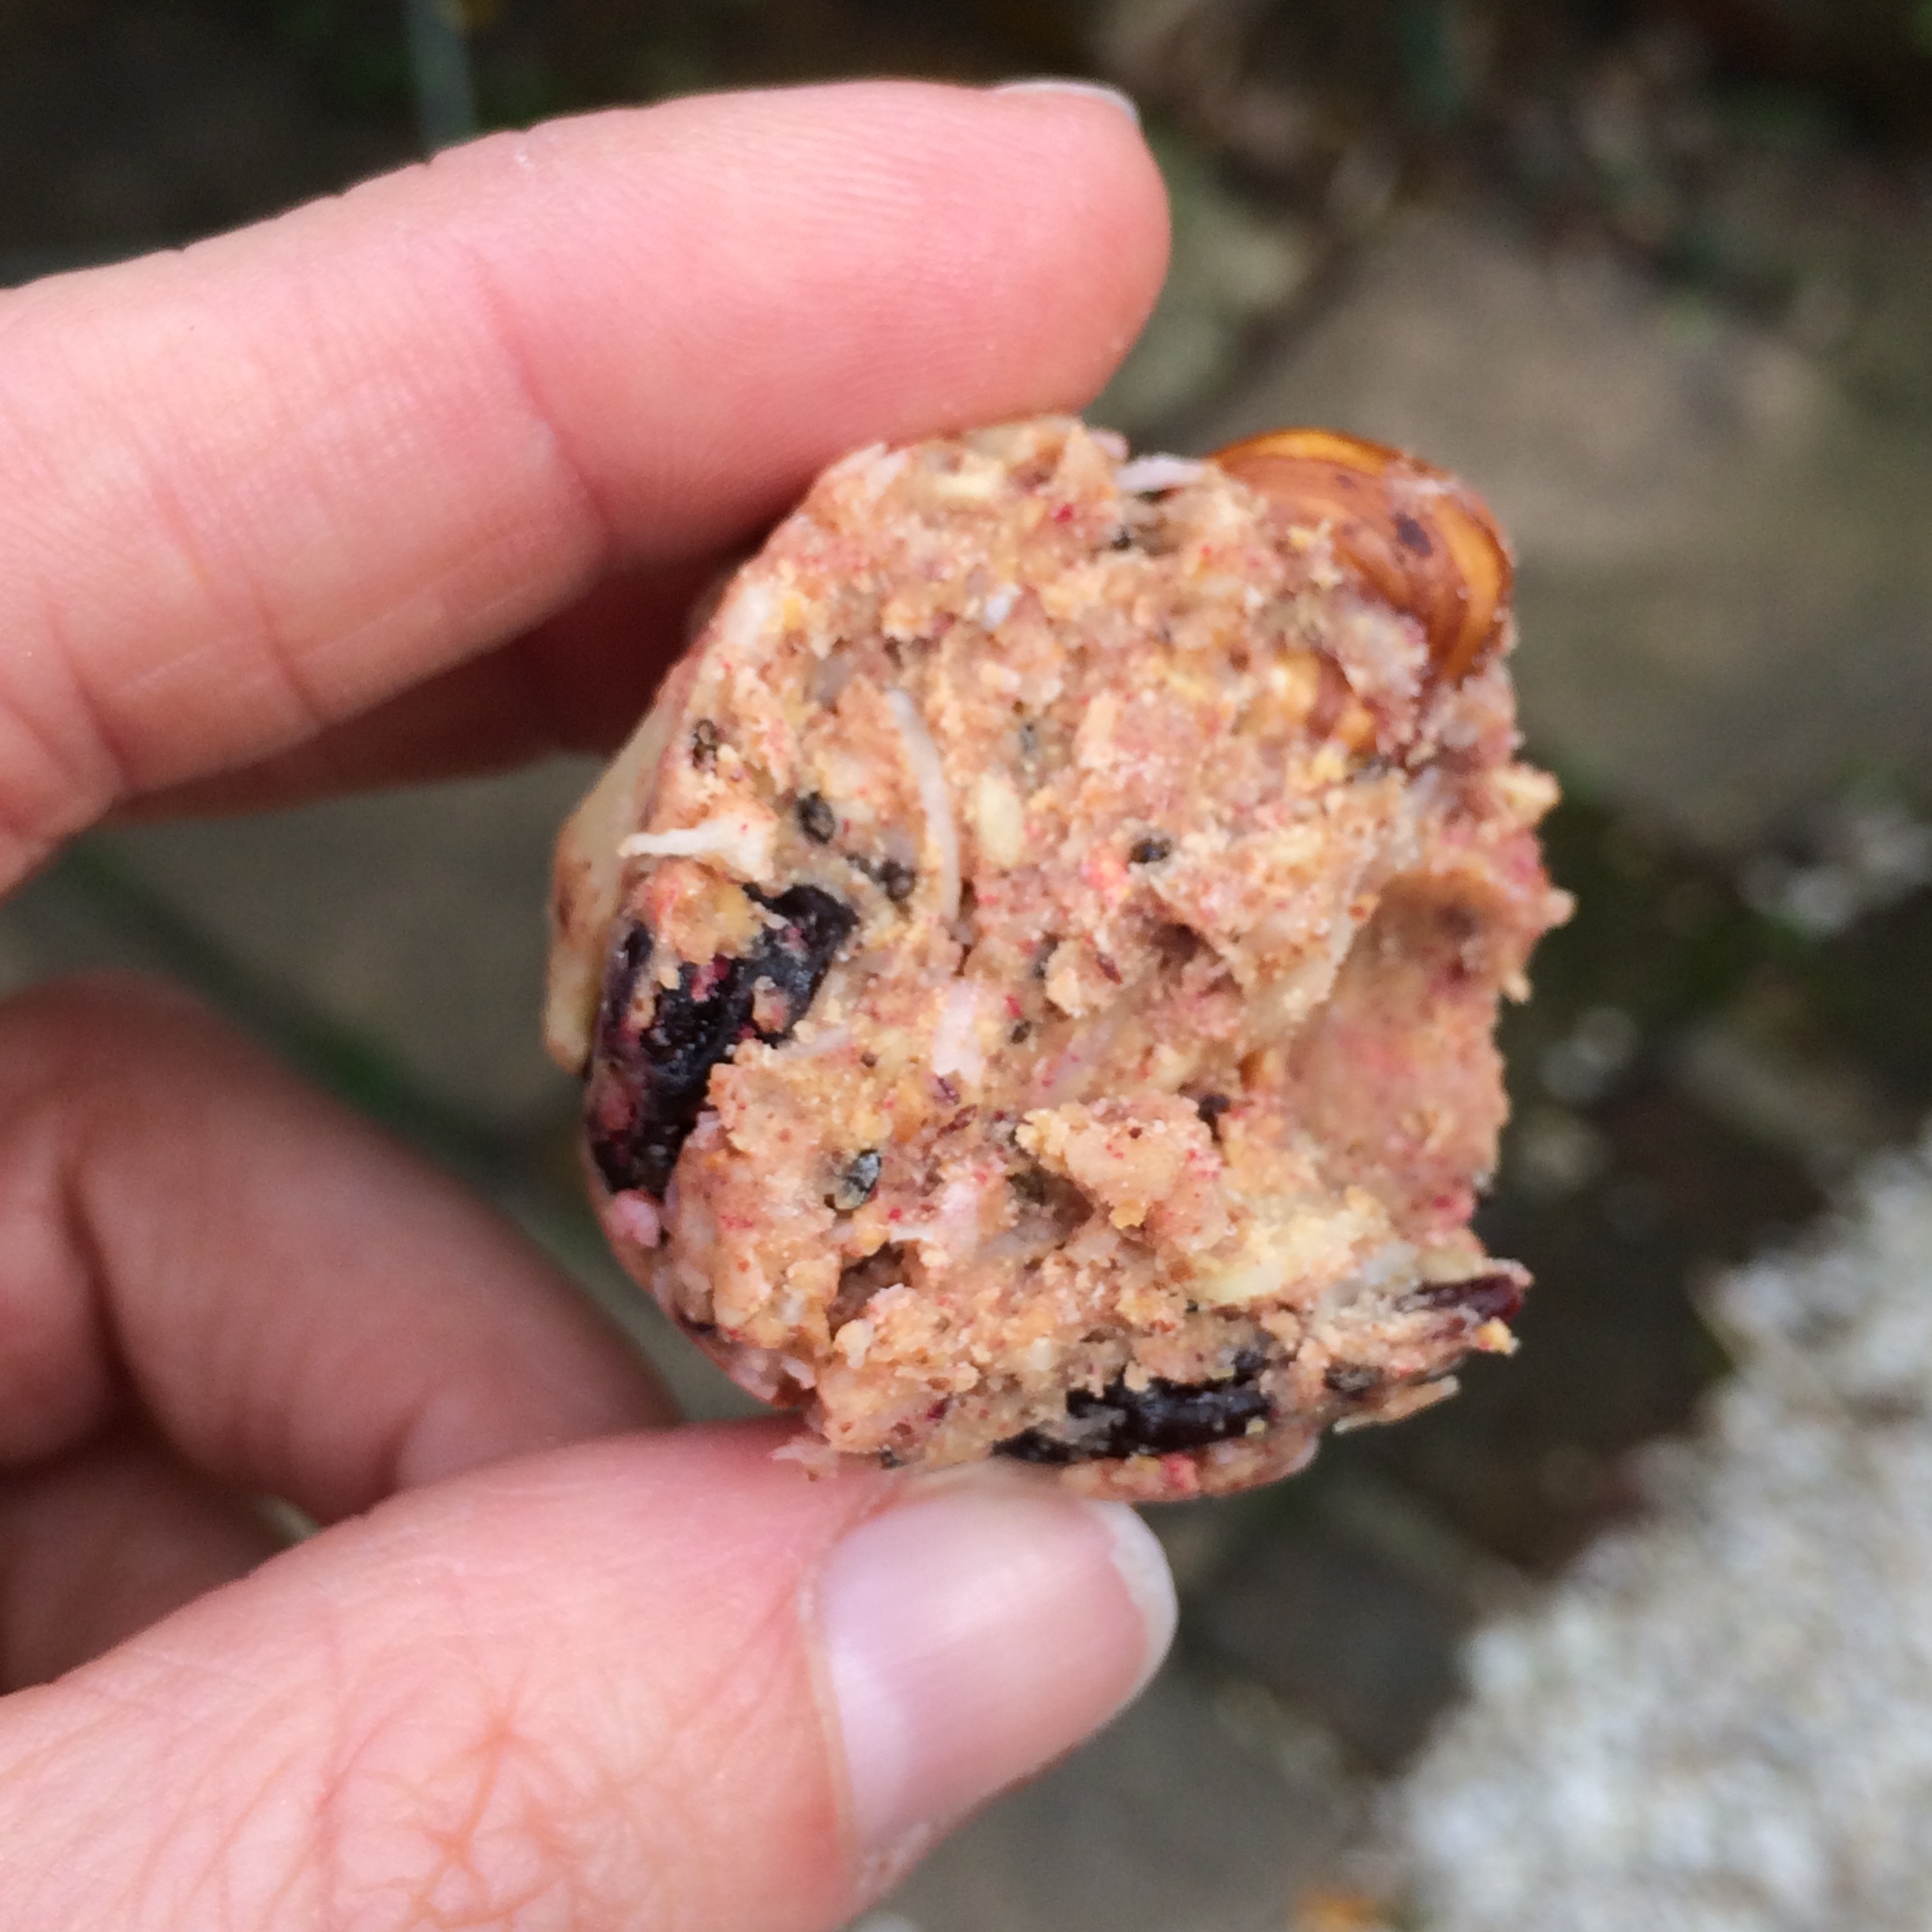
These little beauties have saved me this week!

photo 2

Whenever I feel like I need a boost, or the craving for chocolate kicks in, I’ve just grabbed one of these and they do the trick!

I don’t have specific quantities for these as I just grabbed what I had in the cupboard and threw it together – but I’ll give you a vague idea! It doesn’t really matter what quantities you use – it’s about what you like and finding a combination that’s tasty for you ๐Ÿ™‚

What I like most about these is that they’re also full of protein and good fats.

I used freeze dried raspberry powder in this version – I got mine online (here) but your local health store might stock it too.

2 – 4 tbsp Nut butter (I used cashew and almond)

2 – 4 tbsp liquid Sweetener (maple syrup, agave, sweet freedom – your choice!)

a big handful of Nuts – I used hazelnuts, almonds and cashews (you can chop these up if you want to – I couldn’t be bothered!)

a few tbsps desiccated Coconut

1 – 2 tbsp Chia seeds

1 – 2 tbsp Sesame seeds

half a handful of dried Cherries

2 tbsp of freeze dried raspberry powder

2 scoops of Vanilla protein powder

photo 1

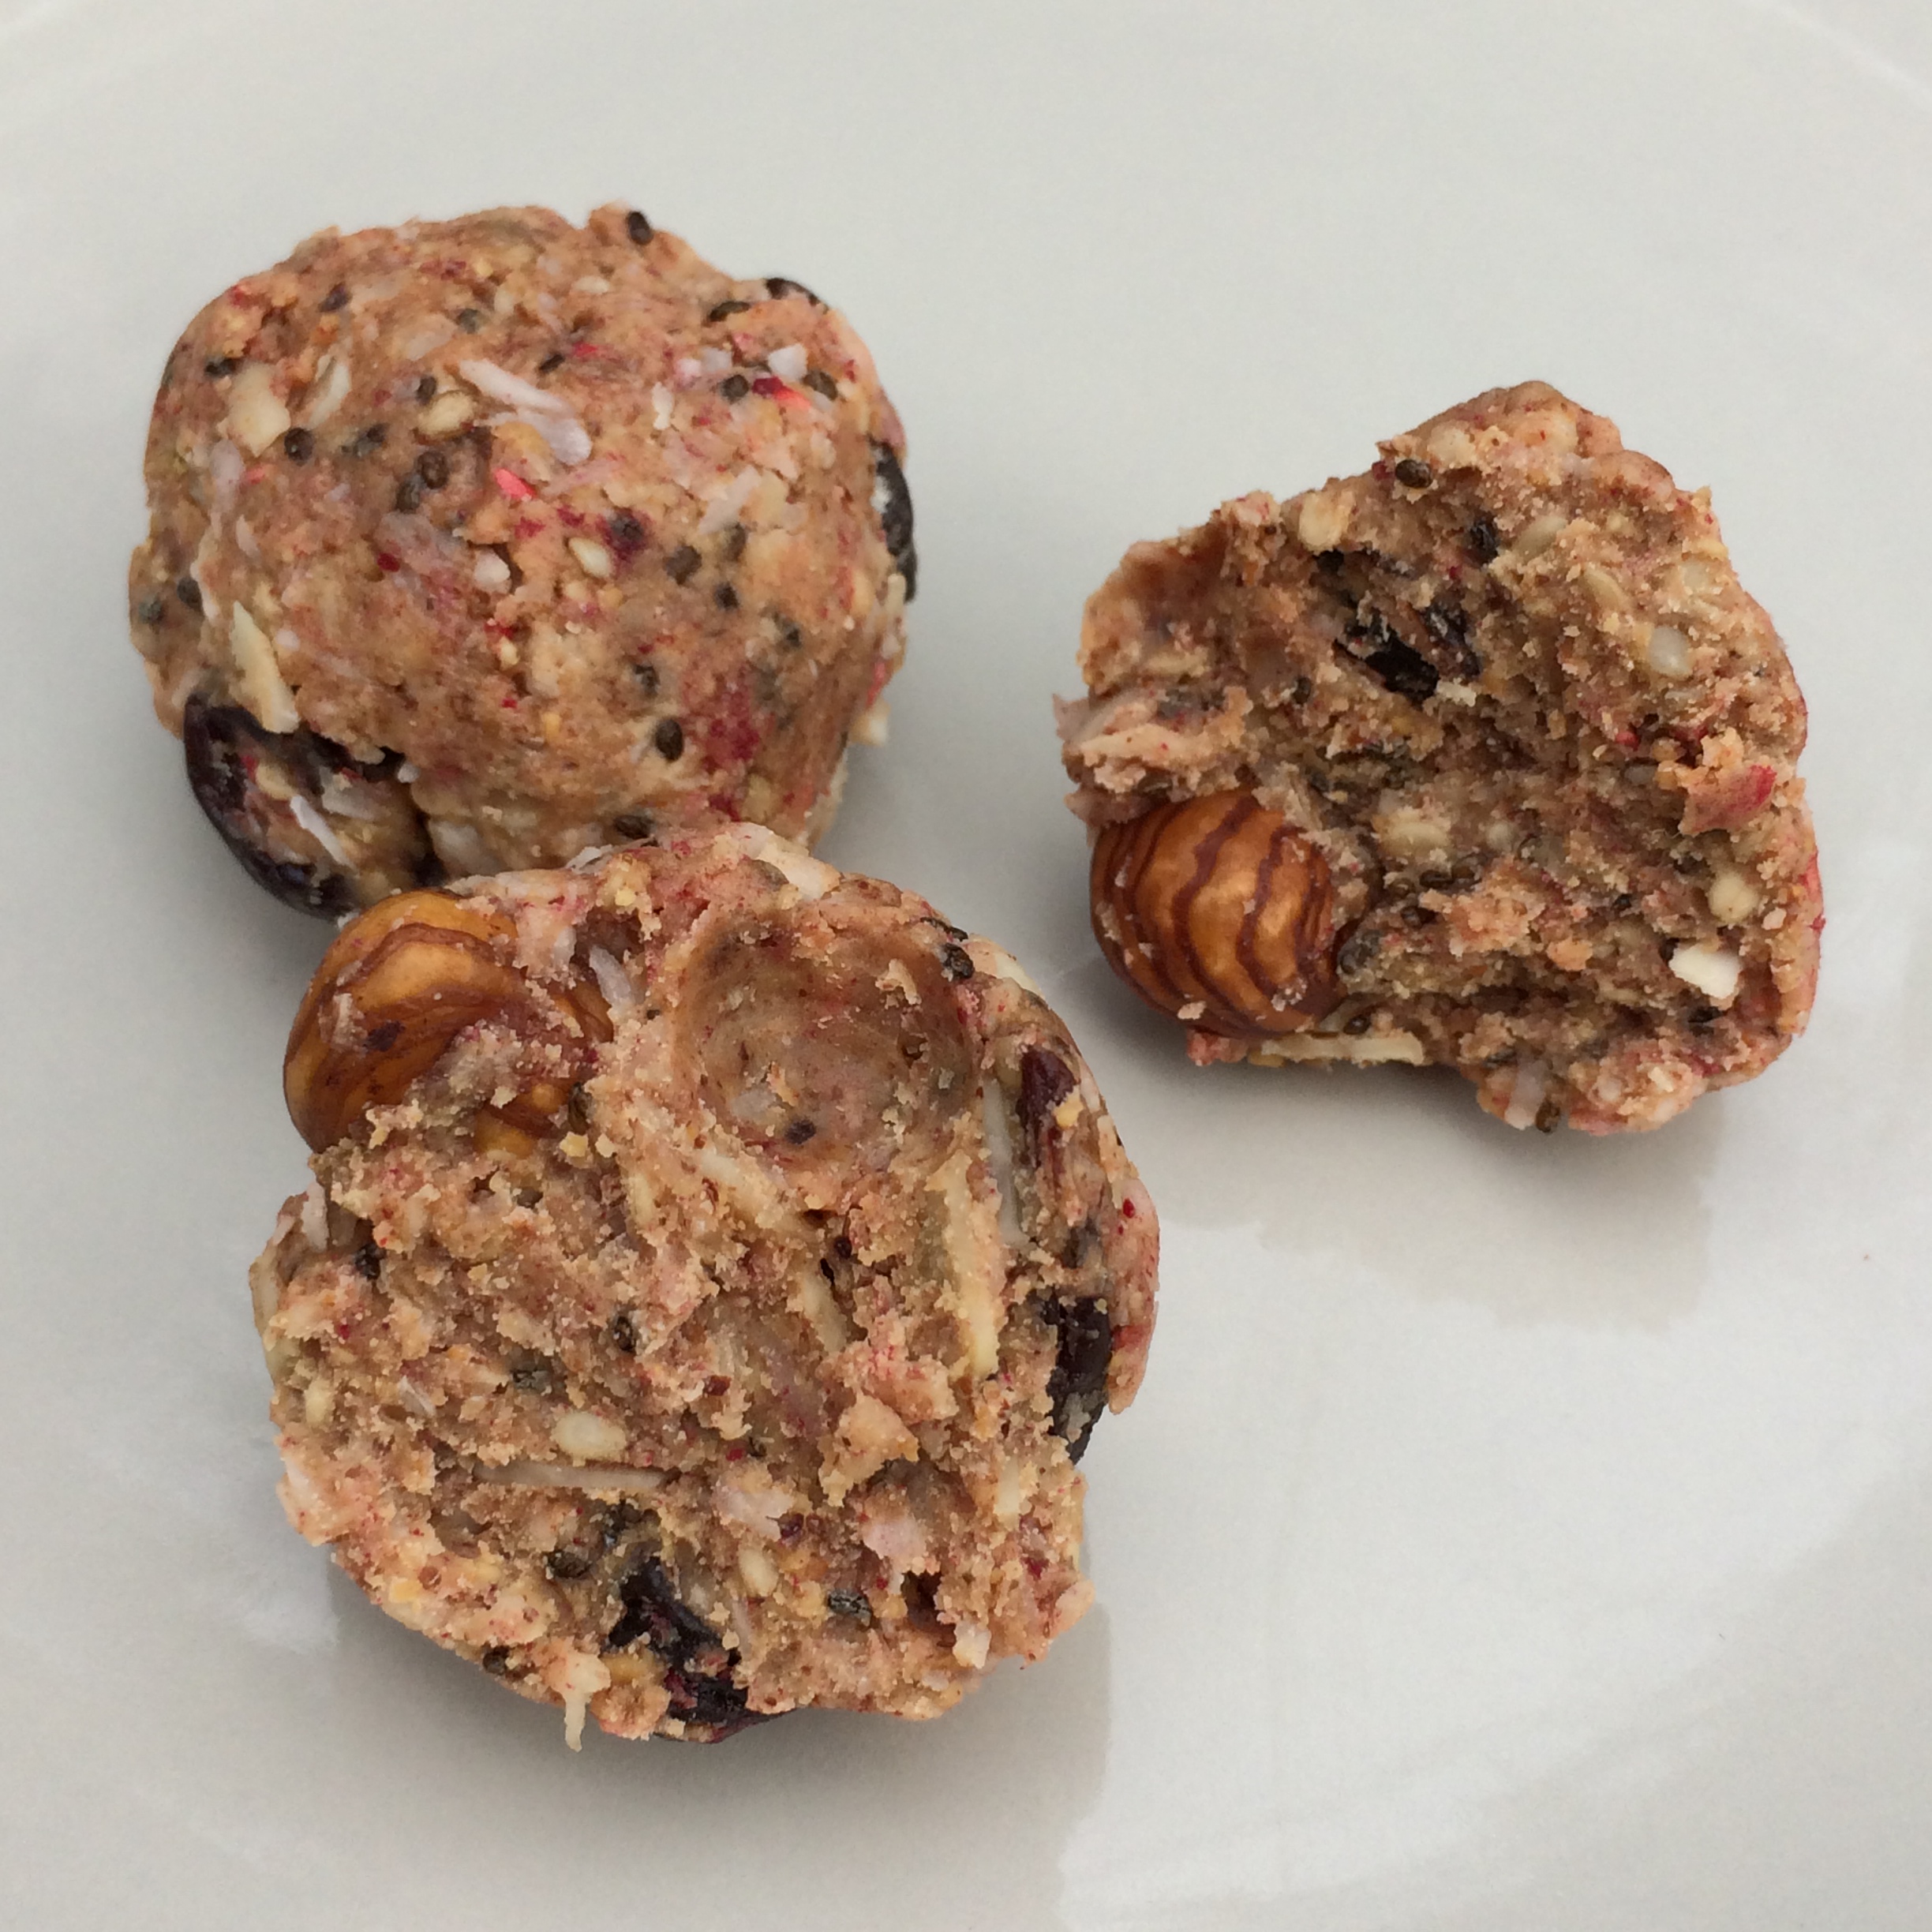
Put the nut butter and sweetener in a frying pan over a low heat. Stir while it heats through and combine the butter and sweetener. Don’t heat too fast or you’ll just end up drying the nut butter out. After a minute or so add in the rest of the ingredients. Stir well. You want to be able to squish the mixture into balls so if it’s too dry add a little more sweetener or nut butter. If it’s too wet add more nuts etc.

Remove from the heat and whilst still warm form little balls! You can roll the warm balls in desiccated coconut, sesame seeds, chia seeds, cocoa powder etc but I like my balls naked!

Enjoy!

photo 3

Lemon and Chia Seed Cookies – Dairy and Gluten free!


I’ve seen quite a few recipes around using tapioca flour and finally my supermarket has started stocking it so Iย thought I’d have a go at making up some cookies with it!

These are simply divine – they’re light and crumbly and really melt in the mouth.

photo 3

You will need:

1 cup Tapioca flour

1.5 cups raw Cashews

1/2 cup Coconut oil (melted)

1 Egg

1/4 cup Maple syrup

3 tbsp Chia seeds

Zest of 1 and 1/2 lemons

a pinch of Himalayan rock salt

For the icing:

100g unrefined Icing sugar

Zest of half a lemon

Juice of up to half a lemon

photo 4

First pop the cashews in to a blender or food processor and blend until they form a fine flour. Combine the cashew flour and tapioca flour together in a large bowl. Grate the lemon zest in to the bowl and add the chia seeds and salt and mix well.

Create a well in the centre of the dry mixture and add the egg, maple syrup and coconut oil and mix really well to form a dough. You may find the mixture is a little too wet (depending on the size of your egg!) – if so add more tapioca flour until it forms a firmish dough (whilst the coconut oil is melted though it will still be quite a loose dough).

Wrap it in clingfilm and pop the dough in the fridge to chill for 20 minutes.

Pre-heat the oven to 160 C.

Place the dough between two sheets of baking parchment and roll thin (few mm thick). Use whatever shaped cutters you like and then transfer the cookies to a lined baking tray. Bake in the oven for 20 – 25 mins or until golden (check after 15 mins).

Allow to cool and then mix the icing ingredients together. Add the lemon juice a little at a time until you have a consistency that you want. Then drizzle over the biscuits. Allow to set and then enjoy with a nice cup of tea! ๐Ÿ™‚

photo 1

Malt loaf muffins! Dairy and Gluten free!


After seeing a post of some delicious looking malt loaf muffins my friend Vicky made I decided I simply had to have a go at gluten and dairy-freeing them! I love the spicy richness of malt loaf so was sure these would be divine. These also super easy to make and make a great grab and go brekkie if you’re on the run. Thank you for the inspiration Vicky! ๐Ÿ™‚

photo 2 (2)

You will need:

1 2/3 cups gluten-free Oat bran (if you don’t need to go gluten free then go with wheat bran)

1 cup and 4 tsp Coconut sugar (or other raw, unrefined sugar)

2 tsp Rice malt syrup (or Agave)

2 cups Raisins and currants

2 tsp ground Cinnamon

2 tsp Allspice

1/8 tsp ground Cloves

1/8 tsp ground Nutmeg

pinch of Himalayan rock salt

2 cups of Almond or other non-dairy milk

2 cups of Gluten free flour (or Spelt flour)

2 tsp Baking powder

This mixture will make approx 12 medium sized muffins and 6 mini ones.

Pop all the ingredients apart from the flour and baking powder in to a large bowl and mix well. Allow to soak for a couple of hours so the bran absorbs the milk and forms a wet mush!

Preheat the oven to 180 C.

Mix the flour and baking powder together really well and then add to the wet ingredients. Combine thoroughly and then pop in to muffin cases, sprinkle some coconut sugar over the top and bake for 20 – 25 mins, or until a skewer comes out clean.

These are delicious straight out the oven while still warm or will keep for a few days in an airtight container. You can also freeze them to eat later.

photo 2 (3)


Peppermint Triple Chocolate Candy Cane Brownies – gluten and dairy-free


I’m a bit late posting this but hey, what can I say – it’s been christmas and all that ๐Ÿ˜‰

I actually re-made this over this weekend so thought it was about time I posted the recipe.

This was a birthday creation for myself, to be shared with my favourite cake-eating friend ๐Ÿ™‚ We are both fans of chocolate and peppermint so what better than this delicious minty chocolatey combo! The crunch of the peppermint candy canes on top really make this something special (you can use any hard mint candy for this).

3648

01ed1c23089e903956a29203b04989f148abd8ec5b

You will need:

1/4 cup Rice flour

1/2 cup Ground almonds

1 cup unrefined Raw sugar (golden caster sugar, coconut sugar etc)

1/2 cup almond oil (or coconut oil)

1/4 cup raw Cacoa powder

2 eggs (or 2 tbsp chia seeds soaked in 6 tbsp water)

1/2 tsp Himalayan rock salt

1/4 tsp Bicarbonate of soda

1 tsp Vanilla extract

1/8 Tsp Pure peppermint extract

Milk, white and dark chocolate chunks (optional)

For Icing

100g Dairy free chocolate

200 – 300g Unrefined icing sugar (adjust quantity to depending how runny you want your icing)

drop of Pure peppermint extract

a dash of warm water

Hard mints or candy canes, silver balls, any other decorations

photo 1

Preheat the oven to 170C and grease a 20 x 20cm square baking pan with parchment paper.

Mix the ground almonds, flour, cacao powder, sugar, salt and bicarbonate of soda together in a large mixing bowl. In a separate bowl beat the eggs (or if using chia seeds instead then soak them in the water). Make a well in the center and add the beaten egg (or soaked chia seeds), vanilla extract, peppermint extract and oil. Whisk together using a hand mixer until well mixed. It should be thick and glossy when mixed.

If you are the chocolate chunks stir them in now. Pour in to the baking tin and place in the oven for 20 – 25 mins until a skewer inserted in the middle comes out clean.

Cool on a wire rack

Take the hard mints (or candy cane) and bash with a rolling pin in to small pieces.

Then prepare the icing. Melt the chocolate and then stir in the icing sugar and peppermint extract.

Use enough icing sugar to get the consistency of icing you want (if it’s too thick add a little water). Spread quickly on to the brownies and sprinkle the crushed mint and any other decorations you want to use on to the top! Then enjoy (with a big old candle if it’s your birthday ๐Ÿ˜‰ )

017a036669e0ee6626053c99677bb8d2b2e6ec2f8e
and in case you’re wondering if they taste good… well this is all that’s left of this weekend’s creation!
photo 2

Frangipane Mince Pie tarts


I know Christmas is over, but I never tire of mince meat! I did actually create these before the big day but didn’t get a chance to post the recipe until now. This was created on request from a special friend for her discerning hubby, and they seemed to go down well … in his words “this is the best thing you’ve ever baked”…! ๐Ÿ™‚

3747

So if you have some leftover mince meat then give this a go!ย These include a layer of marzipan which is optional but I think adds a fab extra almondy loveliness! Make your own (recipe here) or buy a block of plain marzipan – but do buy the good stuff (Neideregger is a great brand).

The frangipane does contain egg but I’ve also posted an egg-free version below too! ๐Ÿ™‚

If you fancy making up a batch of mince meat specially then the recipe is here

3750

For the pastry you will need:

4 oz Buckwheat flour

2 oz ground Almonds

5 tbsp Agave nectar

Up to 6 tbsp Water

For the frangipane you will need (this will be enough for 4 small tarts – 5 – 6cm diameter):

65g unrefined Raw sugar or Coconut palm sugar

100g Ground almonds

1 Egg

50 ml Almond oil (you can use mild Olive oil if you prefer)

1/8 tsp Vanilla extract

1/8 tsp Almond extract (if you have it)

Ground cinnamon (for dusting)

Flaked almonds (for decoration)

125g Marzipan (optional)

Make the pastry first. Put the buckwheat flour and ground almonds in a processor and add the agave. Pulse and gradually add the water until it forms a dough. You may find you need more or less water. If it is too wet add a little more flour. Once it is forming a firm dough remove, wrap in cling-film and place the mixture in the fridge for 20 minutes or so.

Preheat the oven to 175 C.

Remove the pastry from the fridge and roll out as thin as you can. Line mini tart cases (or one large flan/tart tin) with the pastry (you will probably have spare pastry left over). Brush with a little almond oil and then place in the oven to blind bake. They only need a few minutes – just until they start to brown very slightly at the edges.

Meanwhile make the frangipane. Pop the sugar and almond oil in a bowl and mix well together. Add the egg and extracts and mix again. Gently fold in the ground almonds until well mixed.

Once the pastry cases are starting to brown a little remove from the oven. Allow to cool for a few minutes and then spread a thin layer of mince meat (enough to cover the base). Thinly slice the marzipan and layer over the top.

3768

Then cover with a generous layer of the frangipane.Sprinkle flaked almonds over the top and a dusting of cinnamon. Then place in the oven for 15 – 20 mins or until the frangipane is cooked and a lovely golden brown.

Delicious served with custard or soya yoghurt at any time of year! ๐Ÿ™‚

3740

Egg free frangipane recipe:

6 tbsp Coconut Oil (donโ€™t melt it)
2/3 cup Coconut Palm Sugar / Unrefined Raw Sugar
1 and 1/4 cup Ground Almonds
2 tbsp Cornflour
pinch salt
1/4 tsp Ground Cinnamon
2/3 cup Almond Milk
2 tsp Vanilla Extract
1/2 tsp Almond Extract

Put the coconut oil, sugar, ground almonds, cornflour, cinnamon and salt in a food processor and pulse until well combined and all crumbly. Slowly add the almond milk, vanilla extract and almond extract whilst still pulsing the food processor until it forms a thick batter. This frangipane takes a bit more baking than the one above so keep an eye on the tarts and just remove when done.

3752

Mince Pies! Gluten and Dairy Free!


It’s mince pie time again! whoop! This year I’m trying out some mini ones – almost as I type! ๐Ÿ™‚ but for now I thought I’d post my recipe for mincemeat and gluten and dairy-free pastry in case you fancy making a batch this weekend ๐Ÿ™‚

IMG_9941

For the Pastry:

4 oz Buckwheat flour
2 oz ground Almonds
5 tbsp Agave nectar
Up to 6 tbsp Water

For the Mincemeat:

3 oz Bramley apples, cored and finely chopped
6 oz Mixed dried fruit (I prefer raisins, currants, cranberries and apricots)
1 oz Vegetable suet
2 oz Raw sugar (coconut palm or dark raw muscovado)
Juice and grated zest of half an Orange
1 level tsp of ground allspice
1 pinch ground Cinnamon
1 pinch ground Cloves
1 pinch grated / ground Nutmeg
1 small handful chopped Almonds
1 tbsp Date syrup

Make the pastry first. Put the buckwheat flour and ground almonds in a processor and add the agave. Pulse and gradually add the water until it forms a dough. You may find you need more or less water. If it is too wet add a little more flour. Once it is forming a firm dough remove, wrap in cling-film and place the mixture in the fridge.

Put all the ingredients for the mincemeat into a saucepan. Cook on a low heat, stirring frequently. Cook until the apple is soft and the mixture is thick โ€“ it may take some time. Remove from the heat and allow to cool.

Preheat the oven to 180 C/ gas mark 6.

Lightly oil & flour a 12 muffin tin with almond, coconut or hazelnut oil. Remove pastry from the fridge and roll out on a lightly floured surface. Roll it as thin as you can โ€“ a few mm. Use a round biscuit cutter to cut out 12 bases. Place them in the tin. Lightly brush with oil and use a fork to prick the base. Place in an oven to blind bake for 5โ€“10 mins. Keep an eye on them โ€“ this pastry browns quite fast. Once the edges are brown and the middle is firm remove them. While the cases are in the oven take a smaller circular biscuit cutter to cut out the โ€œlidsโ€ or you could use star shapes/ holly leaf shapes/lattice pattern โ€“ whatever takes your fancy ๐Ÿ™‚

Place a generous helping of mincemeat in each of the cases and place your chosen โ€œlidโ€ on top. Lightly oil and sprinkle with a little cinnamon and raw sugar. Place the pies back in the oven and bake until golden (10โ€“20 mins). Keep a careful eye on them. You want the tops to brown but be careful the bases donโ€™t burn. Remove from the oven and leave to cool for 5 mins, then remove and place on a wire cooling rack.

IMG_9864

Gingerdead men! Quick and Easy Spooky Biccies!


Happy Hallowe’en!

photo 1

I couldn’t resist whipping up a few little Hallowe’en biccies today!

photo 4 (3)

It’s been a bit of a challenge as my oven is broken (yes, broken – an absolute disaster!) but luckily I was able to get the little mini part of the oven working so can bake really really tiny batches of things! Phew!

So these are so easy and so fun! You can choose to keep them plain or add some spices. I have also iced them with a cinnamon icing but you could keep the icing plain or add any flavour you want. I had such fun finding some cool little hallowe’en cutters but obviously you could just use any shapes! For the gingerdead man I used a normal gingerbread man cutter and then iced on the bones.

photo 1 (2)

You will need:

2 cups of Spelt flour (or gluten free flour mix)

1 cup unrefined Icing sugar

6 oz Dairy free margarine

Optional: 2 tsp ground Ginger or 2 tsp ground Cinnamon

For the icing:

1 cup unrefined Icing sugar

1 tbsp Soya, almond or coconut milk

Optional: 1 tsp ground Cinnamon

Preheat the oven to 180 C. Put the margarine in a large mixing bowl, sieve the flour, icing sugar and spices (if using) and cream it together using your hands. Try not to over mix but make sure the margarine is properly mixed with the dry ingredients. ย Once itโ€™s formed a dough wrap in cling film and chill for 30 mins. If you find the dough is too sticky then add some more flour.

Once chilled, roll out and use biscuit cutters to cut out the shapes of your choice. Use a palate knife to transfer them carefully to a greased baking tray. Sprinkle with a little raw sugar if you like and bake for 8 โ€“ 10 mins, or until golden. Remove from the oven and allow to cool on the tray.

photo 4

Mix the icing ingredients together and then pipe the icing on to the biccies. Enjoy!

These won’t last long!

photo 5 (2)


Salt and Spice and all things nice! The smallest pumpkin in the world and a yummy pumpkin seed snack! Re-post :)


As if you hadn’t noticed, it’s that time of year again – PUMPKIN TIME! So as part of my drive to post all things pumpkiny I thought I would re-post this little recipe from last year!

I’m getting my hands on another one of these little munchkin pumpkins for this year, but in the meantime – here’s last year’s delights! ๐Ÿ™‚

Well, when I asked for a small pumpkin I wasn’t expecting something quite as small as this….

But anyone who knows me knows I love a challenge so not to be thwarted I decided I’d do my best with this little munchkin of a pumpkin and lo and behold look what I managed to create! Scary eh?

So there wasn’t much meat in this little pumpkin so rather than create the pumpkin-based hallowe’en cake I had planned I decided instead to do something funky with the seeds. It’s a sweet salty treat which sounds odd but combines some wonderful autumn flavours. I adapted it from theย SNOG healthy treats book.

Salty and Spicey Sweet potato, raisin, pumpkin seed yumminess!

So I started off by creating some salted roasted seeds. Take your pumpkin seeds, remove all the stringy bits of pumpkin flesh and put in a pan. For every half cup of pumpkin seeds add 2 cups of water and 1 tablespoon of salt. Bring to the boil and then simmer for 10 minutes. Drain and allow to cool slightly.

Then spread them out in one layer on a baking tray and place in an oven at 200 degrees C for anything from 5 – 15 minutes. Just keep checking them as it will depend how big the seeds are. Mine took around 8 minutes ๐Ÿ™‚

These are yummy as they are or you can hull (de-husk) them if you really want to (I couldn’t be bothered!). Eat them just like this or use them in the next bit of the recipe.

Take 1 sweet potato and cut it into 1cm cubes. Spread on a baking tray with 2 – 3 tablespoons of the salted roasted pumpkin seeds. Add a handful of raisins and then sprinkle with 1 tablespoon of coconut palm sugar and 1/2 teaspoon of cinnamon. Finally drizzle over some coconut oil (approx 2 tablespoons) and place in the oven at 190 degrees C for about 20 – 25 minutes until the sweet potato is cooked through and the sugar is caramelised. Stir occasionally.

Remove from the oven and allow to cool. Then enjoy on it’s own or spoon it over some natural yoghurt (or ice cream!). It sounds odd but trust me – the sweetness of the sweet potato and raisins go really well with the salty roasted seeds and the cinnamon adds a lovely autumnal twist! Divine and healthy too! ๐Ÿ™‚

Happy Hallowe’en!

Plum cake – gluten, dairy and egg free!


When I posted my recipe for my plum and almond cake I promised I would post a recipe for plum cake that was also egg free, so here it is! ๐Ÿ™‚

photo 3 (3)

This cake uses fine cornmeal or polenta and so does have a little bit of a nutty texture to it around the edges but it is moist and soft in the middle.
It also uses coconut milk but not the kind you get in a carton – the canned kind, often called coconut cream. For this to work you need one with a high coconut fat content so you’re looking for one with 65 – 70% coconut extract. You will need to prep the coconut cream the day before.

This one works well:

coconut creamPop the can in the fridge overnight and try not to move it. The coconut fat solidifies and separates at the top, leaving clear liquid at the bottom. When you are ready to make the cake remove the can carefully from the fridge and turn the can upside down in one move (i.e. no shaking!). Then open the can at the bottom – yes – trust me, open the bottom! You should find that the fat has solidified and you will see a few cm’s of clear liquid. Pour this off (don’t throw it away – you can pop it in a smoothie!) and then you are left with the coconut cream to use! ๐Ÿ™‚

So for the cake you will need:

1/2 cup fine Polenta

1/2 cup Rice flour

1/2 cup Raw coconut sugar

1 tsp Baking powder

1 cup minus 1 tbsp of the coconut milk/cream

1/2 cup of apple puree (recipe here)

6 – 8 English plums (less if you’re using the bigger imported plums!)

Preheat the oven to 180 C and line and grease a 20 x 20 cm baking pan.

Put all the dry ingredients in to a bowl and mix well. Add the coconut cream and apple puree and mix together well. Allow this to rest for 15 minutes so the polenta can start to absorb the moisture.

photo 2 (2)

Cut the plums in to halves (or quarters if large). Pour the batter in to the baking pan and use a spatula or the back of a spoon to smooth it out evenly. Then place the plum halves into the top of the batter, spacing them evenly across (I managed to get 3 rows of 4 in mine!). Press in lightly.

photo 3 (2)

Then place in the oven and bake for 25 – 30 mins. Start checking it at 25 mins and remove when the top is golden and a skewer comes out clean.

photo 5 (2)

Remove from the oven and allow to cool on a wire rack for at least an hour. Then cut in to squares and serve!

photo 2 (4)

Apple and almond cake – gluten free and dairy free


This is an apple version of theย plum and almond cake I posted recently. It’s such an obvious combination and a very special friend put in a request for apple so it had to be done! ๐Ÿ™‚

IMG_0334

You will need:

125g unrefined Raw sugar or Coconut palm sugar

200g Ground almonds

2 Eggs

100 ml Almond oil (you can use mild Olive oil if you prefer

1/4 tsp Vanilla extract

1/8 tsp Almond extract (if you have it)

Bramley apple (1 large)

Ground cinnamon (for dusting)

Pre-heat the oven to 180 C and line and grease a 20cm cake tin – if you have a springform tin then use that as it makes it easier to get it out without it breaking. If not a loose bottom tin is the best option.

Add the oil and sugar to a bowl and use a hand mixer to beat together (you can do it by hand with a fork if not). Beat in the eggs one at a time. Then add in the extracts and mix well. Fold in the ground almonds with a metal spoon. Once mixed pour in to the tin.

Peel and core the apple and cut into slices, and place in to the batter. Push them down a little bit so they’re well bedded in there. Sprinkle the top with ground cinnamon.

IMG_0326Pop in the oven for 25 – 30 minutes. It is worth starting to check it at about 20 minutes. Once a skewer comes out clean then it’s done.

Let it cool for 10 minutes in the tin and then carefully remove it and allow it to cool on a wire rack. Slice and enjoy! ๐Ÿ™‚

IMG_0328