For we all like Figgy Jam……. Fig and Ginger Jam!


This is so easy and so delicious! I’ve been trying to add a bit more ginger in to my diet lately as it’s so good for your stomach and helps with the digestion of other nutrients. It’s also a fab anti-inflammatory so is brilliant for muscle and joint aches. Apparently it has aphrodisiac properties as well!!!

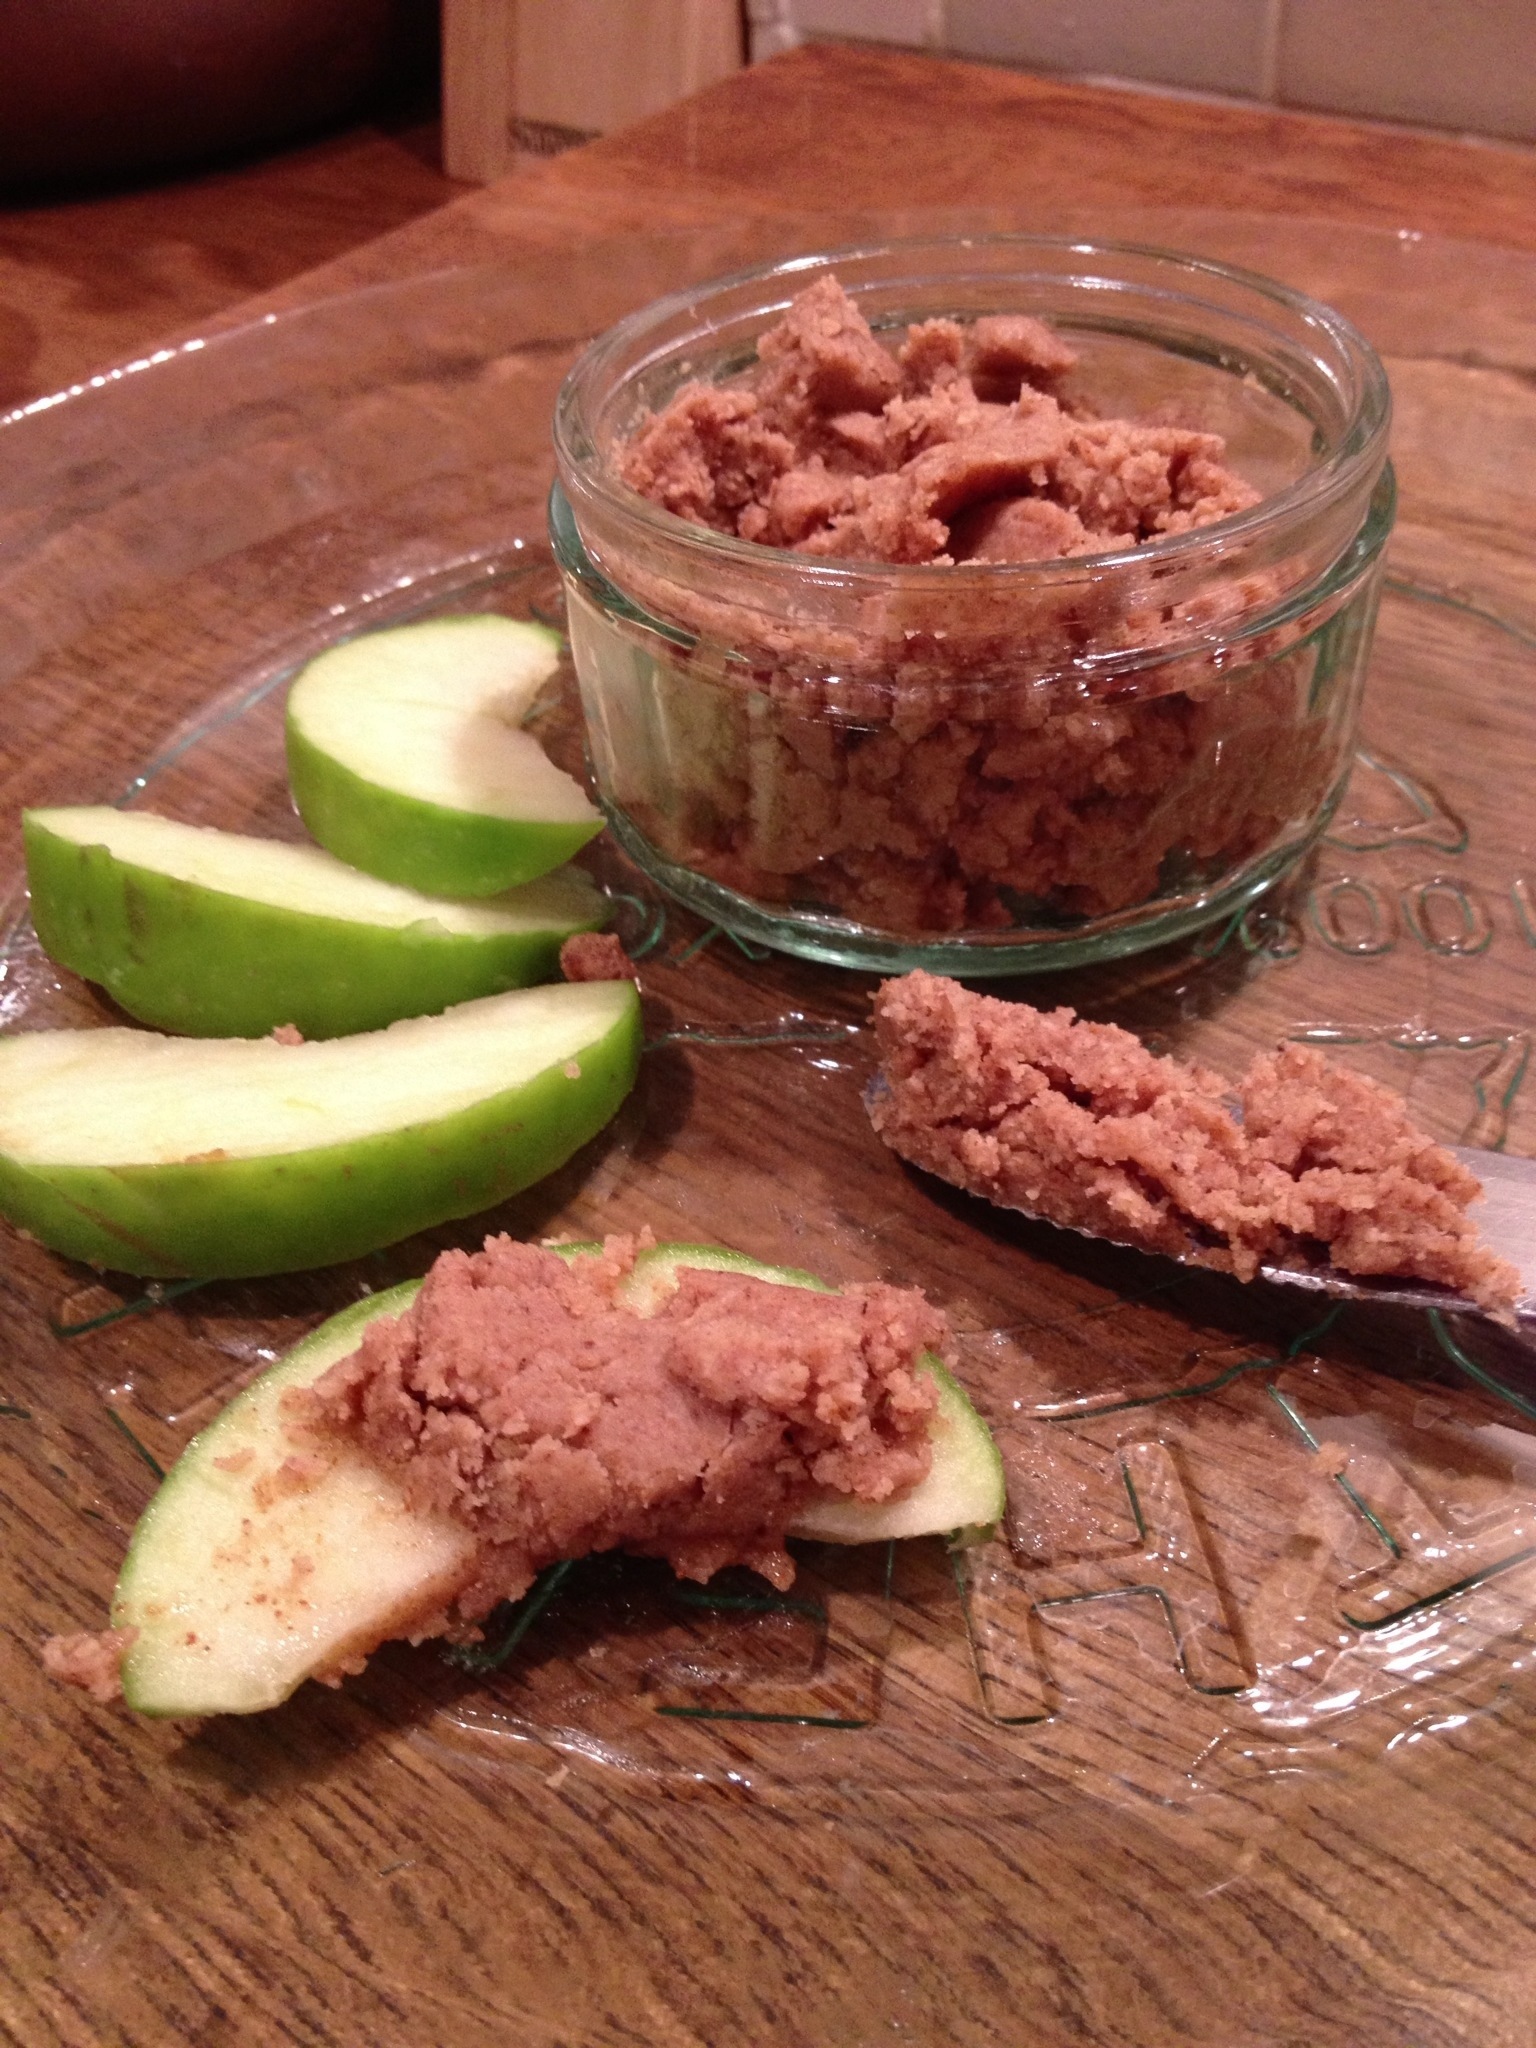
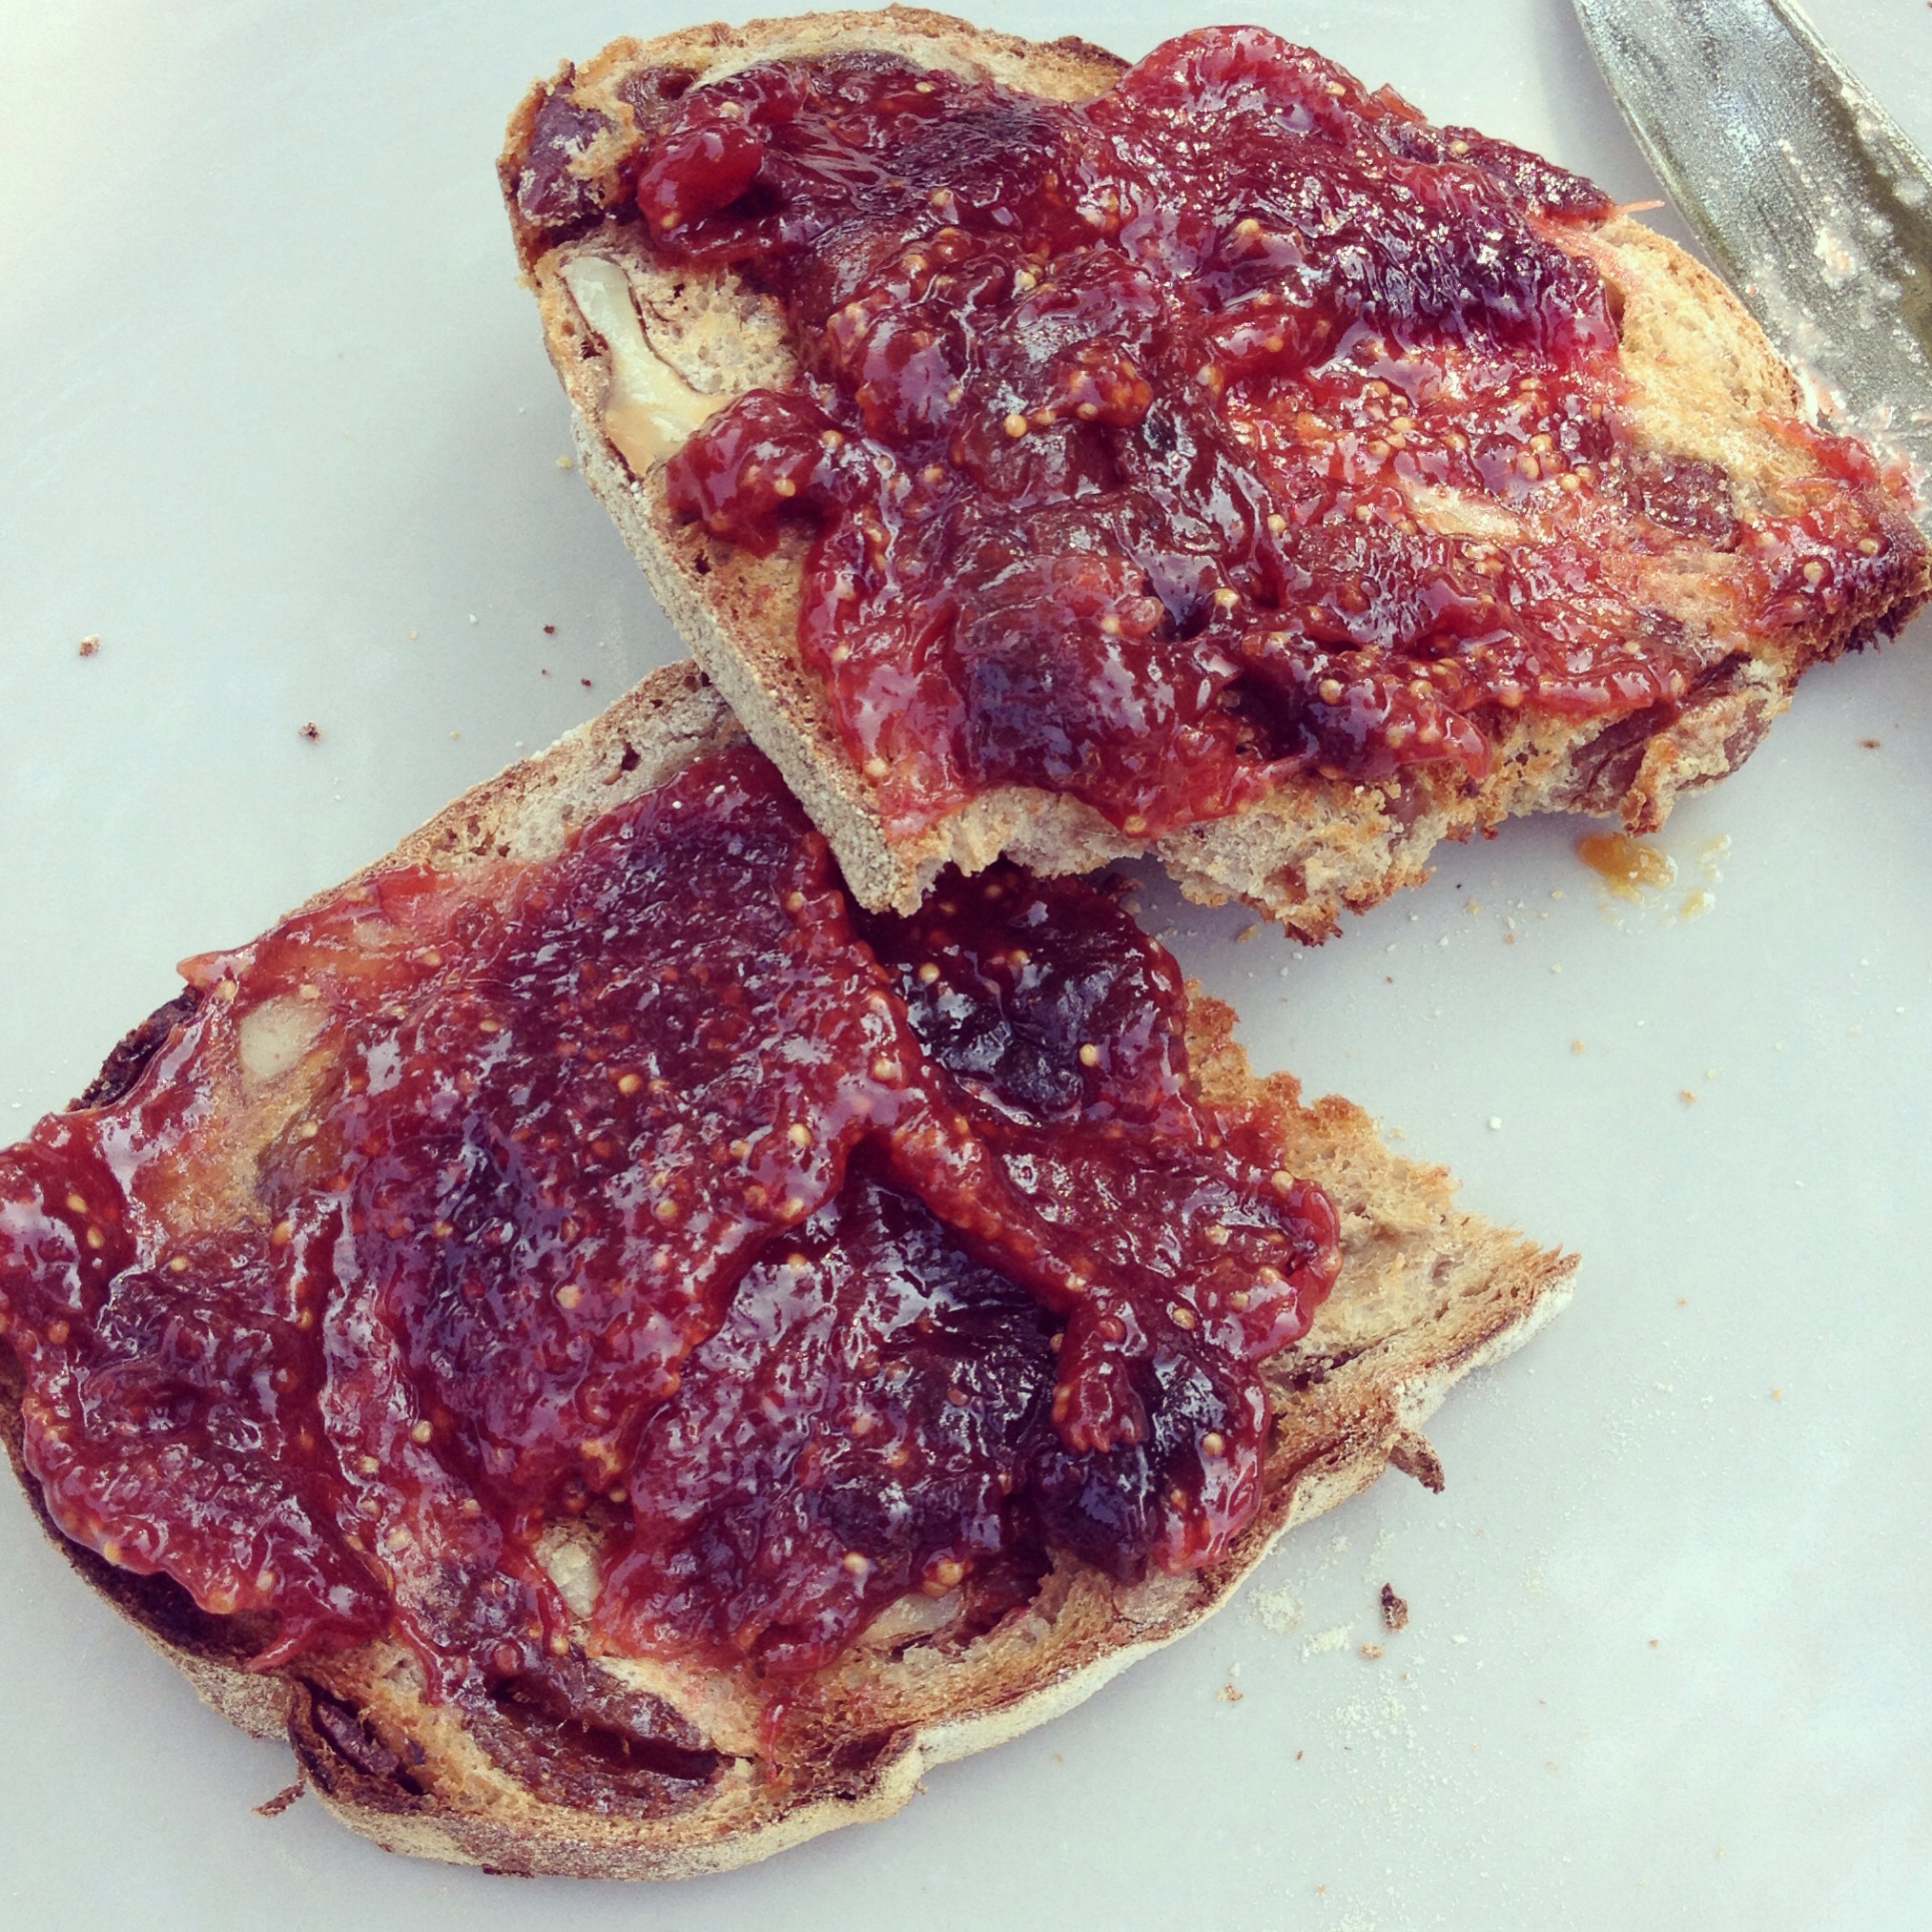
Figs are also brilliant for you – they’re full of fibre and are a great source of potassium and calcium and they taste yummy! 🙂 So this jam is perfect! It’s really easy to make and tastes divine.

IMG_0042

You will need (makes one small jar):

250g fresh, ripe Figs

2 tbsp Maple syrup (or your liquid sweetener of choice – agave, honey, rice syrup etc)

1.5 tbsp Lemon juice

zest of 1/2 Lemon

3/4 tsp ground Ginger

1/4 tsp ground Cinnamon

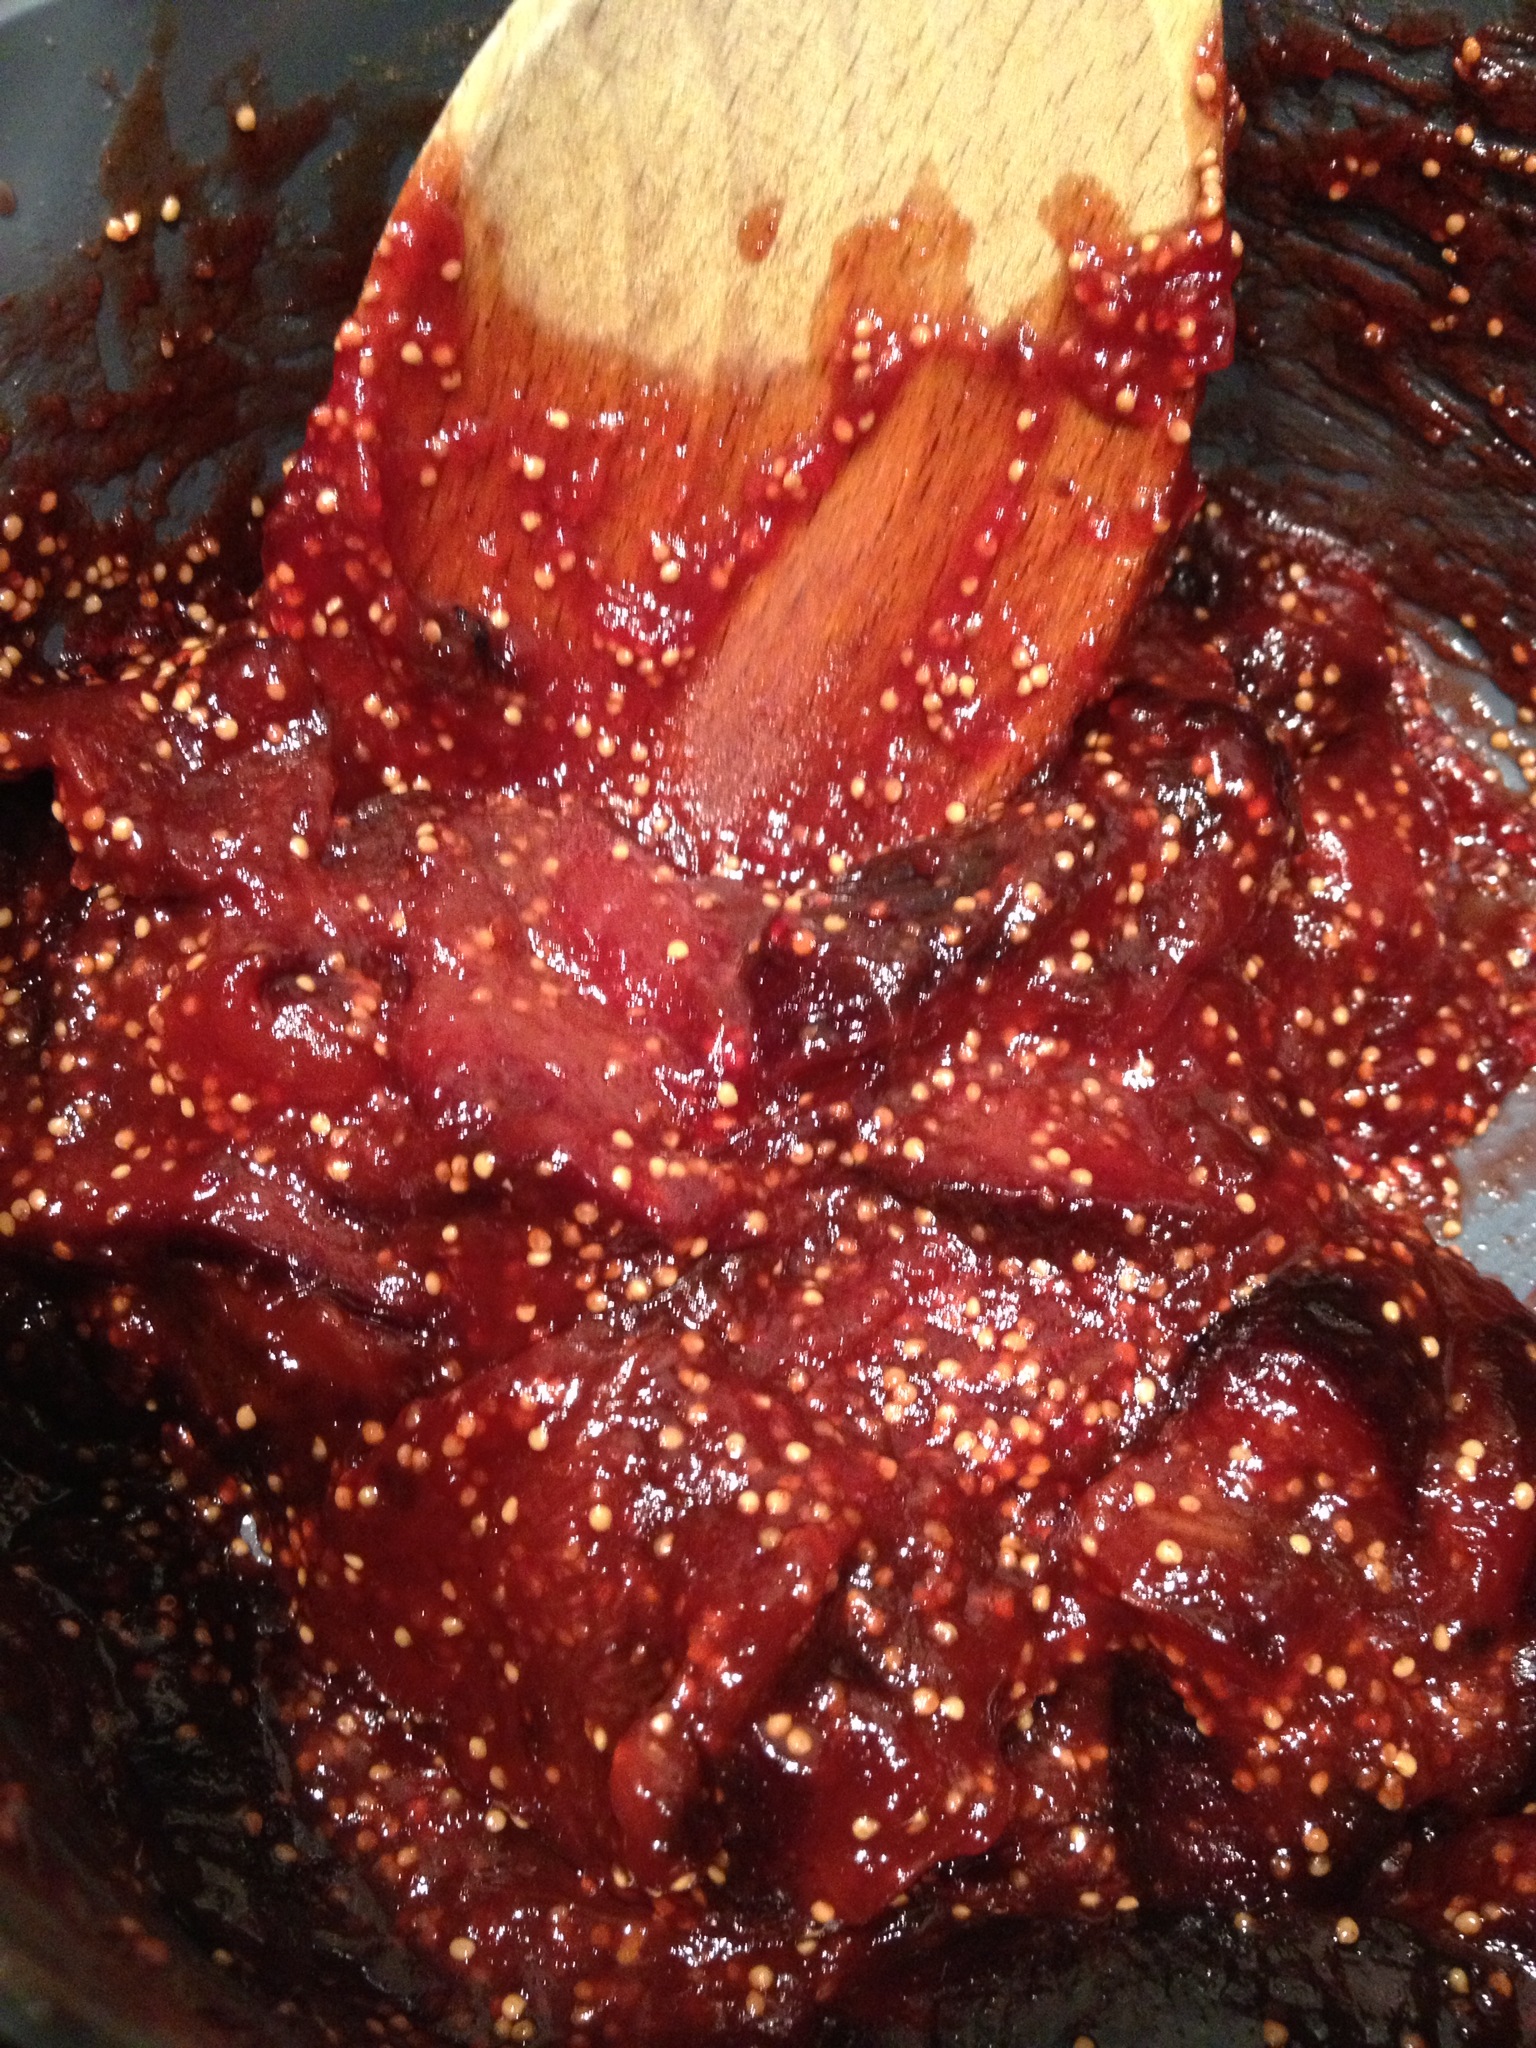
Cut the figs in to quarters (or smaller if they are very large) and pop in a saucepan. Add the other ingredients and then bring to a simmer over a medium heat, stirring all the time.

IMG_0031

Don’t let the mixture boil but keep it simmering for about 30 – 40 minutes or until the fig has started to break down and it takes on a jammy consistency! Taste (carefully – it will be hot!) and adjust the sweetner if required.

IMG_0034

Take a clean glass jar and rinse with warm soapy water (or pop through the dishwasher). Dry it well and then place it in to the oven at about 180 C for approx 20 minutes. Remove carefully and then add the jam to the jars while they are both still hot. Pop a lid on and once cool place in the fridge. This should keep for a few weeks at least.

Enjoy your jam spread on some yummy rye toast with a nice cup of tea 🙂

Spice up your summer! Chocolate chilli cookies (dairy free, low/no gluten)


Chocolate and chilli – what better combination can there be?

I recently baked up another batch of these to welcome home a lovely friend from a trip away and they seemed to go down well so I thought I’d share! They were inspired by a chocolate cookie recipe I found years ago and modified but I can’t now find the original link – when I do I’ll add it! They’re quick and easy to make and taste divine! Oh, and a warning, they smell so good when cooking that it’s pretty hard not to eat them all right there and then!

Makes about 20 (depending how big you make them!)

You will need:

1 and 2/3 cups of white Spelt flour or a gluten-free blend
1/2 raw Cacao powder
1/2 cup Almond oil
1 cup Raw coconut sugar or other raw sugar
1/4 cup Maple syrup (the best quality you can get)
3 tbsp Almond milk (you could use soya or coconut milk too)
1 tsp Bicarbonate of soda
1/4 tsp hot Chilli powder (I used dried chillies, ground up – and they are hot!)
1/2 tsp ground Cinnamon
1/2 tsp Cayenne pepper
1/4 tsp Himalayan rock salt
1 tsp Vanilla extract
1 tsp Chocolate extract (optional – available from whole food stores, online, or Waitrose for those in the UK)

You will also need some cinnamon chocolate chilli sugar to coat them in 🙂 You can buy pre-mixed sugar, but I prefer to make my own. It’s easy! Just mix 100g sugar with 10g of cocoa powder, 2 tsp cinnamon and 1 tsp chilli powder (or more if you want it hotter!). Adjust the amounts depending how much you need but keep them in those ratios. Make up a batch and keep it in an airtight jar. Just shake before use as the sugar tends to sink to the bottom, leaving the lighter cocoa etc at the top.

Preheat the oven to 350 F and grease and line a baking tray (or 2!).

Put the oil, sugar, maple syrup and milk in a bowl and mix together using a fork. Add in the vanilla extract and mix well. Mix the rest of the ingredients in a large bowl and sieve in to the wet ingredients. Mix until you have a dough. The dough will be quite moist and sticky.

Put the cinnamon chocolate chilli sugar on a plate. Take small, walnut sized, balls of the dough and pat into the topping sugar to make discs about 2 inches across. Make sure they are well covered in sugar. Put them on to the baking tray with the sugar facing up. Cook for 10 – 12 minutes until they are crackly on the top and have spread a little. Allow to cool on the baking tray for 5 mins then transfer to a wire rack to cool.

Enjoy! :)

Ninjabread men! Chocolate, cherry and ginger dairy free biscuits


Gosh it’s been a long time since i’ve had time to bake – sorry! Real life has got in the way (in good and bad ways!), but oh how i’ve missed it!

20130709-202434.jpg

Thankfully I had an excuse to bake again 🙂 yippee! I wanted to make something yummy to celebrate (or rather commiserate) the last body combat class with a very special friend of mine. What better way to mark the occasion than by baking some funky little Ninjabread men! I used ginger, dark chocolate and dried cherries in mine but you could flavour the biscuits any way you like 🙂

For the biscuits you need:

2 cups Spelt flour or gluten-free flour mix

1 cups Unrefined Icing sugar

6 oz Dairy-free margarine (get the best quality you can)

2 tsp ground Ginger

handful of chopped dried Cherries

handful of dairy free chocolate (I used Willie’s chef’s drops)

Ninja cutters (available online) or just use normal ginger bread man cutters 🙂

Pre-heat the oven to 180 C. Put the margarine in a large mixing bowl, sieve the flour, icing sugar and ground ginger in and cream it together. Try not to over mix but make sure the margarine is properly mixed with the dry ingredients. Add the cherries and chocolate and combine well. Once it’s formed a dough wrap in cling film and chill for 30 mins. If you find the dough is too sticky then add some more flour.

Once chilled, roll out and use the biscuit cutter to cut out your little ninjas. Use a palate knife to transfer them carefully to a greased baking tray. Sprinkle with a little raw sugar if you like and bake for 8 – 10 mins, or until golden. Remove from the oven and allow to cool on the tray.

20130709-202620.jpg

Decoration

Once the biscuits are cool you can have some fun! I used a variety of ninja designs. For the dark icing you can get black food colouring or use melted dark chocolate. Unleash your best ninja using skills!! 🙂

20130709-201914.jpg

20130709-201957.jpg

20130709-202032.jpg

Healthy, sugar-free ice lollies


Now that the sun is finally shining here I fancied something cold and yummy, so I thought I’d make these up again 🙂 The original recipe was one I posted on Colette’s fitness kitchen, but here it is again 🙂

Cool off with one of these delicious lollies

In the hot weather everyone fancies an ice cream so why not whip up one of these delicious, healthy versions to get you through those warm afternoons.

Pineapple Bliss Lolly

3 Bananas
1/3 Pineapple
1 Apple (or an equivalent amount of fresh apple juice)
Coconut milk (adjust quantity to suit taste and consistency)
Handful of fresh Mint leaves

Put all the ingredients in a blender apart from the mint. Blend until smooth. Chop the mint leaves and add to the mix. Stir well then put into lolly moulds and freeze. The coconut milk adds a lovely creaminess to this, but if you want something even more ice cream like then add in a scoop of vanilla Pure Protein Powder – divine!

Berrytastic Lolly

1 Banana
1 Apple (or equivalent amount of juice)
Handful of Grapes (8 – 10)
4 – 6 Strawberries
4 – 6 Blackberries
4 – 6 Raspberries
20 – 30 Blackcurrants

Put all the ingredients in a blender (you can add whatever fruits you have to this) and blend until smooth. If you want something a bit creamier add some coconut milk or vanilla Pure Protein Powder, and for an added health boost add in the contents of 1 – 3 Acai Berry Plus capsules and some Organic Green Power Powder – yum!

Pour into lolly moulds and freeze! Then go and enjoy the sunshine 🙂

Super easy Almond and Cinnamon Butter – gluten and dairy free


I’ve been meaning to start making my own nut butter for ages and finally got round to it today! 🙂 The cinnamon turns this from a normal spread in to a delicious indulgent treat!

20130317-195752.jpg

This is so easy and so delicious!

You will need:

150g Raw almonds
1/2 tbsp Cinnamon (adjust to taste)
1 tbsp Coconut oil
1 tbsp Sweet freedom, honey or other liquid sweetener

Simply place everything in to a food processor or vitamix and pulse until combined and smooth. It may take up to 10 minutes depending how smooth you want it. You can add a little extra coconut oil for a creamier texture if you like. Adjust the cinnamon and sweet freedom to taste. Once combined remove and eat! It’s lovely on toast, or you can use it in your smoothies, but it’s even better spread on some lovely fresh, tart apples! Yummy! 🙂

20130317-200328.jpg

Dark chocolate cherry cookies (dairy and gluten free! :) )


You’d think I’d be bored of biscuits by now …but no, I just keep thinking of new scrummy flavour combos! Today it’s dark choc and cherry – a winning combination. The tartness of the cherries works so well with the rich, dark chocolate 🙂

20130315-184707.jpg

These use the same basic ingredients as my choc and ginger biccies but just replace the ginger with a handful of dried cherries! Simple! 🙂

20130315-184759.jpg

Yummy mummy! Dark choc and ginger cookies (low gluten and dairy free!)


You may have noticed a certain penchant for cookies and biscuits lately? what can i say? I just love this simple recipe and how easy it is to customise it with whatever flavours you like 🙂

20130310-094729.jpg

20130310-094807.jpg

So this weekend Mother’s Day and the return of my lovely friend from holiday inspired me to bake some more biscuits for both of them 🙂 Both are fans of the combo of ginger and dark chocolate and they work brilliantly with these cookies. I also had some fun with a cool set of letter cutters (I’m such a child!).

20130310-095335.jpg

20130310-095345.jpg

You will need:

2 cups Spelt flour or gluten-free flour mix

1 cup Unrefined Icing sugar

6 oz Dairy-free margarine (get the best quality you can)

A handful of crystallised ginger

A handful of dairy free chocolate (I used Willie’s chef’s drops)

20130310-093326.jpg

Pre-heat the oven to 180 C. Put the margarine in a large mixing bowl, sieve the flour and icing sugar in and cream it together. Try not to over mix but make sure the margarine is properly mixed with the dry ingredients. Chop the ginger and chocolate into small pieces and add to the mix. Once it’s formed a dough wrap in cling film and chill for 30 mins (optional). If you find the dough is too sticky then add some more flour.

Roll the dough out and use cutters to cut your biscuit shapes and transfer to a greased baking tray. I found that this dough worked best as a thick biscuit (about half a cm). If you don’t want to roll it then take small balls and flatten on to the baking tray. Bake in the oven for 10 – 12 mins or until as brown as you like them (I like my biscuits bordering on burnt so I kept them in a little longer! 🙂 ).

If you have some letter cutters (or you’re handy with a knife and can freehand them) then you can have fun spelling stuff in biscuit form! 😉

20130310-095722.jpg

Lemon Drop Shortbread Biscuits (gluten and dairy free and oh so yummy!)


As we move from winter in to spring my thoughts turn to lighter bakes and lemon always features highly in my list of spring and summer baking yumminess!Once again this is the result of a little seed planted in my head by my good friend Colette (anyone would think she had a bit of a thing for these biscuit recipes… 😉 ).

IMG_0470

This is super-easy and fun – perfect to make for the kids and can be done pretty quickly after school or on a sunday afternoon. Equally yummy for adults too though! 🙂

IMG_0475

You will need:

2 cups Spelt flour or gluten-free flour mix

1 cup Unrefined Icing sugar

6 oz Dairy-free margarine (get the best quality you can)

zest of 2 small Lemons

1 tbsp fresh Lemon juice

Dairy- free (or non dairy free if you want!) Lemon curd – it will depend how much you use but less than half a jar should do it 🙂

Pre-heat the oven to 180 C. Put the margarine in a large mixing bowl, sieve the flour and icing sugar in and cream it together. Try not to over mix but make sure the margarine is properly mixed with the dry ingredients. Add the zest and lemon juice and combine it well. Once it’s formed a dough wrap in cling film and chill for 30 mins (optional). If you find the dough is too sticky then add some more flour.  Once chilled, make small balls of dough (approx 1 inch diameter) and pop them on a greased baking tray. Push them down to flatten them and use your thumb to create a deep hollow in the centre. Prick the bottom of the hollow with a fork.

IMG_0463

Bake for 8 minutes. Then remove from the oven and spoon in a small amount of lemon curd in to each hollow.

IMG_0466

Bake for a further 2 minutes or so, or until golden. Remove from the oven and allow to cool on the tray. Be very careful when you remove them from the oven as the curd will be molten! Avoid the temptation to eat them straight away (trust me on this one!), just allow them to cool a little before you tuck in! 🙂

IMG_0476

Crunchy Granola Bars


I’ve been needing a mid-afternoon pick me up lately and as I’m off the ‘Willies’ (chocolate, that is! :)) I thought I’d have a go at creating a crunchy, granola snack bar. My first attempt ended up as a chewy breakfast kinda bar (and although I don’t like it as much I will post the recipe as some of my tasters loved it even if I didn’t!). So I went back to the baking tray and came up with this little beauty 🙂 Totally detox friendly! 🙂

_MG_7771

500g Spelt porridge oats (the whole ones, not flakes) or Jumbo porridge oats

350g mixed nuts of your choice (I used almonds, pistachios and cashews)

100g Pumpkin seeds

100g Sunflower seeds

50g Chia seeds

50g Linseeds

200g dried fruit (I used blueberries, cranberries and banana chips this time)

1 tso cinnamon

250 – 350g Sweet Freedom (light or dark)

Preheat the oven to 150 C. Start by placing the spelt flakes in a baking tray and put in the oven to toast for approx 20 mins, until brown. Place the nuts in a dry frying pan and toast over a medium heat until they start to turn brown. Once the spelt and nuts are toasted add to a large bowl. Add in all the other ingredients, except the sweet freedom. Mix well and then start to drizzle in the sweet freedom. Keep going until you have a sticky mixture. It needs to start to hold together, but be careful not to add too much. Keep stirring well.

Turn the oven up to 200 C. Spread the sticky mixture out on to a baking tray covered in baking parchment. Arrange the mixture to the thickness you want for your bars, 1 – 2cm works well. Compress it down as much as you can. Place in the oven for up to 10 mins until it goes a lovely golden brown. Keep an eye on it as it can burn. As you take it out use the back of a spoon to compress the mixture again and leave to start to cool. It will not hold together at this point so don’t try to cut it! Keep an eye on it as it cools, once it starts to hold together you can divide it in to bars. It should be cool enough to snap. Peel it away from the baking parchment and put it upside down on a wire rack to cool. Keep an eye on it and move the pieces regularly or they will stick! Once totally cool it should be hard and crunchy. Pop it in an airtight tin and it will keep for ages! 🙂


Fruit and Nut Cookies – gluten, dairy, fat and sugar free! omg!


I’m now mid week in to the first week of this amazing detox from Pure Form Fitness. I’ve done this programme before and I just love the energy it gives me and the results it achieves without leaving me feeling deprived or hungry. I also love the way it inspires me to create detox-friendly things to keep any rogue cravings at bay! These liitle cookies just sum up all of that! Fun and easy to make, delicious to eat and 100% detox friendly – just perfect with my afternoon cup of rooibos tea 🙂

_MG_7660-2

You can use any nuts and fruits you like but these are the ones I had in my cupboard and they seem to work well. If you substitute the fruit go for large, juice dried fruits like figs and dates, not things like blueberries etc.

_MG_7671-2

125g Almonds

75g Brazil nuts

40g Dried coconut flakes

85g Dried Prunes (or dates)

45g Dried apricots

20g Pumpkin seeds

15g Sunflower seeds

zest of 1/2 Lemon

1 tbsp freshly pressed Apple juice (or prune juice)

Preheat the oven to 150 C and line a baking tray with baking parchment.

Place everything in a food processor and pulse until the nuts and fruit are finely chopped and the mixture starts to come together. Add a little more juice if you find it’s too dry. You can either make small balls of the mixture and then flatten them on to a baking tray, or if you want pretty little shapes like my flower-shaped biccies then line a baking tray with baking parchment and tip the mixture in to it. Flatten the mixture down. I found the easiest way was to use a piece of baking parchment and then apply pressure with a palette knife or my hands. You want it to be about 5mm thick and well compressed. Use a biscuit cutter to cut out shapes and carefully transfer to another lined baking tray.

Bake in the oven for 15 minutes, or until firm, then cool on a wire rack. They will be a little pliable when removed, but as they cool they will harden.

Eat with a lovely cup of tea! 🙂

If you’re feeling decandent you can also add a layer of peanut butter and make a cookie sandwich! omg! 🙂

_MG_7687