Cherry and apple flapjack slice and a whole lot of love!


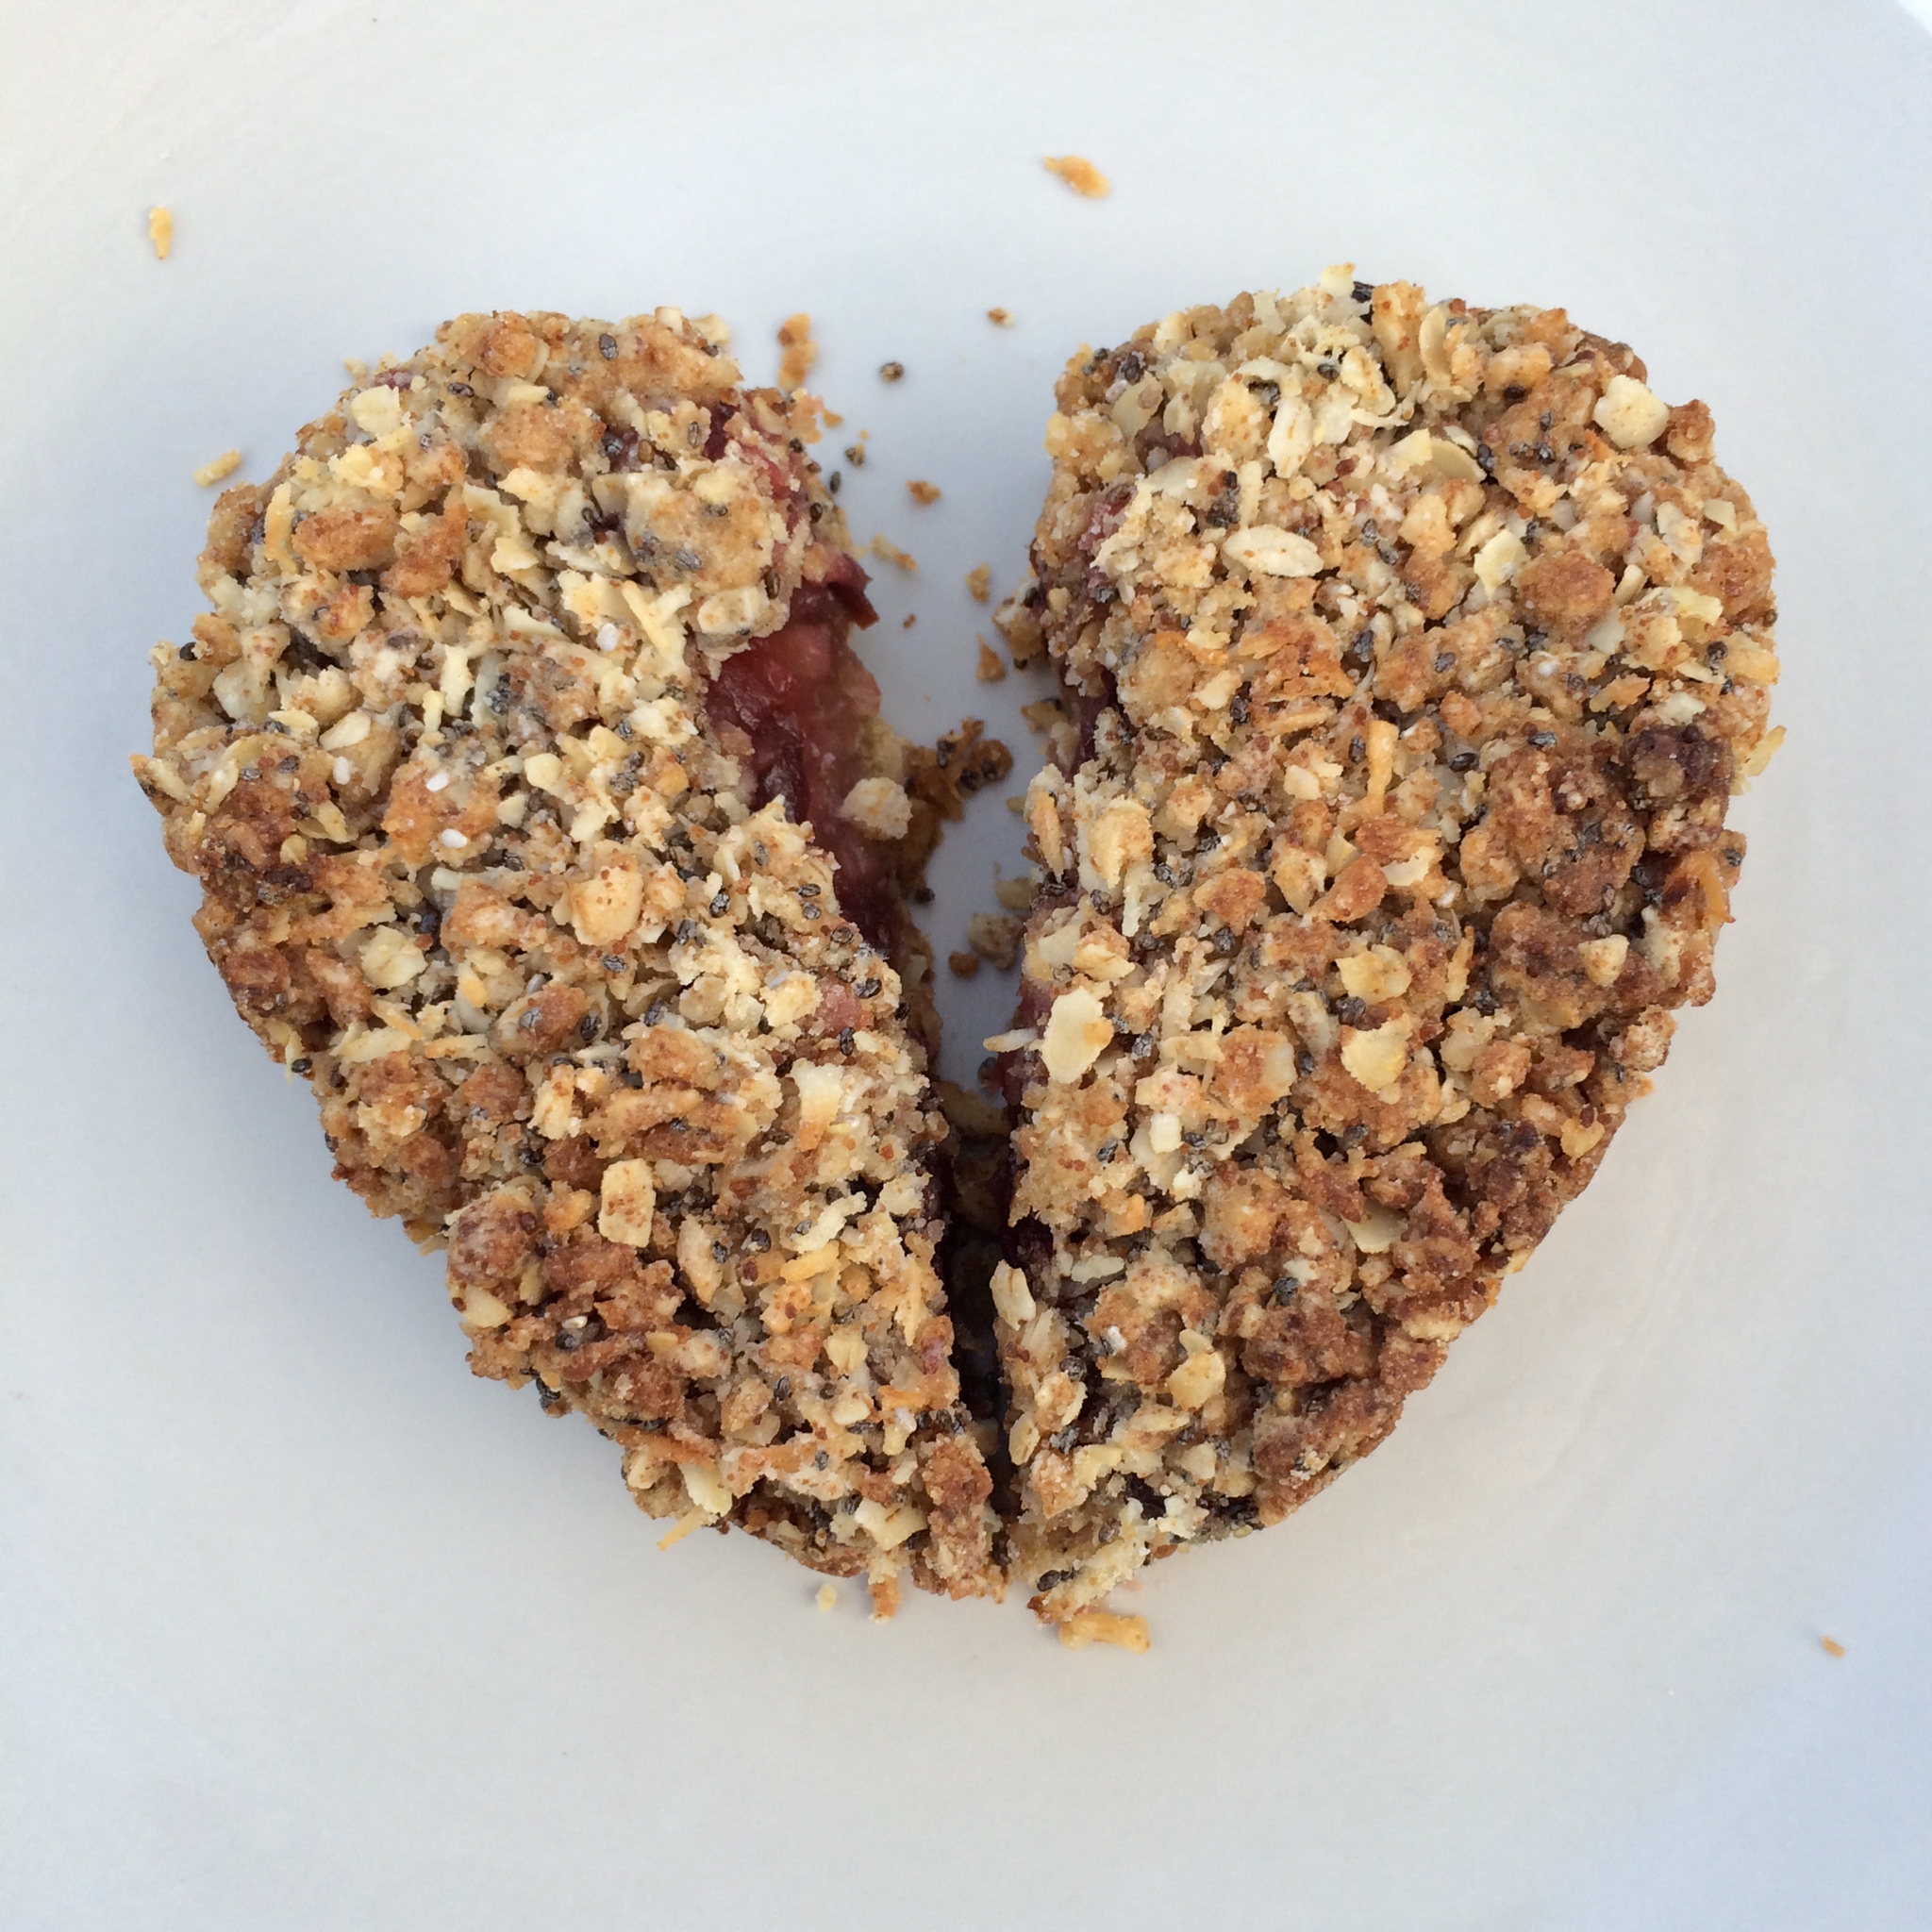
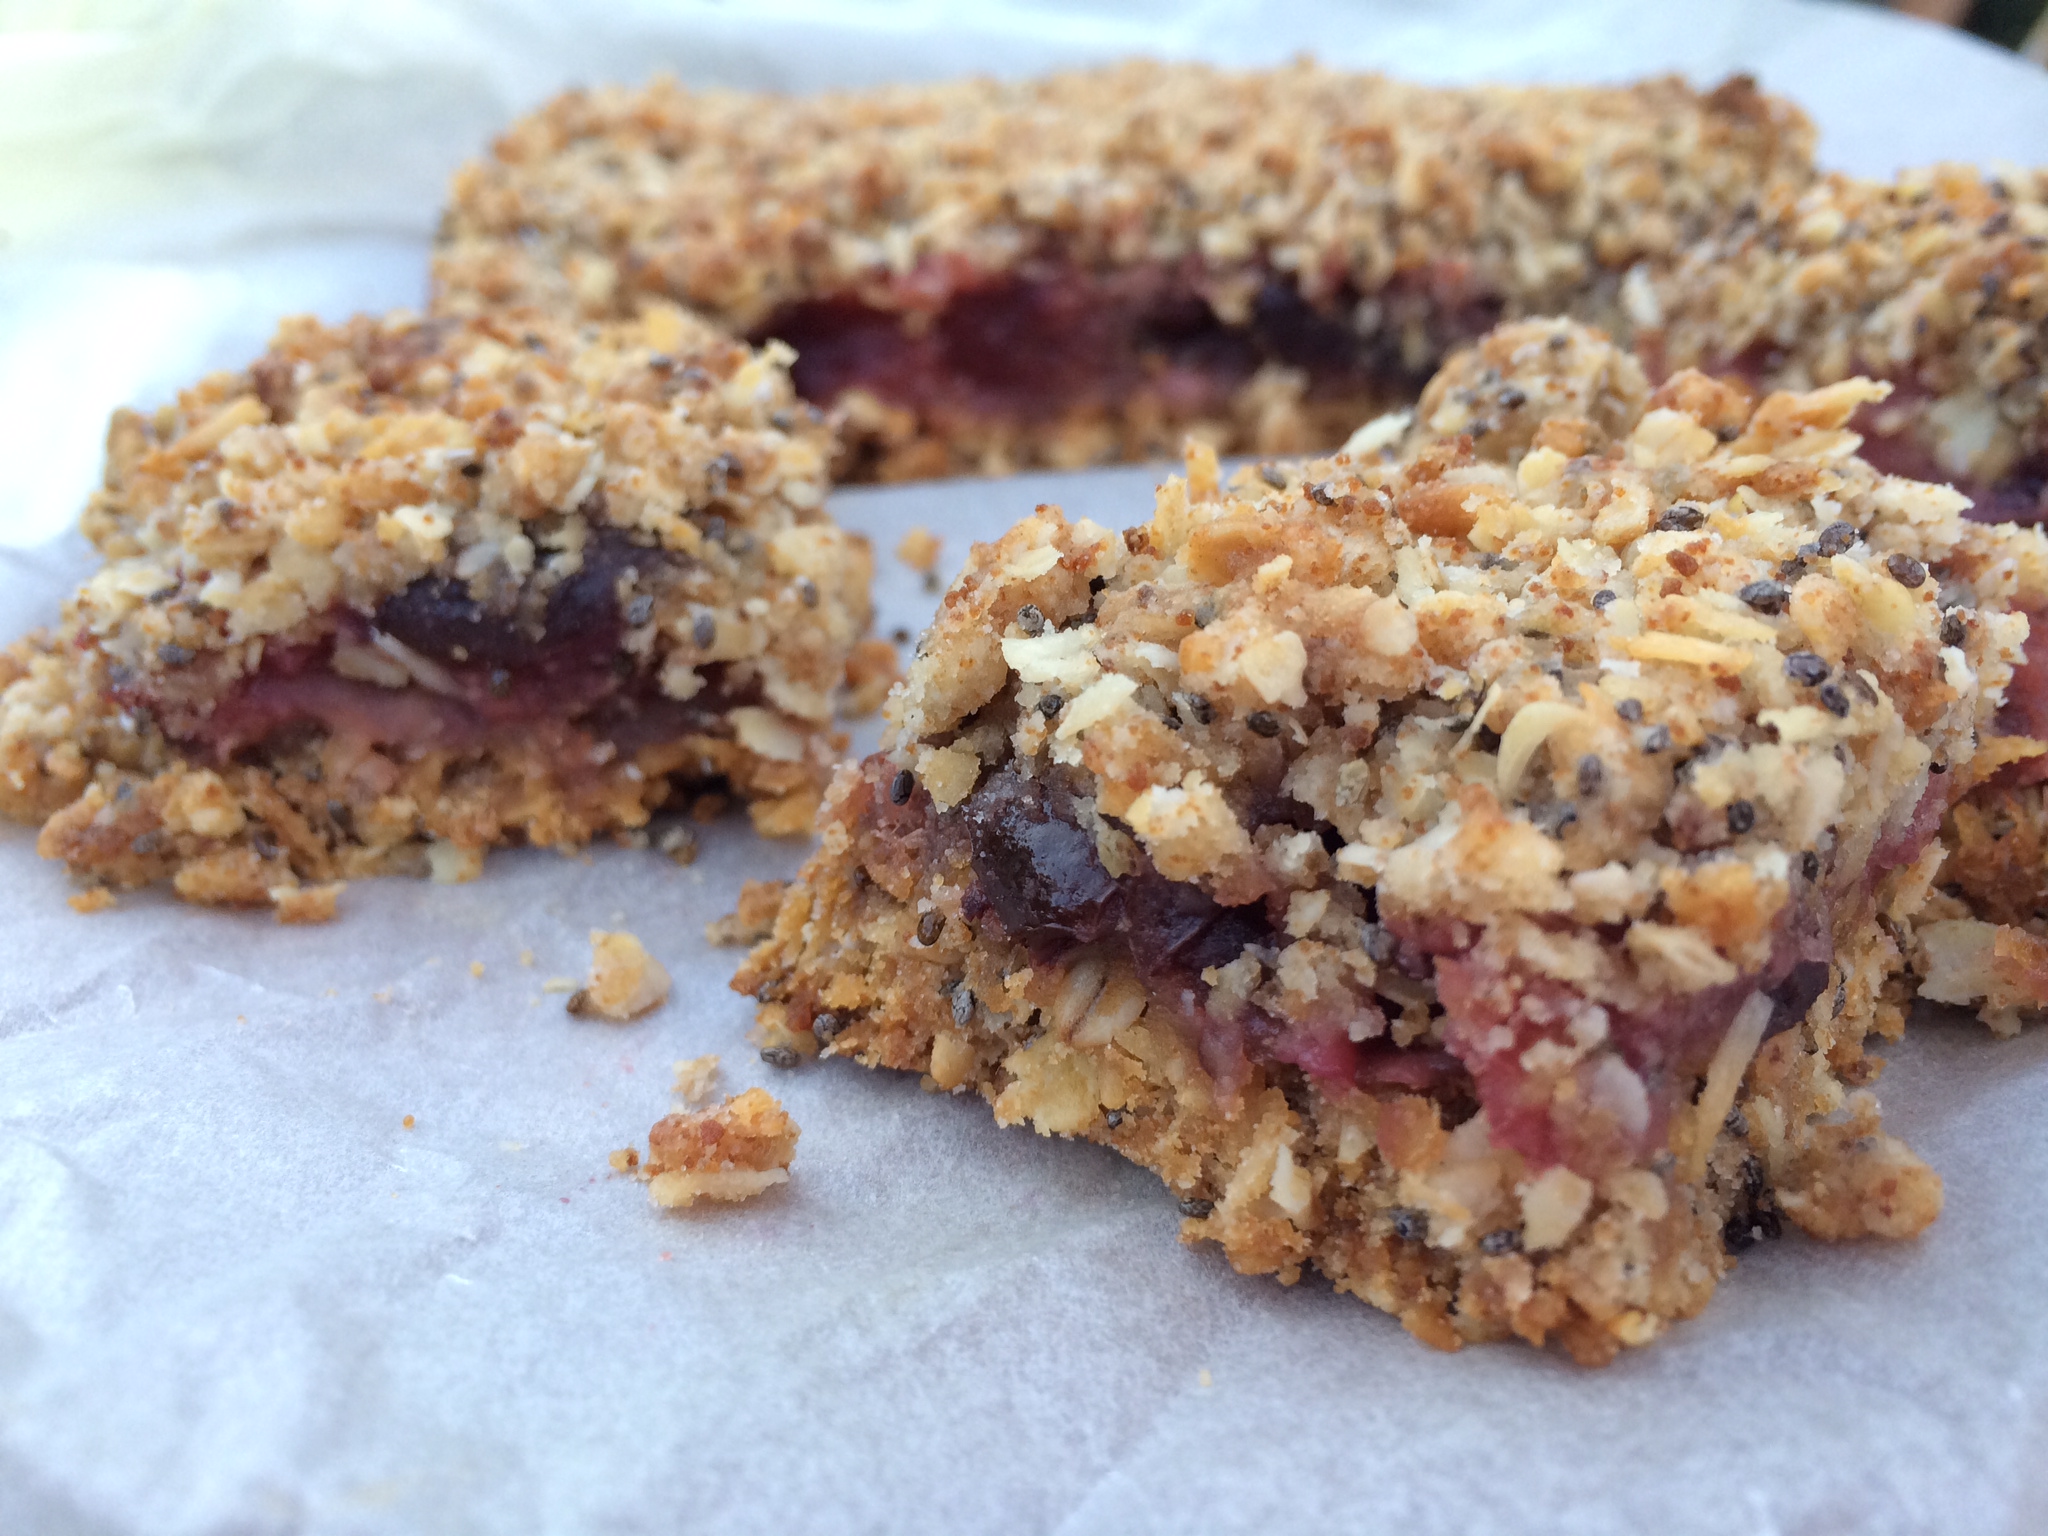
This oaty, fruity, flapjacky treat is simply lovely! You can make it with any fruit compote you choose and in any shape you choose! I was feeling the love so I whipped up one rectangular one and one in a little heart shape! πŸ™‚

01562f15d522c203bd9b815a8a7c50d893d81b1194

This is SO much better for you than traditional flapjack slices – it’s full of wholefoods and the addition of the chia seeds gives an added Omega boost too! You could use store bought compote but they tend to be full of sugar so have a go at making your own if you can – it’s so easy!

017b1f523ad72ab56dec70c3541780d48e85f128a1

You will need:

1 cup Rice flour
1 cup Oats (or quinoa porridge flakes)
1/2 cup Desiccated coconut
1/4 cup Raw coconut sugar
1/4 cup Chia seeds
1 tsp ground Ginger
1/2 tsp Himalayan rock salt
110g Coconut oil (not melted)
3 Tbsp Maple syrup or Agave (or other liquid sweetener)
1 1/2 cup Cherry and apple compote

To make a quick cherry and apple compote take one punnet of cherries (pitted and roughly chopped in quarters) and approximately 3 – 4 Bramley apples (peeled, cored and chopped) and place in a bowl. Pop in the microwave and cook in short bursts until the apple has softened and the cherries are cooked through (can also be done in a saucepan on the hob). If required add a little unrefined sugar to sweeten (though I prefer it without sugar). Allow to cool.

Preheat oven to 175 C.

Add the flour, oats, coconut, sugar, chia seeds, ginger and salt to a large bowl and mix well. Add the coconut oil and rub it in to the dry mixture using your hands to create a breadcrumb consistency. Add the liquid sweetener and mix in to form a crumble-type mixture.

Line a rectangular or square (or heart shaped!) baking dish with baking paper (ensure the baking paper comes up the sides so you can easily remove the flapjack from the tin later). Take just over half of the mixture and place in to a lined baking tin and flatten well. Bake in the oven for 20 – 25 minutes until it starts to brown.

Remove from the oven and spread the compote over the base. Put the remaining crumble mix over the top and lightly press down. Bake in the oven again for 20 – 25 mins or until it browns.

Take it out the oven and let it cool in the tin (or if you can’t wait for it to cool completely wait at least 15 mins!). Then remove, cut up and enjoy πŸ™‚

01e9d34eae728d135b839b20146d22b6be8b23d7d8

0139b6fe964f8c96235a89ef11755f891a1cb75913

Lemon and Chia Seed Cookies – Dairy and Gluten free!


I’ve seen quite a few recipes around using tapioca flour and finally my supermarket has started stocking it so IΒ thought I’d have a go at making up some cookies with it!

These are simply divine – they’re light and crumbly and really melt in the mouth.

photo 3

You will need:

1 cup Tapioca flour

1.5 cups raw Cashews

1/2 cup Coconut oil (melted)

1 Egg

1/4 cup Maple syrup

3 tbsp Chia seeds

Zest of 1 and 1/2 lemons

a pinch of Himalayan rock salt

For the icing:

100g unrefined Icing sugar

Zest of half a lemon

Juice of up to half a lemon

photo 4

First pop the cashews in to a blender or food processor and blend until they form a fine flour. Combine the cashew flour and tapioca flour together in a large bowl. Grate the lemon zest in to the bowl and add the chia seeds and salt and mix well.

Create a well in the centre of the dry mixture and add the egg, maple syrup and coconut oil and mix really well to form a dough. You may find the mixture is a little too wet (depending on the size of your egg!) – if so add more tapioca flour until it forms a firmish dough (whilst the coconut oil is melted though it will still be quite a loose dough).

Wrap it in clingfilm and pop the dough in the fridge to chill for 20 minutes.

Pre-heat the oven to 160 C.

Place the dough between two sheets of baking parchment and roll thin (few mm thick). Use whatever shaped cutters you like and then transfer the cookies to a lined baking tray. Bake in the oven for 20 – 25 mins or until golden (check after 15 mins).

Allow to cool and then mix the icing ingredients together. Add the lemon juice a little at a time until you have a consistency that you want. Then drizzle over the biscuits. Allow to set and then enjoy with a nice cup of tea! πŸ™‚

photo 1

Malt loaf muffins! Dairy and Gluten free!


After seeing a post of some delicious looking malt loaf muffins my friend Vicky made I decided I simply had to have a go at gluten and dairy-freeing them! I love the spicy richness of malt loaf so was sure these would be divine. These also super easy to make and make a great grab and go brekkie if you’re on the run. Thank you for the inspiration Vicky! πŸ™‚

photo 2 (2)

You will need:

1 2/3 cups gluten-free Oat bran (if you don’t need to go gluten free then go with wheat bran)

1 cup and 4 tsp Coconut sugar (or other raw, unrefined sugar)

2 tsp Rice malt syrup (or Agave)

2 cups Raisins and currants

2 tsp ground Cinnamon

2 tsp Allspice

1/8 tsp ground Cloves

1/8 tsp ground Nutmeg

pinch of Himalayan rock salt

2 cups of Almond or other non-dairy milk

2 cups of Gluten free flour (or Spelt flour)

2 tsp Baking powder

This mixture will make approx 12 medium sized muffins and 6 mini ones.

Pop all the ingredients apart from the flour and baking powder in to a large bowl and mix well. Allow to soak for a couple of hours so the bran absorbs the milk and forms a wet mush!

Preheat the oven to 180 C.

Mix the flour and baking powder together really well and then add to the wet ingredients. Combine thoroughly and then pop in to muffin cases, sprinkle some coconut sugar over the top and bake for 20 – 25 mins, or until a skewer comes out clean.

These are delicious straight out the oven while still warm or will keep for a few days in an airtight container. You can also freeze them to eat later.

photo 2 (3)


Christmas Hats! Black Pepper, Coconut Cream and Strawberry Festive Fun!


I love dressing up (as my friends well know…) .. so much in fact that even my bakes are getting in the act this year….. πŸ™‚

These are a fun little festive treat to make for parties over the Christmas season. The biscuits themselves are very light, and not too sweet and so they go nicely with the sweetness of the strawberry and the rich coconut cream – the pepper adds a bite and make these a perfect bit of adult fun. If you want something a bit sweeter for the kids you can use my basic biscuit recipe for the bases instead – recipe here

2464

You will need:

150g Spelt, rice or gluten-free flour blend

50g Dairy free margarine

50g raw Coconut sugar / unrefined dark sugar

1 egg (if you want to go egg-free then use a little oil instead – 1/4 cup olive or almond oil but add less of the mixture in (see below)

2 tbsp Maple syrup (or agave or rice syrup, or honey)

1/2 tsp baking powder

1/2 tsp ground Cinnamon

1/2 tsp fresh ground Black Pepper

1/8 tsp ground Cloves

1/8 tsp ground Nutmeg

A punnet strawberries

1 can of Coconut cream (milk – the canned milk, not the carton) (65 – 70% coconut extract – see below)

a little unrefined icing sugar (optional)

2435


A few hours before you make these (or a day if you can) you need to set the coconut milk. I use this variety.

Pop the can in the fridge for a few hours or overnight and try not to move it. The coconut fat solidifies and separates at the top, leaving clear liquid at the bottom. When you are ready to make the cake remove the can carefully from the fridge and turn the can upside down in one move (i.e. no shaking!). Then open the can at the bottom – yes – trust me, open the bottom! You should find that the fat has solidified and you will see a few cm’s of clear liquid. Pour this off (don’t throw it away – you can pop it in a smoothie!) and then you are left with the coconut cream to use! πŸ™‚

To make the biscuits:

Preheat the oven to 170 C.

Pop the flour, baking powder, spices and sugar in a food processor and blend briefly. Add the margarine and mix again for a minute or so.

While this is mixing break the egg in to a bowl and whisk the maple syrup in to it to form combine. Trickle a little of this mixture in to the processor bowl while it is running slowly. Keep adding until the mixture forms a firm dough (you may not need all of it).

Once it forms a dough use your hands to combine it and remove from the processor. Roll out the dough on a lightly floured surface until it’s about 3 – 5 mm thick and use a small round cutter to cut shapes. You will probably have more dough than you need but it can be wrapped in cling film and frozen for later πŸ™‚

Pop the biscuits on to a lined baking sheet and bake in the oven for 12 – 15 minutes or until they start to brown. Remove and allow to cool.

Coconut cream:

Take the solidified coconut cream and using electric or a hand whisk beat until fluffy. If you want a little sweetness add a little unrefined icing sugar in as you whip it.

Strawberries:

Remove the stem of the strawberries and cut the top off each to give a flat base.

Now you can assemble your biccies!

Pop the whipped coconut cream in to a piping bag. If you don’t have one (I don’t!) then put it in a plastic ziplock bag and just snip the corner of the bag off to use as a nozzle. Pipe a small amount of cream on to the centre of each biscuit. Pop a strawberry on top and then pipe around the base of the strawberry and add a little dot of cream to the top (for the bobble on the hat!). You could dust with a little icing sugar and a grind of black pepper if you wanted to. Serve as soon as possible. They will last overnight but the biscuits will go softer so wait to assemble until as close to serving time as possible. Any extra biscuits can be stored in an airtight container for a few days and they will stay crispy.

Have fun! πŸ™‚

2437


Persimmon Spiced Muffins


I have to confess that until a few weeks ago I’d never even heard of a persimmon fruit, let alone eaten one or cooked with it! I do like a challenge though and these little fruits are very popular at this time of year in the States so I thought I’d experiment.

photo 5

The fruit itself is like a cross between and apple and a pear, and it’s lovely eaten on it’s own, or chopped and served in a salad. It’s also lovely to cook with. This recipe is for some yummy, healthy muffins which would make a perfect afternoon snack or even something you could grab for a brekkie on the go!

photo 2

Before you start the first thing you need to do is make some oat flour. Simply take 4 cups of porridge oats (make sure they are gluten-free oats), pop them in a processor or blender and process until they form a flour. You will need 2 cups of actual flour for the recipe so you will have some extra to use later πŸ™‚

You will need:

2 cups Oat flour

1/2 tsp Bicarbonate of soda

1/2 tsp Baking powder

1 cup Persimmon flesh

3 tbsp Apple puree (recipe here)

1/2 cup Coconut oil (melted)

1 cup Coconut sugar

1 tbsp Chia seeds

1 cup of Raisins

1/2 tsp Vanilla extract

1/2 tsp ground Cinnamon

1/2 tsp ground Cloves

1/2 tsp ground Nutmeg

1/2 tsp sea salt

Makes approx 12 – 14 muffins

Preheat the oven to 180 C and line a muffin tray with paper liners (or just grease the tray).

Put the oat flour in to a mixing bowl, add the bicarbonate of soda and baking powder and mix well and leave to one side.

Put all the other ingredients apart from the raisins in to a food processor and blend for a few minutes until well combined.

Add the wet mixture to the dry and stir gently. Finally fold in the raisins.

Take approximately 2 tbsps of mixture and add to each cake liner. Sprinkle with coconut sugar and pop in the oven for 20 – 25 minutes or until the tops have browned and a skewer comes out clean. These are very moist muffins so they will seem quite loose.

These are divine whilst still warm from the oven! or allow to cool and enjoy later πŸ™‚

photo 4


Chocolate, Nut and Chia Cookies – dairy and gluten free


Do you love chocolate? I do! rather too much sadly! So I’m always on the look out for chocolate goodies that will hit the chocolate spot but are a little bit better for me! These cookies are awesome – they’re chocolatey, they’re healthy and they’re full of omega-3’s and good protein and fat. They’re also dairy, gluten and unrefined sugar free! Whoop!

photo 1

You will need:

1/2 cup Buckwheat flour (you can also use quinoa or rice flour)
1 cup Almonds
1 cup Hazelnuts
1/4 cup Medjool dates (approx 2 – 3 chopped)
1/3 cup Maple syrup
2 tbsp Coconut oil (melted)
3 tbsp Raw cacao powder
3 tbsp Chia seeds
1/4 cup Water
Cinnamon chocolate chilli sugar – for dusting

For the cinnamon chocolate chilli sugar you can buy pre-mixed sugar, but I prefer to make my own. It’s easy! Just mix 100g coconut sugar with 10g of cocoa powder, 2 tsp cinnamon and 1 tsp chilli powder (or more if you want it hotter!). Adjust the amounts depending how much you need but keep them in those ratios. Make up a batch and keep it in an airtight jar. Just shake before use as the sugar tends to sink to the bottom, leaving the lighter cocoa etc at the top.

Preheat the oven to 180 C.

First pop the nuts into a food processor and blend until they are really well ground (almost to a flour). Add in all the other ingredients and process again. It will form a sticky dough.

Take a tablespoon of the mixture and roll it into a ball. Then place on a lined baking tray and flatten until very thin.Sprinkle with the cinnamon chocolate chilli sugar and then pop in the oven. Bake for 12 – 15 mins until firm and starting to brown. Remove from the oven and allow to cool.

Then eat! πŸ™‚

photo 5

Fight that grump! Chocolate, Cherry and Chilli Biscuit balls! Dairy and Gluten free


We all get a little grumpy sometimes don’t we? When I’m feeling the grump I usually reach for the chocolate (Willie’s Cacao is my chocolate of choice!) but I thought this week I’d try something a little different! It’s still chocolate but with a kick, and I guarantee this little beauties will cheer up even the biggest grump!

photo 2

This a modified version of my great balls of biscuit recipe but I’ve made these bigger – cos you need a bit more biscuit to fight that grump πŸ˜‰

photo 5

To make about 16 biscuit balls you will need:

260g Ground almonds

4 tbsp Raw cacao powder (or cocoa powder)

30g Dark, dairy-free chocolate (I use the Willie’s Cacao Drops but any dark chocolate chopped up small will be fine)

30g Dried cherries

5 tablespoons Coconut oil (melted)

1/2 tsp Baking powder

1/2 tsp Himalayan rock salt

1/4 – 1/2 tsp Cayenne pepper (adjust to taste)

1/4 – 1/2 tsp hot chilli powder (adjust to taste)

1 tsp Vanilla extract

4 tbsp Maple syrup (or other liquid sweetener such as agave or honey)

Preheat the oven to 170 C.

Put the dry ingredients in to a mixing bowl and combine thoroughly. Start with a small amount of cayenne and chilli powder at this stage (unless you are confident in how hot you want it πŸ™‚ ). Then chop the chocolate and cherries into small pieces and add them in to the mixture.Β Add the coconut oil, maple syrup and vanilla extract and mix together. Have a little taste and add more of the cayenne and chilli is required. I like it pretty hot so I added quite a bit! Mix it in well if you’re adding more at this stage. You should find the mixture will stick together when you squeeze it between your fingers.

Take tablespoon sized portions of the mixture and form in to a ball. Pop on a greased baking tray and flatten a little. Place in the oven for 10 – 15 minutes (start checking at 10 minutes). Remove when they are starting to brown. They will feel very soft when you take them from the oven but just leave them to cool on the tray and they will harden.

Enjoy with a nice cuppa and feel that grump melt away! πŸ™‚

photo 3

Apple and Cherry Cinnamon Biscuit Balls


Tuesdays are long, tiring days for me so I have just whipped up a batch of these bad boys to get me through!

01cc62a41d73daa109cedff7bd94155a2d26147c40

To make about 24 small biscuit balls you will need:

260g Ground almonds

40g Dried apple

30g Dried cherries

5 tablespoons Coconut oil (melted)

1/2 tsp Baking powder

1/2 tsp Himalayan rock salt

1 tsp ground Cinnamon

1 tsp Vanilla extract

4 tbsp Maple syrup (or other liquid sweetener such as agave or honey)

Preheat the oven to 170 C.

Put the dry ingredients in to a mixing bowl and combine thoroughly. Then chop the apple and cherries finely and add them in to the mixture.Β Add the coconut oil, maple syrup and vanilla extract and mix together. Β You should find the mixture will stick together when you squeeze it between your fingers.

Take tablespoon sized portions of the mixture and form in to a ball. Pop on a greased baking tray and flatten a little. Place in the oven for 10 – 15 minutes (start checking at 10 minutes). Remove when they are starting to brown. They will feel very soft when you take them from the oven but just leave them to cool on the tray and they will harden.

Enjoy with a nice cuppa!

014a52b312eb3bb6bdf30bc382c19b384b035bd0e2


Gingerdead men! Quick and Easy Spooky Biccies!


Happy Hallowe’en!

photo 1

I couldn’t resist whipping up a few little Hallowe’en biccies today!

photo 4 (3)

It’s been a bit of a challenge as my oven is broken (yes, broken – an absolute disaster!) but luckily I was able to get the little mini part of the oven working so can bake really really tiny batches of things! Phew!

So these are so easy and so fun! You can choose to keep them plain or add some spices. I have also iced them with a cinnamon icing but you could keep the icing plain or add any flavour you want. I had such fun finding some cool little hallowe’en cutters but obviously you could just use any shapes! For the gingerdead man I used a normal gingerbread man cutter and then iced on the bones.

photo 1 (2)

You will need:

2 cups of Spelt flour (or gluten free flour mix)

1 cup unrefined Icing sugar

6 oz Dairy free margarine

Optional: 2 tsp ground Ginger or 2 tsp ground Cinnamon

For the icing:

1 cup unrefined Icing sugar

1 tbsp Soya, almond or coconut milk

Optional: 1 tsp ground Cinnamon

Preheat the oven to 180 C. Put the margarine in a large mixing bowl, sieve the flour, icing sugar and spices (if using) and cream it together using your hands. Try not to over mix but make sure the margarine is properly mixed with the dry ingredients. Β Once it’s formed a dough wrap in cling film and chill for 30 mins. If you find the dough is too sticky then add some more flour.

Once chilled, roll out and use biscuit cutters to cut out the shapes of your choice. Use a palate knife to transfer them carefully to a greased baking tray. Sprinkle with a little raw sugar if you like and bake for 8 – 10 mins, or until golden. Remove from the oven and allow to cool on the tray.

photo 4

Mix the icing ingredients together and then pipe the icing on to the biccies. Enjoy!

These won’t last long!

photo 5 (2)


Salt and Spice and all things nice! The smallest pumpkin in the world and a yummy pumpkin seed snack! Re-post :)


As if you hadn’t noticed, it’s that time of year again – PUMPKIN TIME! So as part of my drive to post all things pumpkiny I thought I would re-post this little recipe from last year!

I’m getting my hands on another one of these little munchkin pumpkins for this year, but in the meantime – here’s last year’s delights! πŸ™‚

Well, when I asked for a small pumpkin I wasn’t expecting something quite as small as this….

But anyone who knows me knows I love a challenge so not to be thwarted I decided I’d do my best with this little munchkin of a pumpkin and lo and behold look what I managed to create! Scary eh?

So there wasn’t much meat in this little pumpkin so rather than create the pumpkin-based hallowe’en cake I had planned I decided instead to do something funky with the seeds. It’s a sweet salty treat which sounds odd but combines some wonderful autumn flavours. I adapted it from theΒ SNOG healthy treats book.

Salty and Spicey Sweet potato, raisin, pumpkin seed yumminess!

So I started off by creating some salted roasted seeds. Take your pumpkin seeds, remove all the stringy bits of pumpkin flesh and put in a pan. For every half cup of pumpkin seeds add 2 cups of water and 1 tablespoon of salt. Bring to the boil and then simmer for 10 minutes. Drain and allow to cool slightly.

Then spread them out in one layer on a baking tray and place in an oven at 200 degrees C for anything from 5 – 15 minutes. Just keep checking them as it will depend how big the seeds are. Mine took around 8 minutes πŸ™‚

These are yummy as they are or you can hull (de-husk) them if you really want to (I couldn’t be bothered!). Eat them just like this or use them in the next bit of the recipe.

Take 1 sweet potato and cut it into 1cm cubes. Spread on a baking tray with 2 – 3 tablespoons of the salted roasted pumpkin seeds. Add a handful of raisins and then sprinkle with 1 tablespoon of coconut palm sugar and 1/2 teaspoon of cinnamon. Finally drizzle over some coconut oil (approx 2 tablespoons) and place in the oven at 190 degrees C for about 20 – 25 minutes until the sweet potato is cooked through and the sugar is caramelised. Stir occasionally.

Remove from the oven and allow to cool. Then enjoy on it’s own or spoon it over some natural yoghurt (or ice cream!). It sounds odd but trust me – the sweetness of the sweet potato and raisins go really well with the salty roasted seeds and the cinnamon adds a lovely autumnal twist! Divine and healthy too! πŸ™‚

Happy Hallowe’en!