Raw Almond Caramel Chocolate Fingers


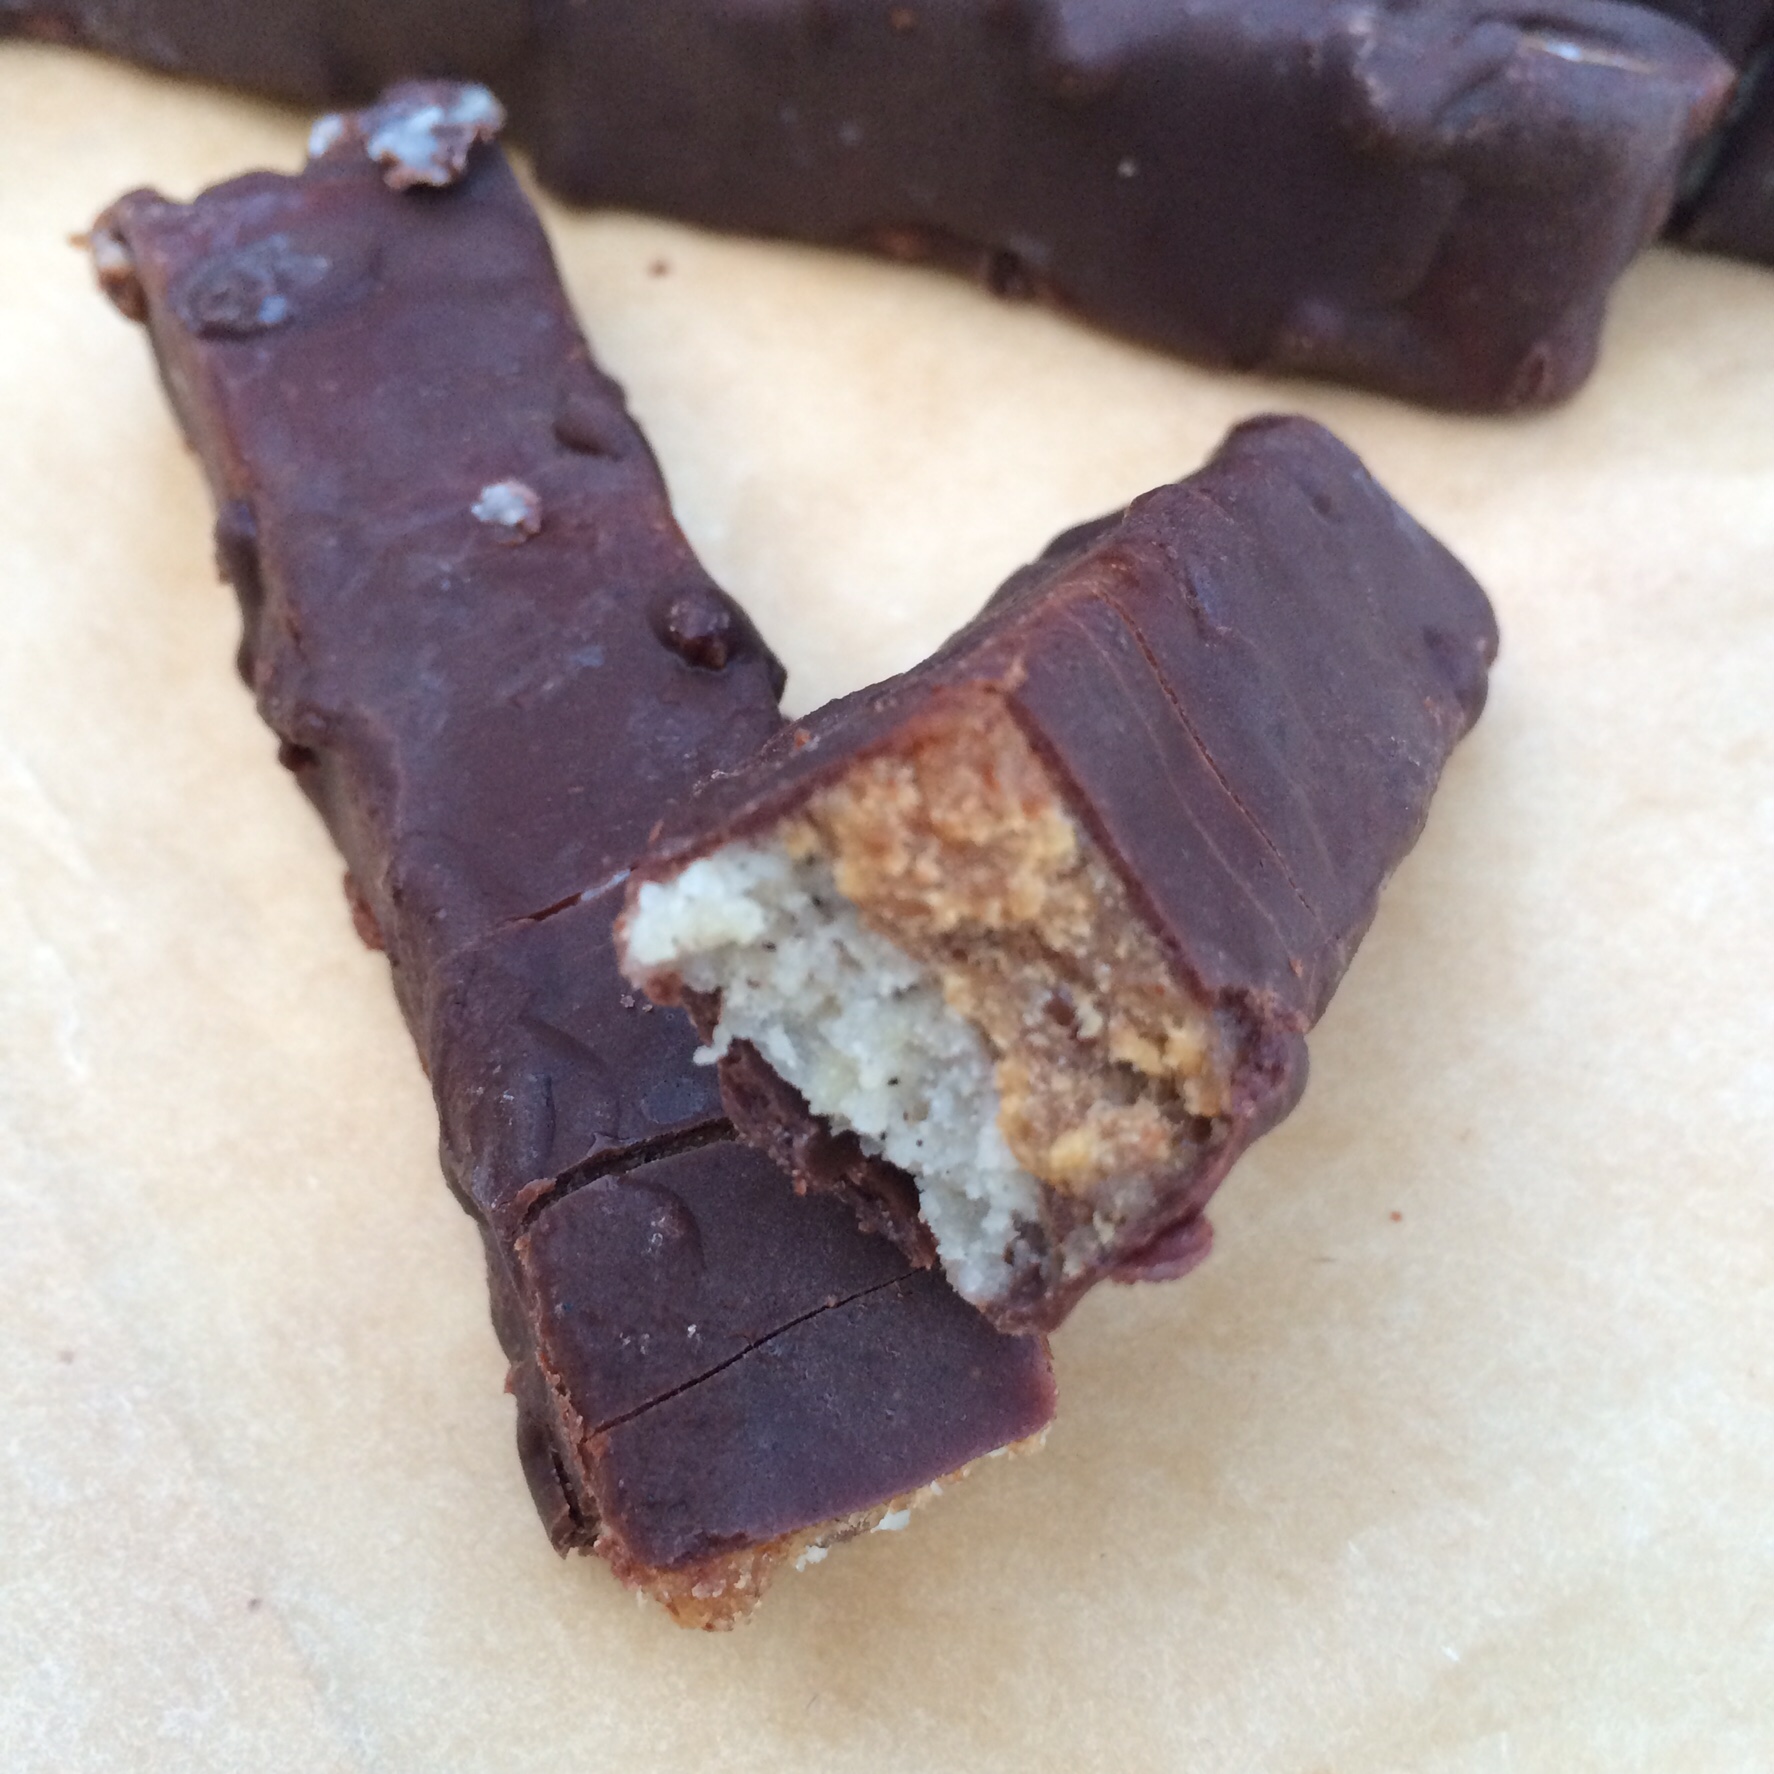
I’ve been dying to make something nutty and caramel-ly for ages and just haven’t got round to it  – finally the other weeked I got all my ingredients out and had a play and I’m very very pleased with the results! These are delish! They need to be kept in the freezer and are best eaten cold otherwise they get a bit squishy… although… that’s not such a bad thing!!

IMG_1411

You will need:

For the base:

1 cup Macadamia nuts

2 – 3 Tbsp Coconut syrup (or any liquid sweetener – agave, rice malt syrup etc)

1/2 tsp Vanilla powder or 1 tsp vanilla extract

1/4 tsp Almond extract

For the caramel:

12 – 14 Medjool dates

3 tbsp Almond butter

1/8 tsp Almond extract

pinch of salt

A little Water as needed (it depends how dry your dates are)

For the chocolate:

1/2 cup Coconut oil (melted) or Cacao butter (melted)

1/3 cup Raw cacao powder

1/4 cup Coconut syrup or maple syrup (or any liquid sweetener)

1/4 tsp Vanilla powder or 1/2 tsp Vanilla extract

First you need to make the base. Pop all the ingredients into a food processor and pulse until well blended and it forms a sticky dough. Line a small tray with baking paper and then press the base mixture in to the tray firmly.

IMG_1388    IMG_1390

Pop this in the freezer and then start on the caramel layer. I find it easier if you chop the dates up a bit first, so chop them and pop in to the processor together with the other ingredients, but not the water. Pulse until blended in to a paste. If it’s a little too dry then add some water (carefully so you don’t add to much). Once you have the consistency you want (sticky but spreadable) then take the base out the freezer and spread the caramel on top. You may have some caramel left over – this is no bad thing, I rolled it into balls which I coated in chocolate for some extra little caramel bites! 🙂

IMG_1391

Place this back in the freezer for as long as you can – an hour or more if possible.

Once you’re nearing the end of your the hour you can make up the chocolate (if you want to make it sooner you can, and you can just gently warm it to re-melt it). It’s best to use a large bowl for this so your caramel fingers will fit in (it makes it easier to coat them). Add the cacao, coconut syrup and vanilla to the melted coconut oil or cacao butter and mix well using a fork or a small hand whisk. Remove the caramel from the freezer and slice into fingers (or any shape you want).

IMG_1394

Then comes the fun bit! First of call place a wire rack over some baking parchment (or a board – or anything you don’t mind getting messy!). Make sure your chocolate is melted and combined well, then begin the dipping! Dunk the caramel fingers in the chocolate and ensure they’re coated. Then transfer to the wire rack and allow to set. They will stick to the rack, so before they’re set just move them slightly. If you’re anything like me you will probably end up with a bit of a mess on the bottom side, don’t worry, just wait til the top is set (it won’t take long) and turn them over and drizzle chocolate over them to tidy them up.

If you find the chocolate starts to thicken while you’re still coating them then just pop it in the microwave for a few seconds to re-melt (or even just place in a warm area – like on a radiator for a few moments – it melts so easily). Once they are all coated and lightly set (because the fingers are frozen it sets pretty quickly but will still be fragile) pop back in the freezer (I just popped them in a tupperware pot).

IMG_1395

Store in the freezer until you want to eat them.. then eat! They’re delicious as a quick pick me up.. and if you’re feeling really naughty they’re even better dipped in a tofu chocolate chili mousse (oh yes I did..!).

IMG_1400IMG_1408IMG_1414


Treating myself – Divaliciously Raw, a review


Every now and then it’s important to look after yourself, so when I stumbled across this site –Divaliciously Raw and all Gail’s amazing goodies I decided I should most definitely take the opportunity to treat myself to some deliciousness! I couldn’t decide what to try so went for the Valentine’s box, which gave me a taste of all her main products. Although that box won’t always be available as a package, all the contents are. They are all raw, gluten, wheat and egg free and vegan!

It arrived so beautifully packed – it really was like receiving a valentine’s gift! There was even a card!

IMG_1271IMG_1272

And then just look at how stunning these cakes look! I couldn’t believe it! Wow – just wow!

IMG_1275So in my box of goodies I got:

Raspberry Rapture Love Bomb

Magical Mint Love Bomb

Oriental Orange (Orange and Ginger) Love Bomb

Two Goji Bites

Ultimate bar

Zinger Bar

Unconditional Love Cake

Now where to start…Firstly they were all beautiful so it was really hard to know what to try first! I ended up going for the love bombs.

The love bombs were just perfect – lovely chocolatey coating, moist cake inside and then a surprise creamy filling. The flavours are really good in these and they really feel like a decadent dessert. They have a great nuttiness to them and a texture that really works. The creamy filling is definitely the best bit and it was hard not to eat them all at once! I’m not sure which my favourite flavour was to be honest – they were all so good!

IMG_1339 IMG_1345 IMG_1336

IMG_1340IMG_1348IMG_1338

Goji bites – these were a lot larger than I expected – which was great! They’re a little harder in texture than the bombs and kinda crumble in to your mouth – which i really liked. Lovely flavours – nutty and with enough goji to really taste it and balance the chocolate.

IMG_1335

Ultimate bar and the zinger bar – these were both delish. The ultimate bar has mulberries, goji berries and buckwheaties in which give it a fantastic crunch and sweetness – this was great dipped in a cup of tea! The Zinger was just bursting with flavour from the Incan (golden) berries which were a great balance to the dark raw chocolate.

IMG_1366

Last and by NO means least – the unconditional love cake! Sharing is caring so I did share this – not only with my very good friend Colette, but also with my husband. And we all agreed this was out of this world. Raw chocolate, filled with raw chocolate cake, chocolate ganache, caramel and a malted cashew cream. Oh my word! This was just amazing! Definitely my favourite!

IMG_1358IMG_1363

So there you go! That was one big, delicious treat for me! I highly recommend you check out Gail’s page on facebook and place an order. The cakes aren’t cheap but the amount of love, care and sheer dedication that’s gone in to them mean they are most definitely worth every penny and they’re not small either so you’re getting a lot of cake for your buck! Do let me know if you try any!


Green Goodness Protein Smoothie


Starting today with this delicious, fully loaded, green glass of wonderfulness!

IMG_1227

If you’re worried about the kale and spinach – don’t be – you can’t really taste them. They just give the smoothie a lovely freshness and of course are packed full of fab nutrients.

I made up a batch of smoothie to last a couple of days so this will serve 2 – 4.

You will need:

3 bananas

2 cups of Almond/Soya milk

4 Tbsp Vanilla protein powder (I use About time vegan protein powder)

generous handful of Spinach

generous handful of Kale

handful raw Cashews

1 Tbsp Cashew butter (just to add a little extra creaminess but you could just add more cashews)

1 cup Ice

Optional – a drizzle of coconut syrup if you need it

Blend in a high speed blender and serve!

IMG_1228

Pancakes! Super quick dairy and gluten free pancake recipe


I’d been having cravings for pancakes for weeks so the other weekend I whipped up a quick batch of these lovely gluten-free, dairy free fluffy pancakes!

IMG_1213

I used rice flour because it’s what I had in the cupboard but you could use buckwheat, coconut flour, spelt flour (if you’re not fussed about gluten) etc – just adjust the amount of milk if needed (with coconut flour you will need more).

You can serve these with anything you like – I went for berries, coconut syrup and banana ‘nice’ cream (frozen bananas blitzed in my vitamix). They’re also lovely with banana, chia jam and lemon curd – yum yum!

IMG_1218

You will need:

1 1/4 cup rice flour
1 tbsp Coconut sugar
1 1/2 tsp Baking powder
1/2 tsp Cinnamon (optional)
1 1/4 cup Soya/almond/coconut milk
1 1/2 tbsp Almond oil (or another light oil)
1/4 tsp Vanilla extract

Mix the dry ingredients together in one bowl.
Mix the wet ingredients in another and then add to the wet mixture. Stir well.
Heat a frying pan with a little oil – drop a good dollop of batter in, allow to cook, turning so both sides are done.

IMG_1222

Coconut Collaborative dairy-free yoghurts review

Image


I’ve waited until after the Christmas/ new year palava was all over with to post this – but I’ve been bursting to share it with you all!

The very lovely people over at the Coconut Collaborative were kind enough to send me some pots of their recently launched range of dairy-free coconut yogurts for me to try. This is truly a yoghurt for everyone – it’s free from dairy, soya and gluten so perfect for anyone with food allergies or following a dairy-free/vegan lifestyle.

They’re available in a few varieties- natural, raspberry (natural with a layer of raspberry compote), mango and passion fruit (natural with a layer of tropical fruit compote) and natural with berries and seeds (which comes with a little bag of seeds and berries for sprinkling).

They’re free from nasty additives and are made with only live coconut milk, dairy-free cultures and some starch to thicken them. The fruit compotes are natural too with no artificial sweetners etc. Best of all they are full of coconut fat – but it’s fat I hear you cry?! Yep but coconut fat is one of the best fats you can eat – it’s full of medium-chain fatty acids which means it’s a great fat to eat as it’s broken down and used for fuel, rather than being stored as body fat. Yay! 🙂

I was sent the raspberry and mango and passion fruit yoghurts to try. Both were simply delicious. The raspberry one is lovely – a little sweetness from the raspberry and a lovely light yoghurty tartness from the coconut yoghurt.

Raspberry.JPG

The mango and passion fruit one is also really good and I had this with some tropical granola which was a divine combo! Once again  – it wasn’t too sweet but had a lovely tangy taste. These are a fab option for dairy-free yoghurts, and unlike other coconut yoghurts they’re not too rich which means they’re good any time of day – for brekkie, a snack, or even dessert.

Mango.JPG

I’ve tried the natural one myself too and that’s also delicious and would also make a great alternative to sour cream on savoury dishes e.g. my pumpkin chili (posted over at The Pure Form Fitness Kitchen). On top of all of that they are also beautifully packaged!

Packet.JPG

You really must try these – I promise you won’t be disappointed.

The yoghurts are available from Waitrose, Ocado, some Tescos, Itsu stores, Daylesford Organics, Harvey Nichols and some local healthfood shops. They also make the most delicious ice cream too – so if you see that then grab yourself a pot as it’s amazing!

Check out their facebook and twitter accounts for more info 🙂

Nancy’s Mince Pies! gluten and dairy free!


It’s mince pie time again! whoop! It’s so hard to find plant-based, dairy and gluten free mince pies that don’t taste like cardboard so I decided to make my own and boy are they good! I could eat these by the dozen… and in fact I do!

This recipe has been posted here before but has recently been featured over at Pure Form Fitness Kitchen so I thought I’d repost for you 🙂

and here’s a little video of me making them too :

For the Pastry:

4 oz Buckwheat flour
2 oz ground Almonds
5 tbsp Agave nectar
Up to 6 tbsp Water

For the Mincemeat:

3 oz Bramley apples, cored and finely chopped
6 oz Mixed dried fruit (I prefer raisins, currants, cranberries and apricots)
1 oz Vegetable suet
2 oz Raw sugar (coconut palm or dark raw muscovado)
Juice and grated zest of half an Orange
1 level tsp of ground allspice
1 pinch ground Cinnamon
1 pinch ground Cloves
1 pinch grated / ground Nutmeg
1 small handful chopped Almonds
1 tbsp Date syrup

Make the pastry first. Put the buckwheat flour and ground almonds in a processor and add the agave. Pulse and gradually add the water until it forms a dough. You may find you need more or less water. If it is too wet add a little more flour. Once it is forming a firm dough remove, wrap in cling-film and place the mixture in the fridge. You can do this by hand if you prefer – just ensure you mix the flour and almonds thoroughly.

Put all the ingredients for the mincemeat into a saucepan. Cook on a low heat, stirring frequently. Cook until the apple is soft and the mixture is thick – it may take some time. Remove from the heat and allow to cool.

Preheat the oven to 180 C/ gas mark 6.

Lightly oil a mini muffin tin with almond, coconut or hazelnut oil. Remove pastry from the fridge and roll out on a lightly floured surface. Roll it as thin as you can – a few mm. Use a round biscuit cutter to cut out the bases. Place them in the tin. Place in an oven to blind bake for 5–10 mins. Keep an eye on them – this pastry browns quite fast. Once the edges are brown and the middle is firm remove them. While the cases are in the oven take a smaller star shaped (or any shaped) biscuit cutter to cut out the “lids”.

Roll and cut out the pastry cases and lids

Roll and cut out the pastry cases and lids


Place a generous helping of mincemeat in each of the cases and place your chosen “lid” on top. Lightly oil and sprinkle with a little cinnamon and raw sugar.

Fill the cases and add the lids

Fill the cases and add the lids

Place the pies back in the oven and bake until golden (5 – 7 mins but check regularly). Keep a careful eye on them. You want the tops to brown but be careful the bases don’t burn. Remove from the oven and leave to cool for 5 mins, then remove and place on a wire cooling rack.

Enjoy!

Enjoy!

Christmas Gingerbread Tree – gluten and dairy free


The gingerbread christmas tree has become a bit of a tradition for me now and my friend’s husband is a big fan so I couldn’t let this year pass without making him one. This is a quick dough to make and is something fun to do on Christmas Eve 🙂

/home/wpcom/public_html/wp-content/blogs.dir/ca7/32324338/files/2014/12/img_3654.jpg

/home/wpcom/public_html/wp-content/blogs.dir/ca7/32324338/files/2014/12/img_3629.jpg

To make the gingerbread biscuits: (if you’re going for a really big tree then you can always double this)

1/3 cup Olive oil

3/4 cup unrefined raw sugar (golden raw caster sugar, coconut palm sugar, or dark raw cane sugar)

1/4 cup molasses

1/4 cup soya milk

1 cup amaranth flour / quinoa flour

1 cup gluten free flour mix (make your own or you can use an organic pre-mixed one. If you want low gluten not gluten free then go for spelt flour instead of the amaranth and gluten free flours)

1/2 tsp ground nutmeg

1/2 tsp ground cloves

1/2 tsp ground cinnamon

1 and 1/2 tsp ground ginger

1/2 tsp bicarbonate of soda

1/2 tsp baking powder

1/2 tsp Himalayan rock salt salt

Whisk the oil and sugar together in a large bowl. Add the soya milk and the molasses and whisk all together. Sieve the flours, spices and baking powder, salt and bicarbonate of soda in to the wet ingredients and mix until it forms a dough. The dough may seem quite moist. You want it to be workable but not so sticky that you can’t lift it. Add a bit more flour if it is too wet. Wrap in cling film and leave in the fridge to chill for an hour if you can (the dough can be left in the fridge for several days so you don’t have to use it all at once. It can also be frozen).

Preheat the oven to 175 C and line a baking tray with greaseproof paper. Roll the dough out on a floured surface. It’s worth trying small amounts of dough at a time and be generous with the flour. It will stick a bit but don’t worry. You want it to be rolled out fairly thin but not too thin – maybe 5mm thick or so.

To make the tree you need star cutters of different sizes. If you don’t have them don’t fret. Draw some stars out on a piece of card and use them to draw around 🙂 If you want to make a massive tree then you could use more stars. You want at least 2 or 3 of each sized star. I used two tiny christmas tree shaped cutter for the very top, but you could use another star.

Cut out the biscuits and transfer to the baking tray. Bake for 8 minutes. Then remove from the oven and allow to cool on the tray for 3 minutes before transferring to a wire rack. They will seem soft when they come out the oven but as they cool they harden. If you want super crispy biscuits just pop them back in the oven for another few minutes.

/home/wpcom/public_html/wp-content/blogs.dir/ca7/32324338/files/2014/12/img_3649.jpg

For the icing:

1/2 cup raw icing sugar

1 tsp soya milk (or any non dairy milk)

Mix the icing sugar with the milk until it’s smooth. If the icing is too runny just add more icing sugar until you get the consistency you want. Transfer to a piping bag (if you don’t have one then use a plastic freezer bag and snip the corner off to pipe through).

Assemble the tree!

This is the fun bit 🙂

Start with your biggest star and place it on the plate. Add a glob of icing to the centre and stick the next star on top (arranged so the points don’t overlap).  Then add a glob of icing to the top of the uppermost star and stick the next one one… continue, going down in size until you get to the top! I then added a glob of icing and popped two tree shaped biscuits on the top.

/home/wpcom/public_html/wp-content/blogs.dir/ca7/32324338/files/2014/12/img_3650.jpg

Now you can decorate each layer. Pipe icing on to the points of the bottom star and decorate with silver balls, gold balls, edible glitter etc.

/home/wpcom/public_html/wp-content/blogs.dir/ca7/32324338/files/2014/12/img_3651.jpg

Finally dust with icing sugar so it’s all snowy-looking! Then you’re done!

yay! 🙂

/home/wpcom/public_html/wp-content/blogs.dir/ca7/32324338/files/2014/12/img_3655.jpg

/home/wpcom/public_html/wp-content/blogs.dir/ca7/32324338/files/2014/12/img_3652.jpg

The Ultimate Breakfast Smoothie


This is my go-to breakfast smoothie almost every day. This recipe was originally posted over at the Pure Form Fitness Kitchen. It’s full of goodness and absolutely delicious. It’s so important to have breakfast but sometimes it’s hard to eat a big meal early in the morning, especially if you workout early. This smoothie is perfect pre-workout fuel – light enough to make sure you don’t feel sick but satisfying enough to keep you going. It’s great to grab on the go too. The protein powder keeps you full and the L-glutamine is great for muscle recovery.

IMG_6810

You can change things around with this – use different nut butters if you like, add other bits and bobs eg frozen berries, guarana, chilli powder, chia seeds etc but this is my favourite base.

This mixture usually makes 2 – 3 shakes and it’s fine in the fridge for a few days.

You will need:

2 cups non-dairy milk (almond, soya, oat etc)

2 large or 3 medium Bananas

1 tbsp Cashew nut butter

4 scoops  Protein Powder (I use About Time vegan protein powder – but you can use any one you like)

2 scoops L-glutamine powder (optional – but great for muscle recovery. I use MyProtein L-glutamine powder)

2 tsp ground Cinnamon

2 tsp Coffee (decaf or caffeinated – your choice)

1 – 2 tbsp raw Cacao powder

1 cup Ice

Sprinkling of Chia seeds

Put all the ingredients in to a blender and blend until smooth.


IMG_6808IMG_6811

Pour into glasses and sprinkle the chia seeds over or pour into protein shakers and pop in the fridge if not drinking immediately. Enjoy!

IMG_1080.JPGIMG_6812

Amazing Protein-Packed Flapjacks – dairy and gluten free


I get hungry, especially after a workout and I love a good flapjack or energy bar but I hate the fact that so many of the store bought ones are just full of sugar. Many of the ‘healthier’ versions I’ve bought are tasteless and unappetising so last Saturday, after a full on day, I thought I’d create some homemade protein flapjacks – full of good things!

image

I thought I’d do a little video to show you them in the flesh – so here goes:

and the finished product:

image

These don’t take long to put together and you can always substitute things if you don’t have them in the cupboard or don’t like them.

image

You will need:

300g rolled porridge oats (gluten-free or spelt if you want)

100g desiccated coconut

100g flaked almonds

100g Pumpkin seeds

215g dried, soft Prunes

315g dried dates

175g Almond butter (or your nut butter of choice)

100g Liquid sweetener (I used rice malt syrup but you can use agave, maple syrup, honey etc)

2 tbsp Coconut oil (measured when solid)

4 tbsp Vanilla protein powder (any brand you like – or you can also omit this)

4 tbsp Water

2 generous tsp Cinnamon

1/2 tsp Salt

Preheat the oven to 170 C.

Line a baking tin (I used a 20 x 20cm one) with baking paper. Mix the oats, almonds, pumpkin seeds and coconut together and pour into the baking tin. Place in the oven for 20 mins or until starting to brown. Make sure you turn regularly with a wooden spoon so the whole mixture gets toasted.

While that’s in the oven pop the dates and prunes into a blender or food processor and blitz to a paste. You may need to keep stopping to scrape the mixture back down in to the bowl. It doesn’t need to be completely smooth – a few lumpy bits are good!

Remove the oats from the oven and stir the protein powder through the mixture. Allow to cool.

Put the date mixture, nut butter, liquid sweetener, coconut oil, water, cinnamon and salt in to a large saucepan and heat very gently. Stir and allow the mixture to come together. Remove from the heat and pour the oats into the liquid mixture and mix really well.

Using a spatula scrape the mixture back into the lined baking tin and press down firmly. Then allow to cool and pop in the fridge. Do make sure you lick the saucepan (once it’s cool enough!!!) because the mixture is divine when warm! 🙂

Once it’s chilled you can cut in to slices. It makes the perfect post workout snack on the go and is great to pop in to lunchboxes too!

image

Chocolate Orange and Almond Brownies – dairy and gluten free


I think I’m in heaven. I’ve managed to combine three of my most favourite things – Willie’s Cacao Luscious Orange chocolate, roasted Almonds and my dairy and gluten free brownie! And wow – this is good! I’ve even managed to win over my orange chocolate hating friend! Win! 🙂

IMG_0026.JPG

You will need:

1/4 cup Rice flour

1/2 cup Ground almonds

1 cup unrefined Raw sugar (golden caster sugar, coconut sugar etc)

1/2 cup almond oil (or coconut oil)

1/4 cup raw Cacoa powder

2 tbsp chia seeds soaked in 6 tbsp water

1/2 tsp Himalayan rock salt

1/4 tsp Bicarbonate of soda

1 tsp Orange extract

Handful of Almonds

1 – 2 bars Willie’s Luscious Orange chocolate (chopped)

For Icing

1 – 2 bars Willie’s Luscious Orange chocolate

50 – 100g Unrefined icing sugar (adjust quantity to depending how runny you want it)

Silver balls to decorate

IMG_0476.JPG

Preheat the oven to 170C and grease a 20 x 20cm square baking pan with parchment paper.

Toast the almonds in a dry frying pan until they just start to turn brown. To make them even crunchier I let them cool to room temperature then chopped them and toast again briefly. Pop to one side until later.

Mix the ground almonds, flour, cacao powder, sugar, salt and bicarbonate of soda together in a large mixing bowl. In a separate bowl soak the chia seeds in the water. Once the chia seeds have absorbed all the water add them to the mix along with the orange extract, and oil. Whisk together using a hand mixer until well mixed. It should be thick and glossy when mixed.

Stir in the chocolate and almonds. Pour in to the baking tin and place in the oven for 25 – 30 mins until a skewer inserted in the middle comes out clean.

Cool on a wire rack

Then prepare the icing. Melt the chocolate and then stir in the icing sugar a little at a time until you get the consistency you want. Spread quickly on to the brownies and sprinkle the silver balls and any other decorations you want to use on to the top!

Enjoy!

IMG_0478-0.JPG